-->

Welcome

I love answering your questions. If you ask them in the comment section, I have no way to answer you (if you haven't heard from me, that is why). If you use the "EMAIL ME" in the left column of this page, I will be able to respond to you. You can also use it if you want to be added to my newsletter. Laura
Showing posts with label Sailing. Show all posts

Wednesday, April 23, 2014

The Sea Calls to Me – Paper Sailboat Tutorial

Come with me and sail the seas,
On a dream boat of paper and string.
Adventures abound and wondrous things found,
Where mermaids ride waves and sing!
The overall size of the piece is 11½”x 11½”.
The teal swirls along the sides of the boat represent the boat slicing through the waves.
The adventurous ladies on the boat are from my “TheSea Calls to Me” collage sheet.
TUTORIAL
The base of the boat is a paper sailboat which is super simple to make.  I viewed several how-to videos on YouTube looking for just the right sailboat.  I wanted something that was not complicated and that had a tall sail.  The video below by Tavin fit the bill.  With 3 folds you can create this boat.  After watching the video continue through the tutorial where I will cover the rest of the steps.
For my boat, I used 12” x 12” double-sided patterned paper cut to 10” x 10”.
Once the boat was folded I removed some of the paper from the back of the sail.  I did this to accommodate an additional sail on the back and the mast.
To make the boat sturdier, I added pieces of thin chipboard to the insides of the sail.  On one side of the chipboard, I added decorative paper.  I used the sail as the pattern and cut the chipboard slightly smaller so that it would fit snugly inside the sail.
Below you can see how I flattened the boat out and glued the chipboard in place.
To create the ship's wheel, I used a combination of a gold bangle, a gold Dresden Medallion, buttons, and other brass bits.  There is a complete list of the items I used at the bottom of the post.  The medallion is colored with Patina Gilder’s Paste.  The button is painted black and then colored with Inca Gold Gilders paste( to make the design pop).
I attached the ship's wheel to a wooden skewer and then added a bead to the bottom.  The bead gives me a larger surface area to glue the ship's wheel in place.
Next, I made a mast with a second sail.
To accommodate the string, I used a piece of brass with holes.  I tied 7 strings to the brass; 6 that attach to the main boat and one that holds the small sail in place.  I poked a hole in the center of the brass piece.
I used a memo pin and glue (E6000) to attach the brass piece to the top of a wooden dowel.  I cut my dowel to 9”.  I pre-poked a hole in the dowel before inserting the pin.  The dowel is stained with Vintage Photo Distress Ink.
The sail is made from two pieces of decorative paper glued together with two memo pins glued between them.  The loop of the memo pin slides onto the dowel.  I punched a hole in the sail and added an eyelet.  One of the strings from the top is inserted through the eyelet.  The string keeps the sail in place and the sail is free to move from side to side. 
 
To the bottom of the wooden dowel I glued a piece of light chipboard covered with decorative paper.
The piece of chipboard is used to attach the mast to the boat and to keep the back of the boat from opening too far.  Make the height of the chipboard small enough that you won’t see it from the side of the boat.  The width depends on how wide you want the back of your boat to be.  In the picture, you can see that I curved the chipboard and glued it in place just inside each side of the mainsail.
One of the great things about memo pins are that they gave me a way to attach the Dresden Star to the top of the mast.  I glued two stars together and colored them with the Patina Gilders paste.  Glued in the center of the stars is a button colored in the same manner as I colored the buttons on the ship's wheel.  The double-sided banner is glued to the mast.
To accommodate the other six strings which make up the mainsail rigging, I punched 3 holes on each side of the boat.  I glued a rondelle on top of each hole.  Using a brad, I attached ring handles.  Doing it this way means that the ring handles are free to turn making it easier to attach the string and to get the string taut.  I attached lobster claw clasps to the ring handles using a jump ring and then tied each string to the lobster claw.  The string not only visually looks like rigging but also functions like rigging to keep the mast and small sail in place and straight.
Along the bottom of the boat I used chipboard swirls (you’ve seen me use these on lots of projects) to add the sense of the boat slicing through waves.  I used filigree pieces to dress up the front of the boat..
Below is the banner I cooked up for this project.  There are two so that they can be glued together to make a double-sided banner.  Feel free to use them in your art.

COLLAGE SHEET

Friday, April 11, 2014

Ship Ahoy! - Tutorial & New “The Sea Calls to Me” Collage Sheet

This is the first of multiple nautical and summer-themed pieces I have to share with you.  Titled “Ship Ahoy” the overall size of this piece is 5”x 8 ¾”.  Its unique feature is a ship’s mast with rigging which I think makes a great embellishment for any nautical themed project.  In the tutorial below, I’ll walk you through how to make a mast and how I assembled the piece

Just in time for the summer, I have a new nautical-themed collage sheet titled “The Sea Calls to Me”. The sheet is packed with seafaring women and nautical ephemera.  Click on the image below to purchase the sheet.

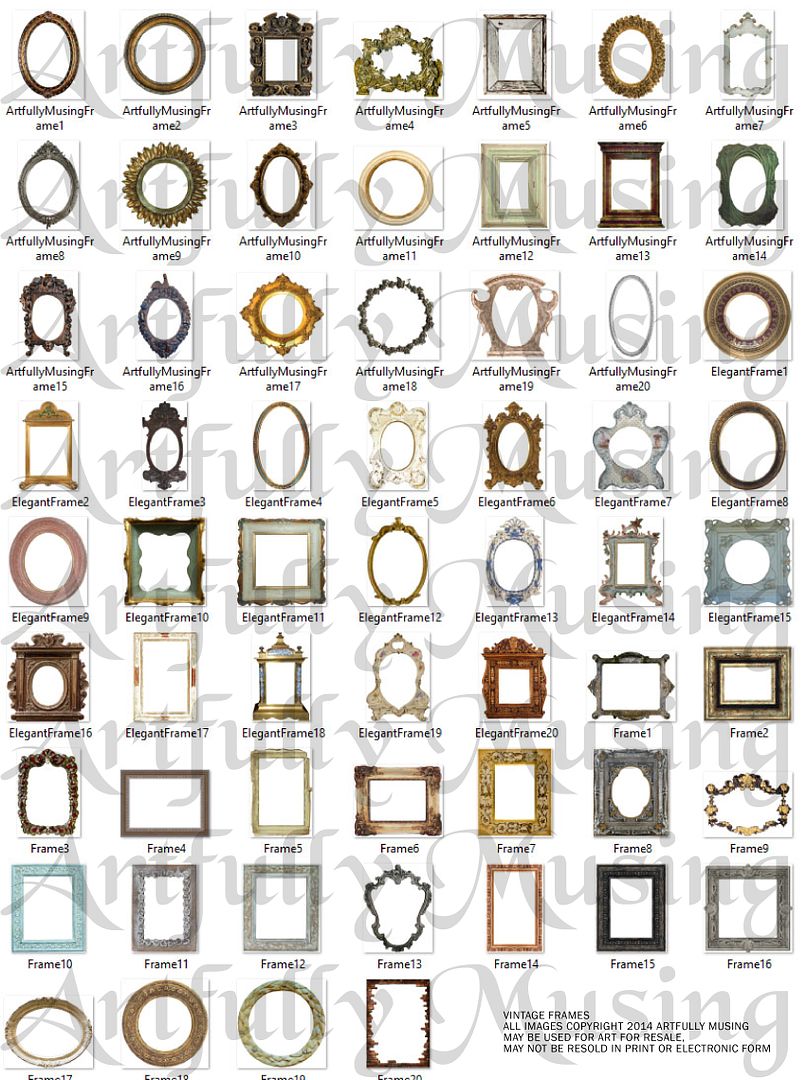
Frames are a great way to add structural elements to your projects and to create a focus on some of the elements in your piece.  I like to not only use the whole frame but also pieces of the frame or combine pieces of different frames.  The digital image set contains 60 separate and unique images with various styles.  Because these are separate images and are 300 dpi it is easy to change the size to fit your project.  Click on the image below to purchase the digital set.

TUTORIAL
To make the mast and rigging you will need string, a wooden skewer, flat toothpicks, stain or paint and hardware to serve as rigging.
Start by staining or painting the three toothpicks and the wooden skewer.  Cut 6 long pieces of string (better to have extra than too little).  Tie each piece of string to the ends of the toothpicks.  After snipping away the excess string from the toothpick, add a little dab of glue to the knot to help keep it in place.
Stagger where you tie the string on each skewer.  Note in the picture below that the strings are closer together on the top toothpick then they are on the toothpick below it and so on.
Glue the toothpicks to the wooden skewer using a strong glue like E-6000.
The base of the piece is made using a frame from my Antique Frames Digital Image Set.  For support, I backed the frame with lightweight chipboard.  The background is a piece of chipboard covered with decorative paper (front & back).  The size of the background is slightly smaller than the frame.  
To accommodate the string, I added hardware to the bottom corners of the frame.  I selected pieces that I thought looked like rigging but are actually used for making jewelry.  The pieces include lobster claw clasps (3 on each side) attached to a three-hole connector (from my stash) using jump rings.  
The combination of clasps and a connector is attached to the frame with a brad.
The frame is attached to the background using double-stick foam core tape.  This pops up the frame adding depth and also creates space for the mast.  The mast is glued into place behind the frame and in front of the background.  I waited until this step to trim the end of the skewer thereby insuring that it was long enough.
Next, thread the string through the clasps.
The ends of the tread are attached on the back of the piece.  
The strings on the right side of the frame are wrapped around a handle before attaching it to the back.
I used tape to hold the string in place while adjusting it on the front.  Once you are satisfied with the placement of the string, glue it in place on the back, trim the excess and cover the ends with more decorative paper.
I further embellished the piece with a woman, anchor, ship’s wheel and flags from the TheSea Calls to Me collage sheet.  The final touch is 3 brass seagulls.
COLLAGE SHEETS & DIGITAL IMAGE SETS

Monday, August 22, 2011

Ship Ahoy

The mast is made from a wooden skewer and toothpicks.  The rigging is made from string and jewelry findings.  The string is tied off using a Tim Holtz Hitch Fastener.  I popped up the frame to give the piece more dimension and to have room to insert the mast.  The image of the boy is German scrap.

Monday, August 15, 2011

Creatures of the Deep

To create the ocean, I mixed sand with translucent embossing paste.  I divided the mixture in half and colorized each half with different colored alcohol inks (green and blue).  To create waves, I applied each of the colorized mixtures to the card using a popsicle stick in a swirling motion.  Once the mixture was dry, I used the tip of my finger to lightly brush cream acrylic paint on to the highest tips of the waves to create the appearance of foam.  The ship is a rub-on transfer I created using Grafix Rub-Onz transfer film.  The maps at the top of the card are made of vellum.