

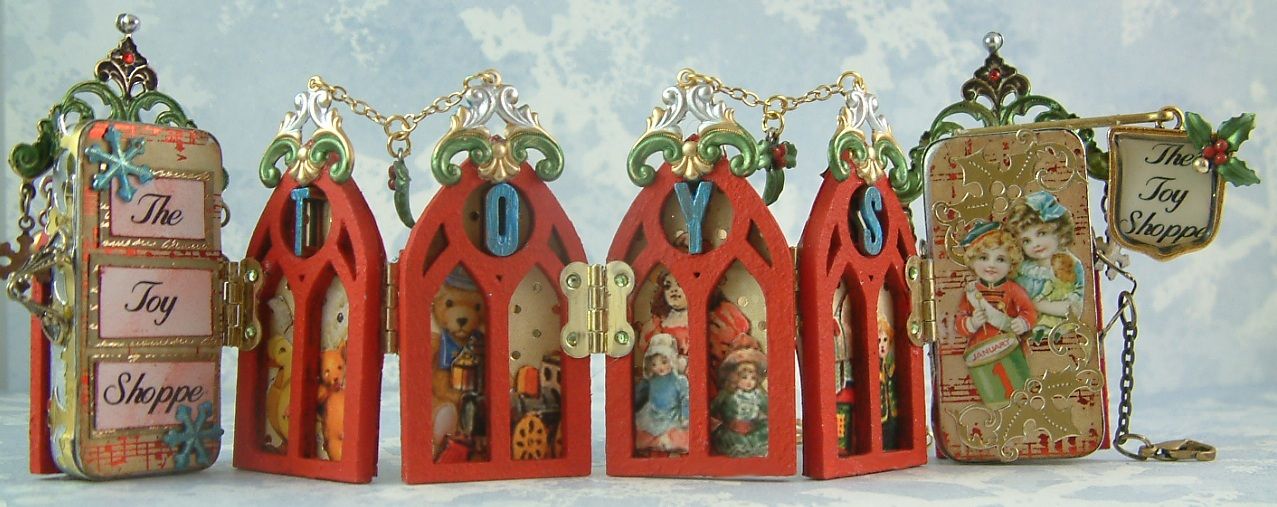
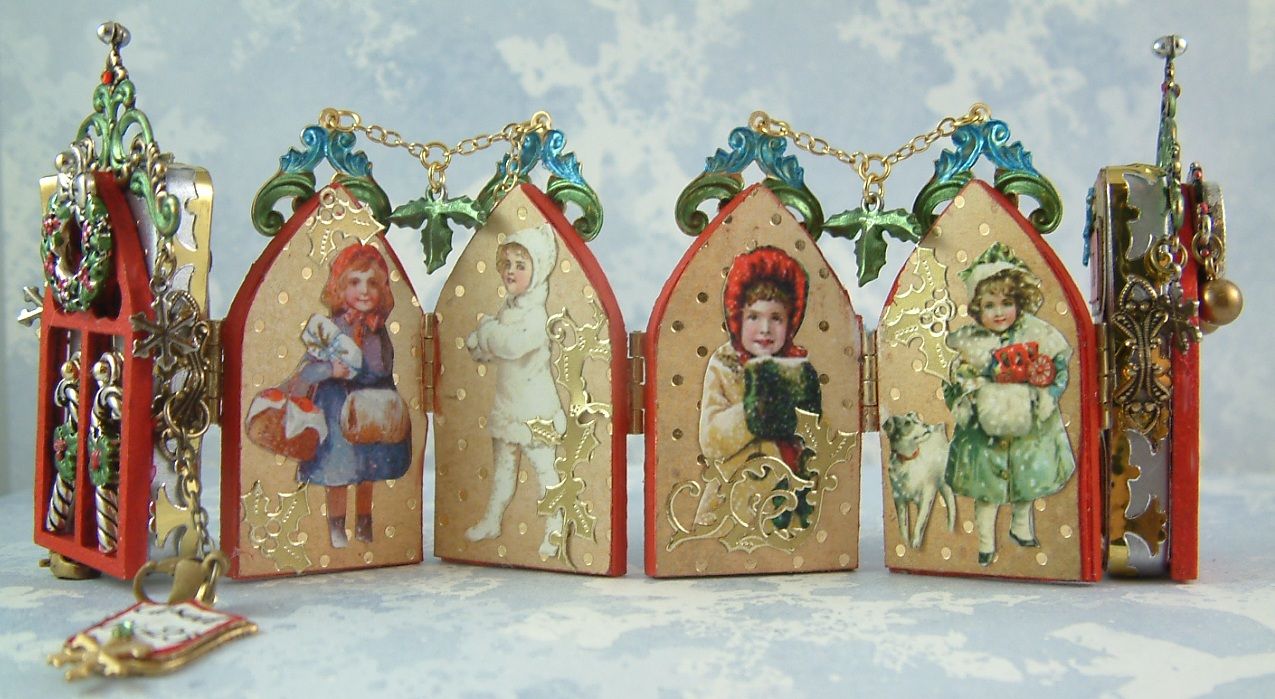
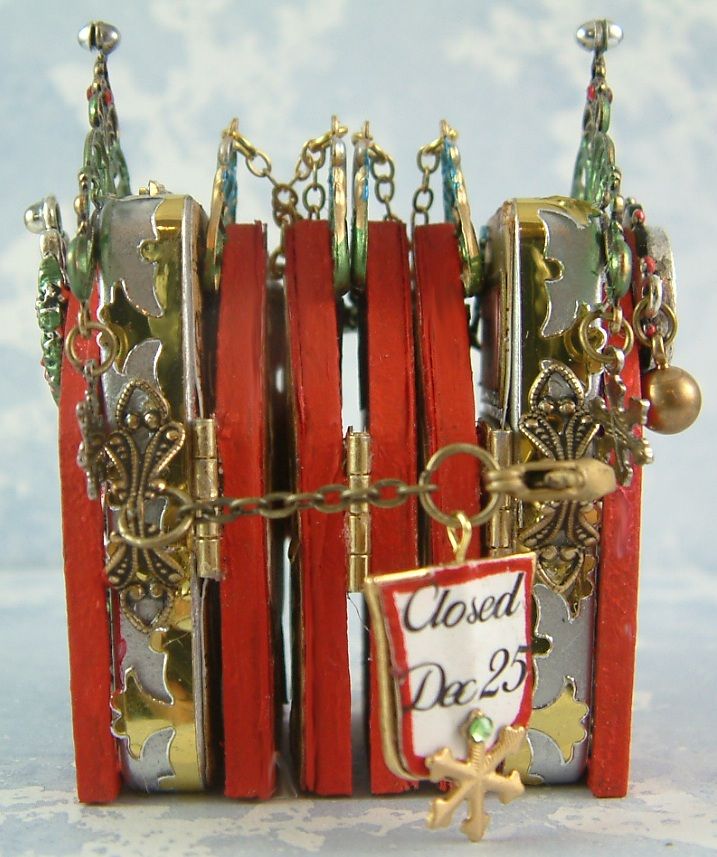
The
front and the back of the Toy Shoppe are dominoes with Masonite Gothic arch windows
attached. In the middle of the book are
4 Gothic arch windows that are hinged together and hinged to the dominoes.
The key to creating this book
is gluing and patience. Since I was
dealing with mostly non-porous surfaces such as the plastic (dominoes), Masonite
(arches) and metal (hinges and embellishments), I used E6000 to glue almost
everything. The only exception was the
paper items which I used Glossy Accents if I was gluing to a non-porous surface
and Tombo Mono Multi if I was gluing paper to paper.

The key to creating this book is gluing and
patience. Since I was dealing with
mostly non-porous surfaces such as plastic (dominoes), Masonite (arches) and
metal (hinges and embellishments), I used E6000 to glue almost everything. The only exceptions were the paper items. I used Glossy Accents if I was gluing to a non-porous
surface and Tombo Mono Multi; if I was gluing paper to paper.
CONSTRUCTING
THE BOOK
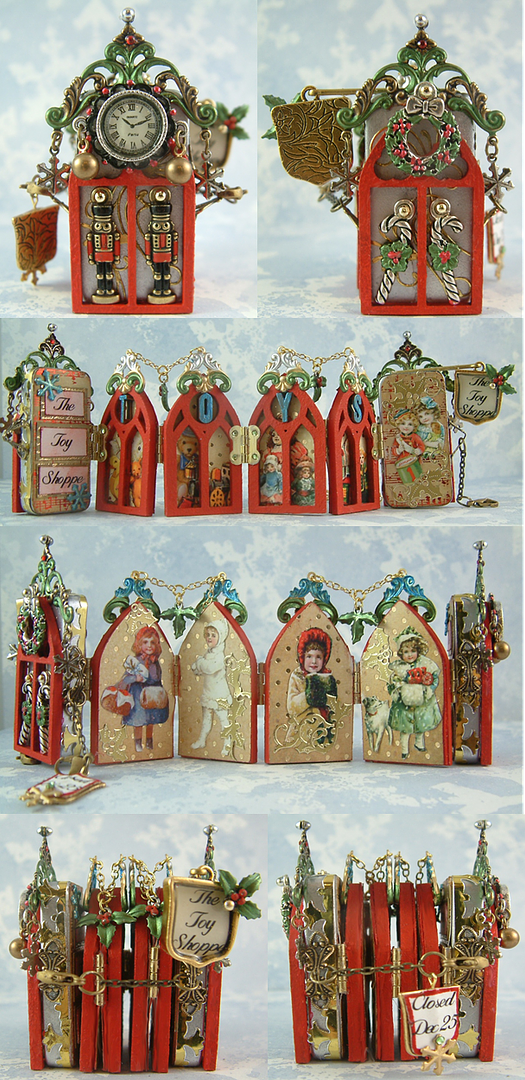
- I started by inking all the surfaces of the dominoes with Silver Alcohol Mixative Ink. I used a wooden handle with a piece of felt attached to apply the ink. I choose this method as the ink goes on with a smooth finish.

- I added gold stickers to the front and sides of the dominoes.
The Closures
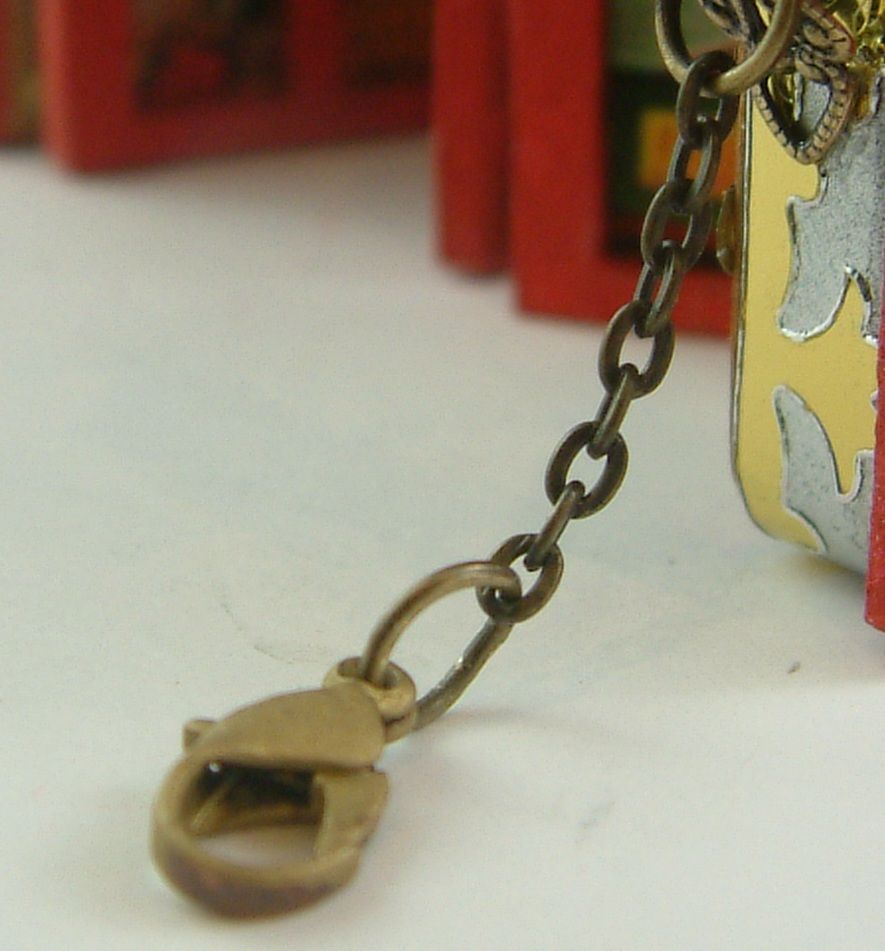
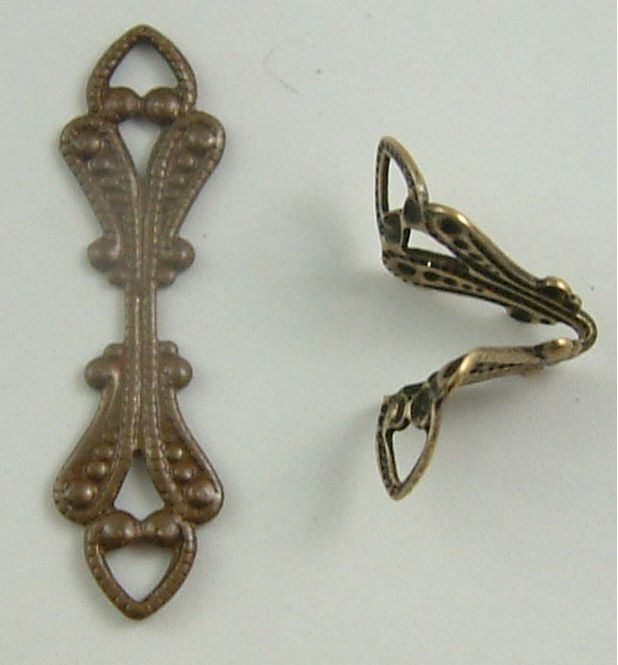
- To accommodate the chains and jewelry clasps (which keeps the book closed) I bent fold over bails and glued them to the sides of the dominoes. You will need 4 bails glued to the middle of each long side of both dominos. Add the chains to the bails before gluing them to the dominos. That way you won’t be putting extra pressure on the bails trying to attach the chain. Once your book is done you can trim your chain to the proper length (to close the book) and add the jewelry clasps to each chain. I attached the two chains to the bails glued to the front domino.
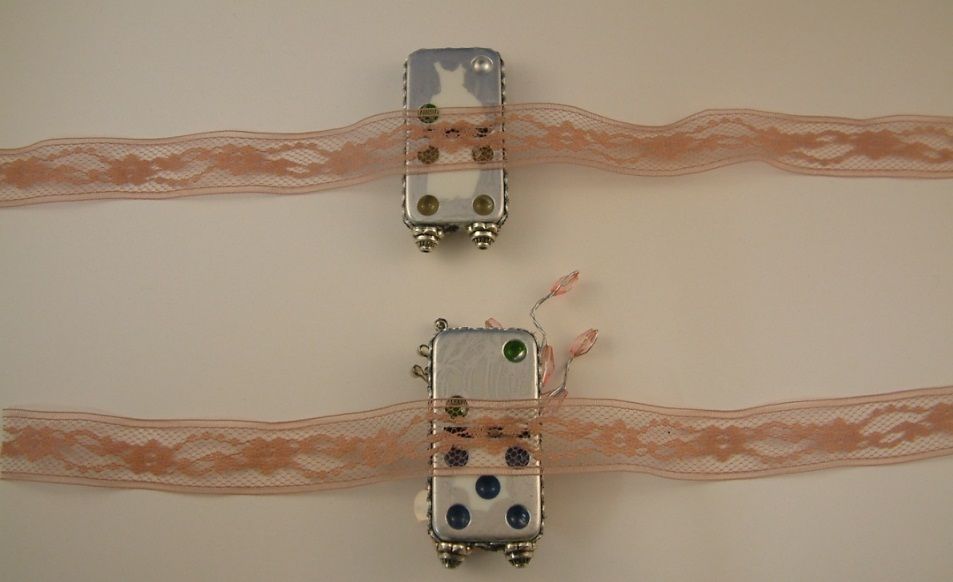
- An alternative closure is to use ribbon instead of chain. Another alternative would be to use ribbon without the fold over bails by gluing ribbon to the backside of each domino before adding paper etc. (see the picture below).
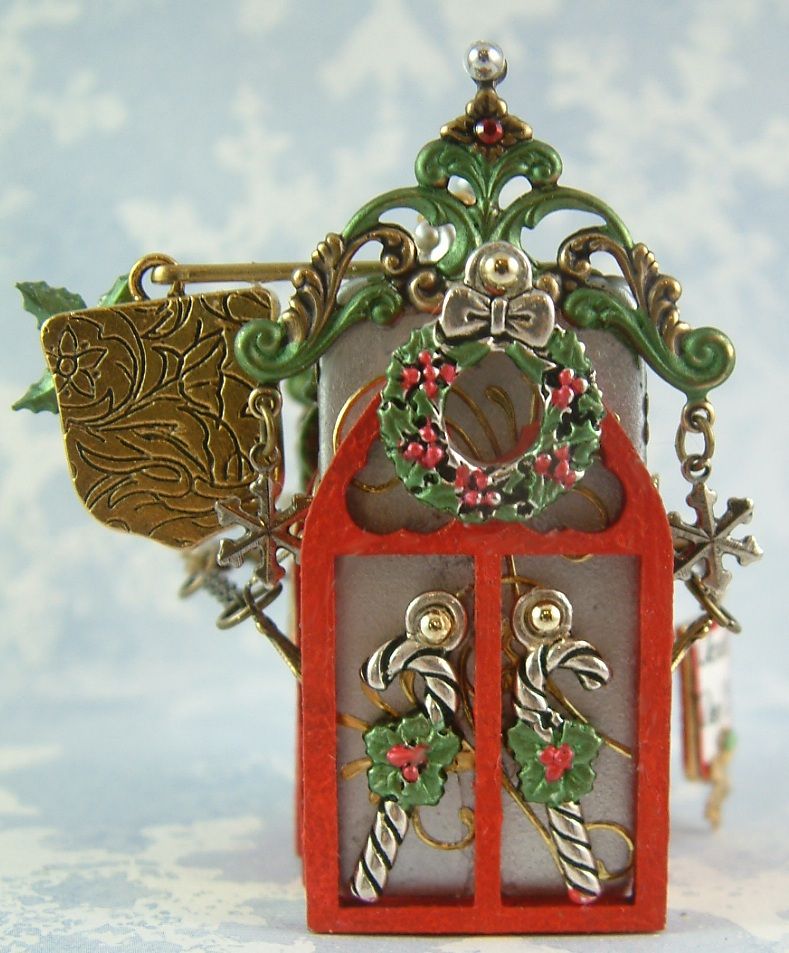
Painting the
Arches and Embellishments
- I painted all of the Masonite gothic arches red; this includes the ones for the front of the dominoes and the ones for the pages inside the dominoes. The arches come in a package of 10 and include various designs. These are the same arches I used to make bay windows for the large Victorian Toy Shop Diorama.
- I glued a Masonite Gothic arch to the front of each of the dominoes.
- I painted the various embellishments using acrylic paint. If this had been something that would be worn as jewelry I would have used products that are made for metal. But since this was an art project I went with acrylics.
- After the metal embellishments had dried, I attached all of the dangling bits like beads, snowflakes and chain to all of the embellishments etc.
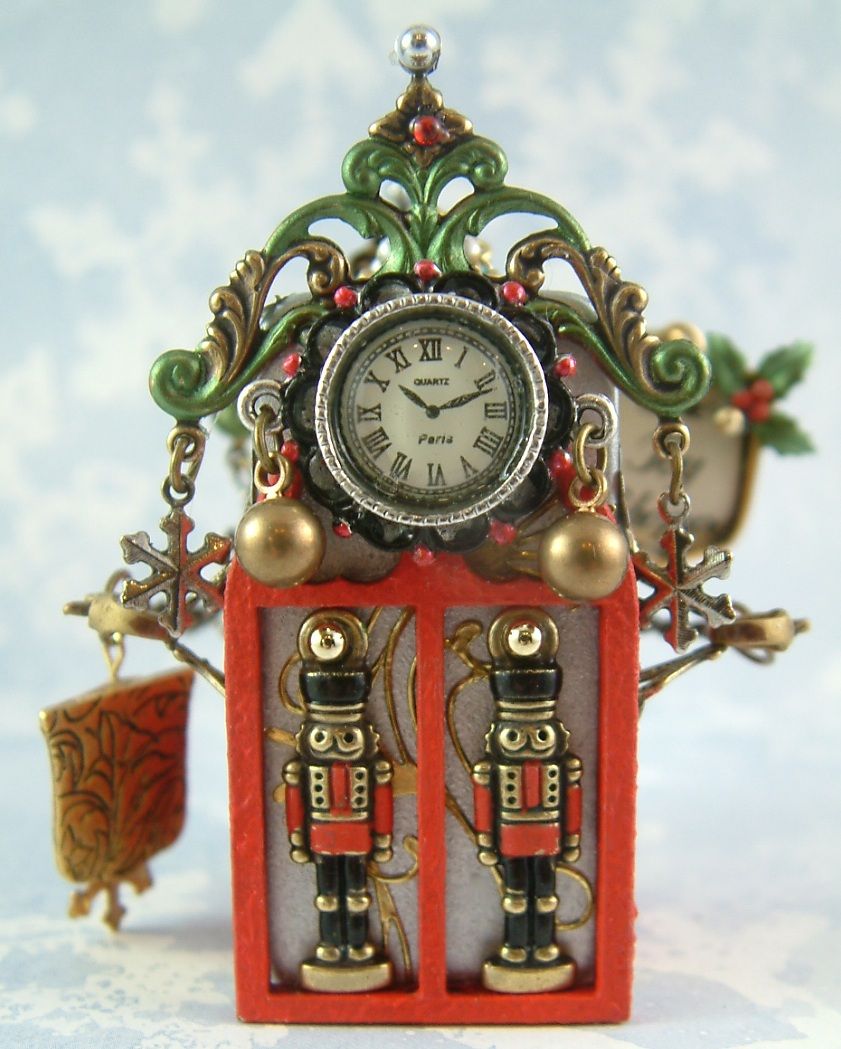
The Clock
- To make the clock I glued a clock button into a round pendant. The clock had a clear domed covering. To create even more of a dome, I filled the round pendant with Glossy Accents and allowed it to dry.
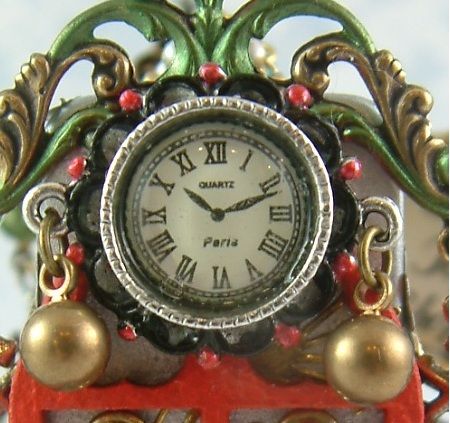
- I attached all of the metal embellishments to the front and back arch/domino book covers using E 6000 glue and allowed them to dry. To get the strongest bond with E6000 glue you need to let it dry 24 hours or more depending on the dampness of your climate.
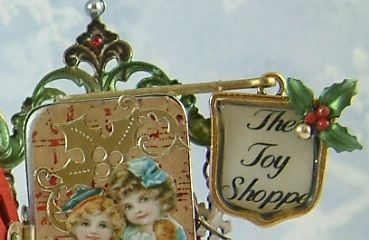
Toy Shoppe and
Closed Dec 25 Signs
I
made the Toy Shoppe sign out of a crest pendant and a cotter pin. I glued the wording into the crest and filled
it with Glossy Accents. I attached the
shield to the cotter pin and glued the cotter pin to the top of the back domino
using E 6000. I made the Closed Dec 25
sign out of crest tag and hung from one of the closure chains.
Below
is the wording I used for the signs. They
are sized to fit the pendants so feel free to download and use them.


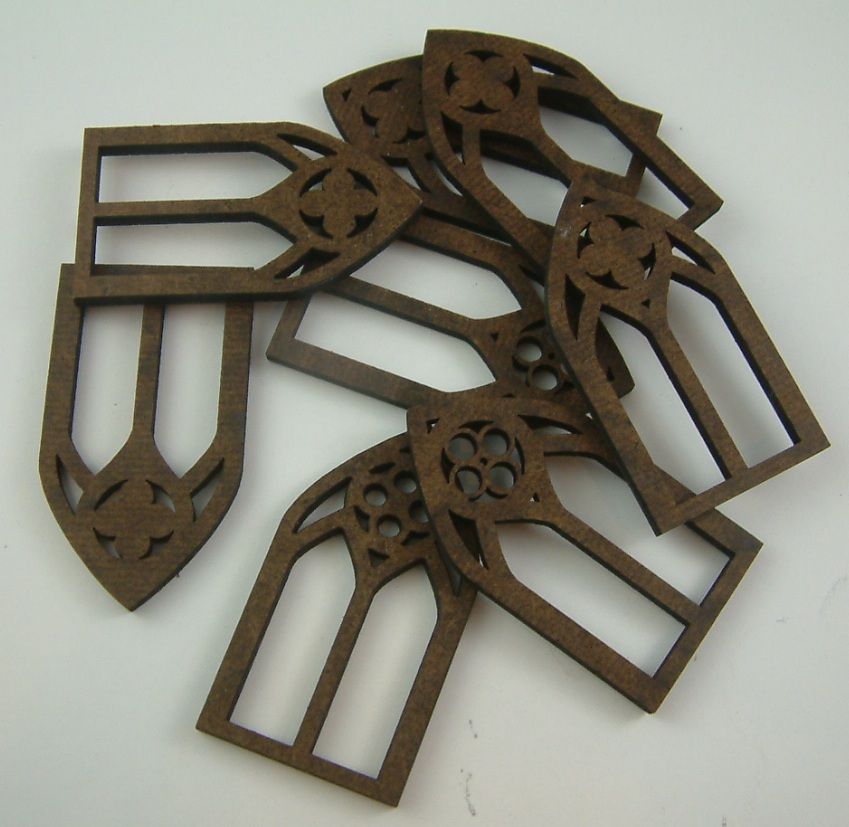
Gothic Arch
Pages
- You need an even number of arches for the book to accordion fold properly. I would suggest using 2 or 4 arches. More arches and the book gets really thick and unwieldy.
- Glue the images and a piece of decorative paper to the backs of the 4 center arches.
- I attached the baroque scroll with loops with connecting chains and holly charms to the tops of the arches before hinging them together.
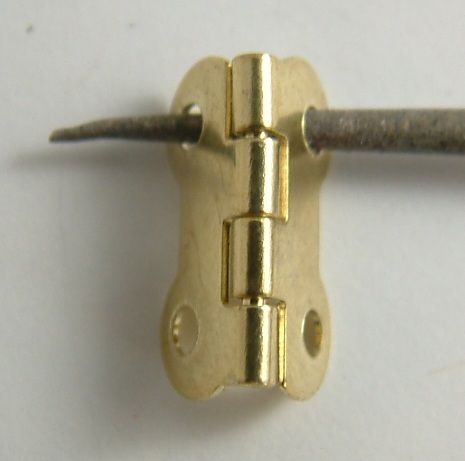
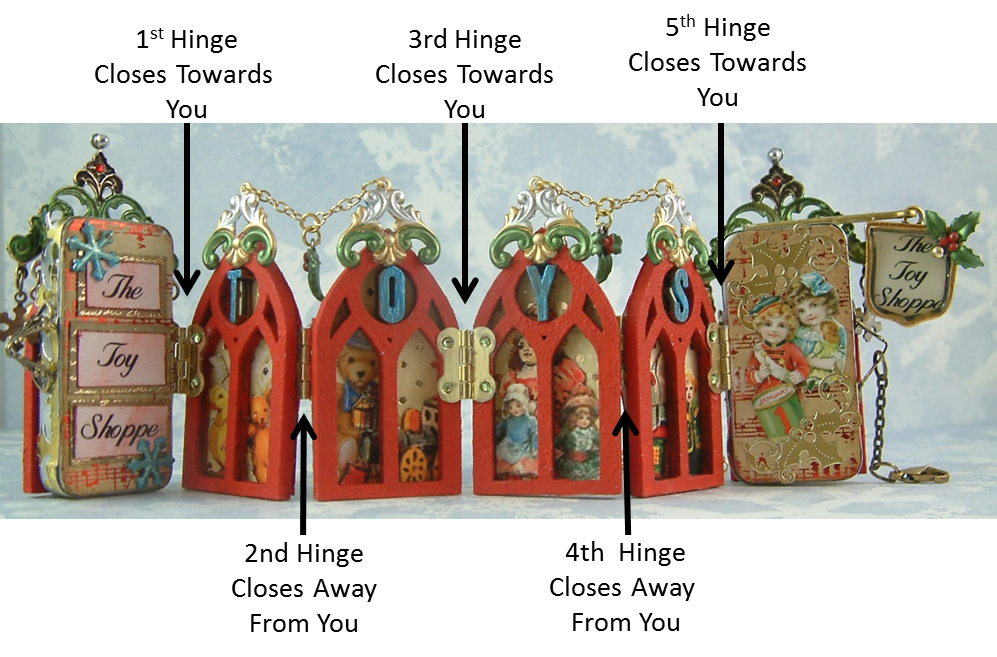
- Here is where patience is important. As you attach each hinge you need to give it plenty of time to dry before attaching the next hinge. You need to use very strong glue like E6000. The other important thing to be mindful of is the direction of the hinges. Each hinge you attach should fold in the opposite direction of the hinge before it. It is really easy to attach the hinges incorrectly (I did).
- The hinge closes in only one direction. In the first picture below I show the hinge closing towards you. I show this so you know what I mean when I explain how to hinge the book together.

- In the picture below the hinge is reversed from the picture above and the hinge closes away from you.
- You can either assemble the book starting from the front domino and working your way from left to right assembling each piece (one at the time and allowing it to dry) or if you feel confident you can assemble the book starting at both ends and meet in the middle. This option is also faster.
- As you assemble the pieces (dominoes and arches) make sure that they are level at the bottom so that you book will stand on its own.
- For the purpose of this tutorial I’m going to describe the order of assembly from left to right using 4 arches as in the sample book. You will need 5 hinges. Between each step allow the glue to dry completely which is probably at least 24 hours. You can also consult the diagram below for hinge placement.
Attach
a hinge to the front domino
Attach the 1st arch to the hinge attached to the front domino
2nd Hinge – Closes Away From You
Attach a hinge to the 1st arch
Attach the 2nd arch to the hinge attached to the 1st arch
3rd Hinge Closes Towards You
Attach a hinge to the 2nd arch
Attach the 3rd arch to the hinge attached to the 2nd arch
4th Hinge Closes Away From You
Attach a hinge to the 3rdth arch
Attach the 4th arch to the hinge attached to the 3rd arch
5th Hinge - Closes Towards You
Attach a hinge to the 4th arch
Attach
the back domino to the hinge attached to the 4th arch.
- Now that your book is assembled you can add decorative paper to the inside of each domino and backs of the arches. The paper will hide some of the hinges depending on which direction they fold.
- On the sample, I added decorative paper inside each domino. On the front domino I also added the “The Toy Shoppe” verbiage and some snowflake charms. On the back domino I added gold stickers and the image of the boy and girl. Notice how the paper covers part of the hinge attached to each domino.
- On the backs of the inside arches I added a piece of decorative paper, gold stickers and images. Notice in the picture below how the paper covers part of the hinge attached to each arch. I used a separate arch as a template to cut the decorative paper to size before gluing it in place.
Alpha Stamps Products Used
Items used on the front and
back of the domino book
Lydia Connector – Antique Gold – You’ll
need 2
Ensign
Crest Pendants - Toy Shoppe sign
Ensign
Crest Tags – Closed Dec 25
Items used inside the
domino book
Dazzles Gold Holly Stickers – Inside of back
domino
Collage Sheets
Winter
Kids – Boy and girl inside book and girl on back of book
Snow
Collage Sheet – Back of book
Snug
in their Beds Collage Sheet – Back of book and bear.
Christmas
Dolls - Dolls
Victorian
Umbrella Kids – Back of book
18 comments:
Stunning design and layout and as usual your attention to detail is fantastic. I love this. Tracy x
All I can say is WOW...this is one of your best yet!
Thank you so much for taking the time to break down what and how you did what you did.
Beautiful new banner. This domino book is extra fun with all the details and dimension and hinges. Blissful Creating...
Another incredible project!!!
Clap Clap Clap.
Love those little Toy Soldiers!!
hugs Lynn
Just amazing and wonderful instruction as always. Thank you
Love Chrissie xx
Amazing again Laura. And I love your blog header.
What a charming little holiday book Laura! Thanks so much for sharing the tutorial. xoxo
AMAZING...I have been wanting to try a Dominio Book but nothing caught my fancy but this is definitely the one I want to make. Love all the details!
Simply AMAZING!!
Take care,
Diane
This is truly a piece of art to hand down as an heirloom. Wonderful. A
I am stunned by the beauty and complexity of this work of art. Your talent is amazing.
I'm so old fashion I print off all your project instructions and put them in a folder for when I can try them out!! It is overflowing but I want to do each and every one of them!!
This is amazing. Patience is the key i bet!Totally beautiful beyond words..thank you for your constant endeavors of beauty and elegance.
susan s.
Absolutely awesome! Thanks for brilliant tutorial!
Wow! Just incredible.
Totally amazing and just stunningly gorgeous! Your art work always just amazes me! I love all of the trinkets that you have added here! Ineradicable art work Lady!
Peace,
Kristy
WOW what a beautiful, creative and brilliant idea, gorgeous
this is wow wow wow i love it, where can i find the little toy soilder charms. I need some of them in my life xx
You book is amazing!! Thanks for sharing!!
Post a Comment