

Wednesday, July 31, 2013
Tuesday, July 30, 2013
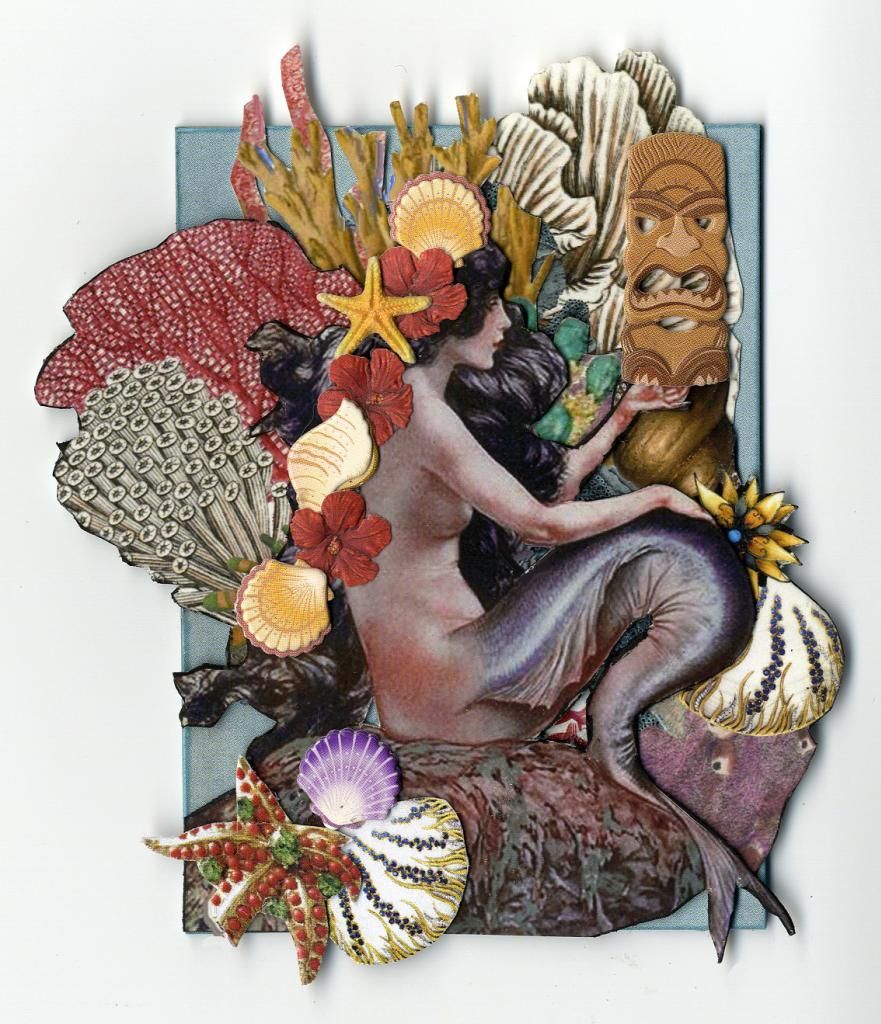
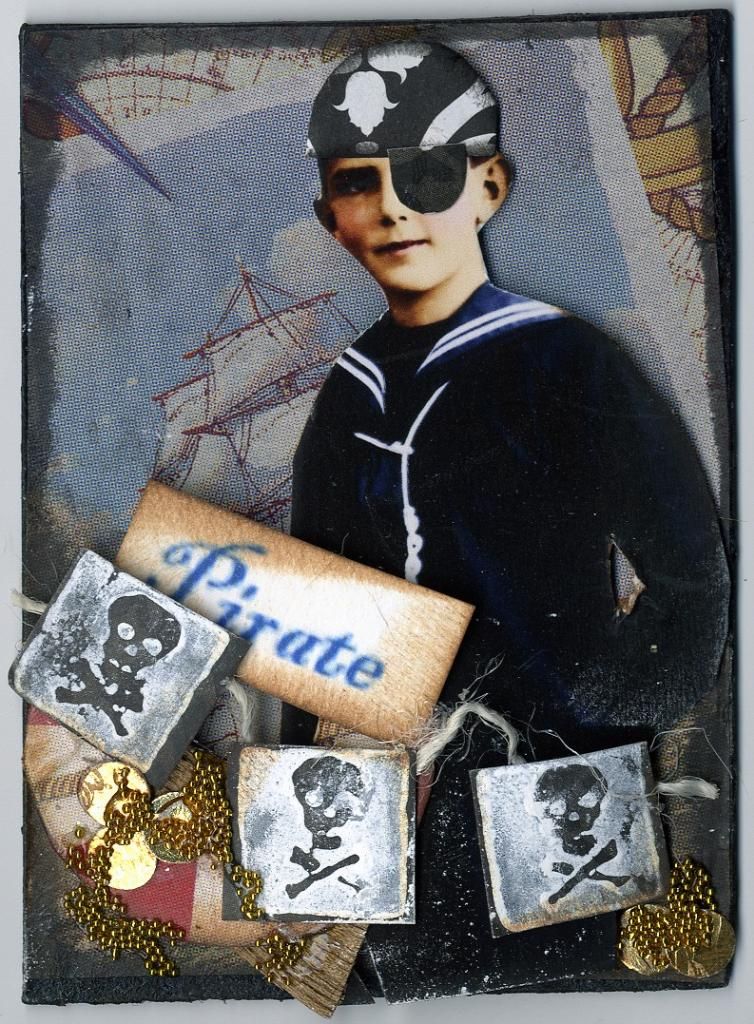
AARG MATIES THERE BE PIRATES
I am sooo far behind on
posting art from swaps. These ATCs are
from a Pirate swap that I participated in last year. The one above is mine.
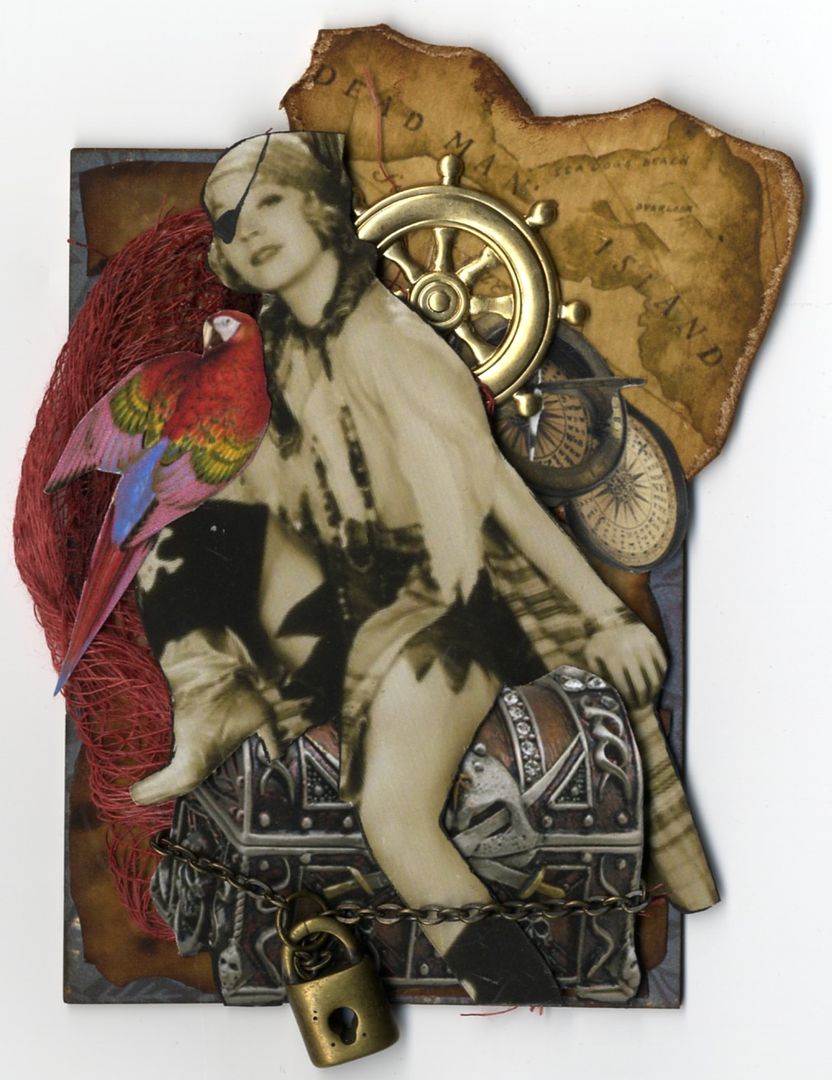
The ATC below is by Connie Koutsourelis
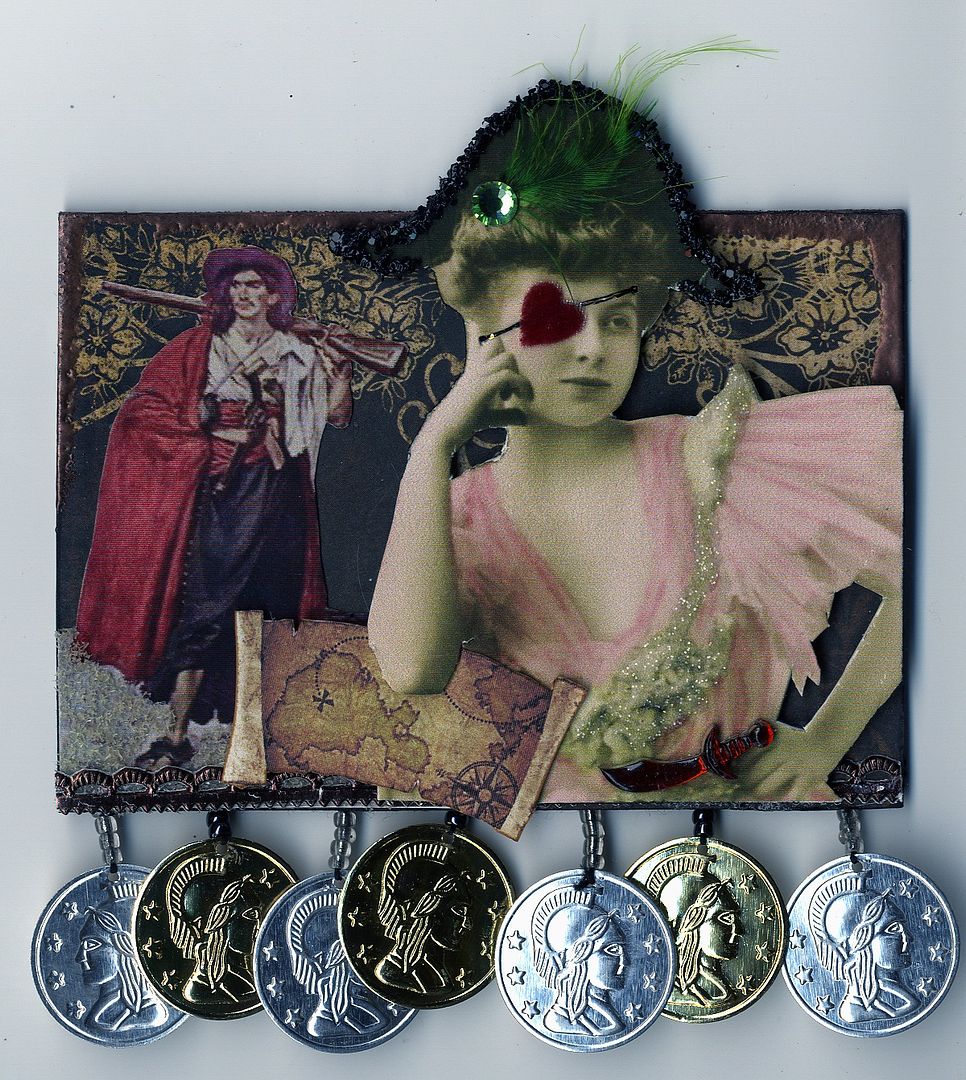
The ATC below is by Liz DeWitt
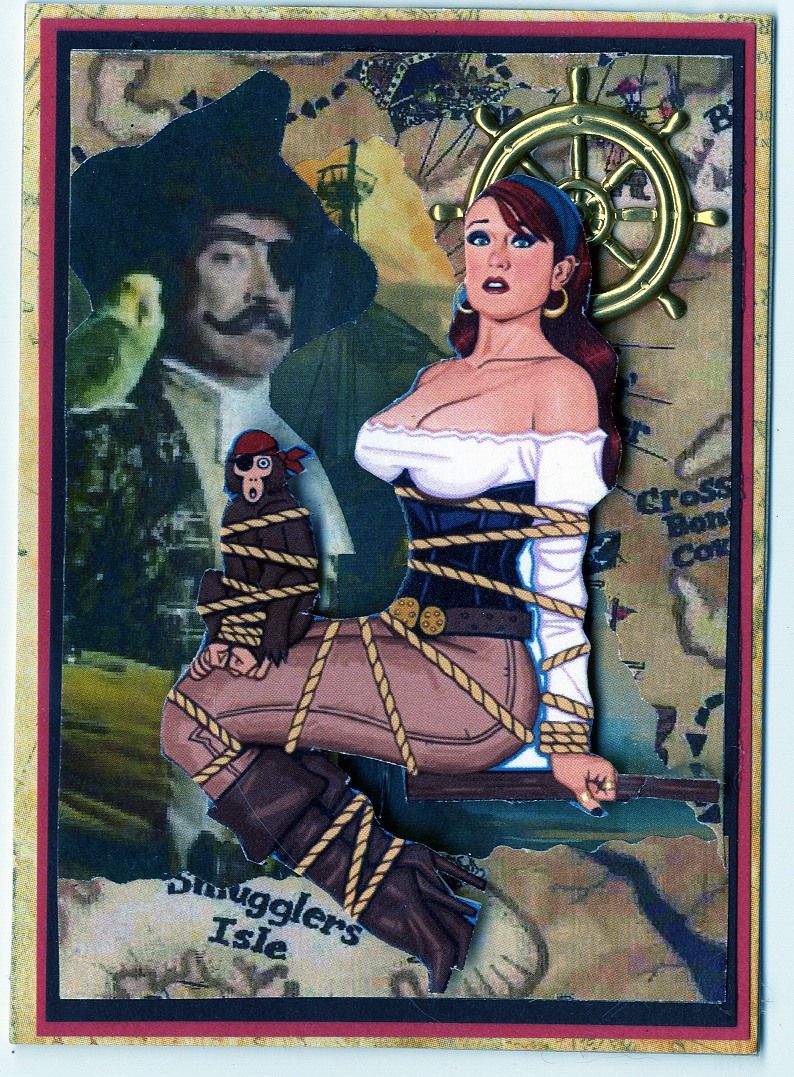
The ATC below is by Wendy Aspinal
The ATC below is by Kris Dickinson
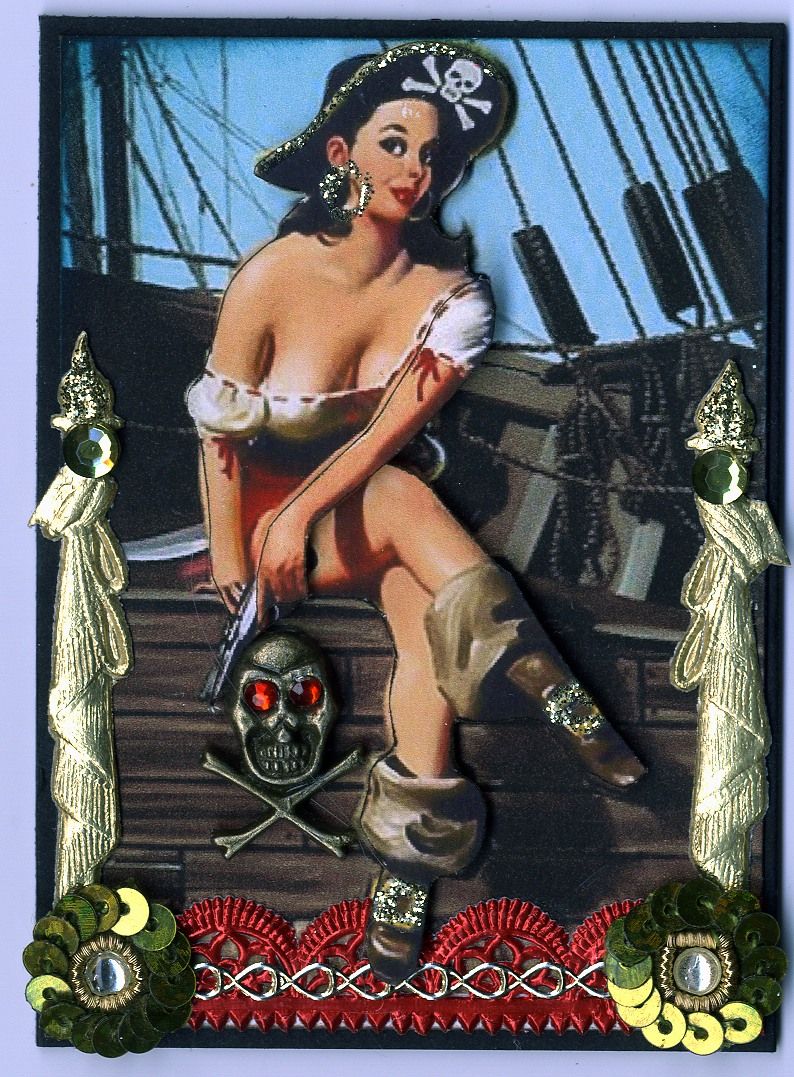
The ATC below is by Lynn Stevens
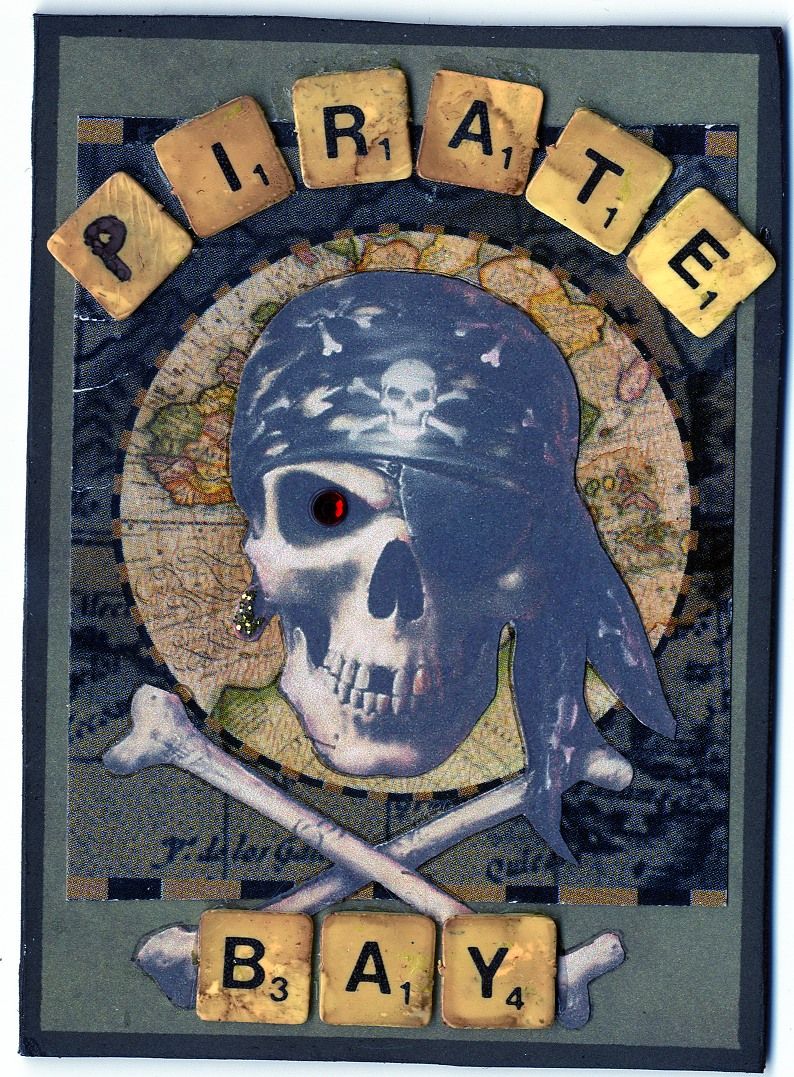
The ATC below is by April Dudko
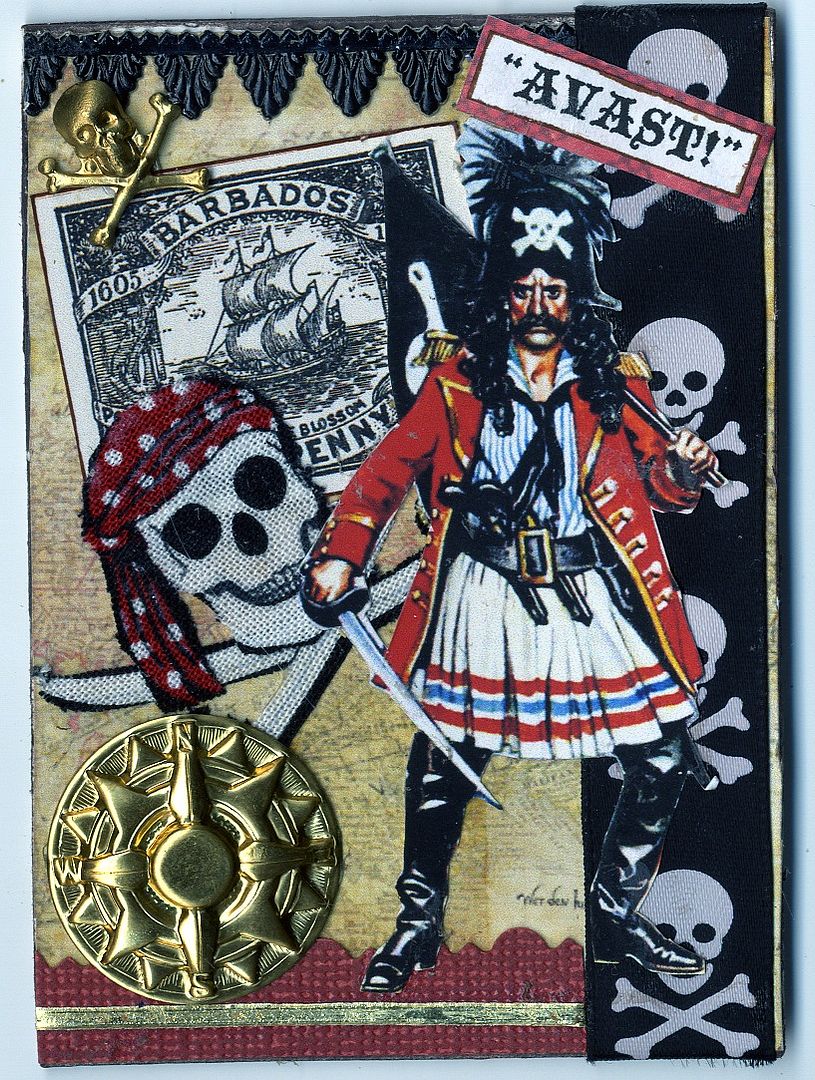
I hope that you will agree
they were great pirate’s booty!
Saturday, July 20, 2013
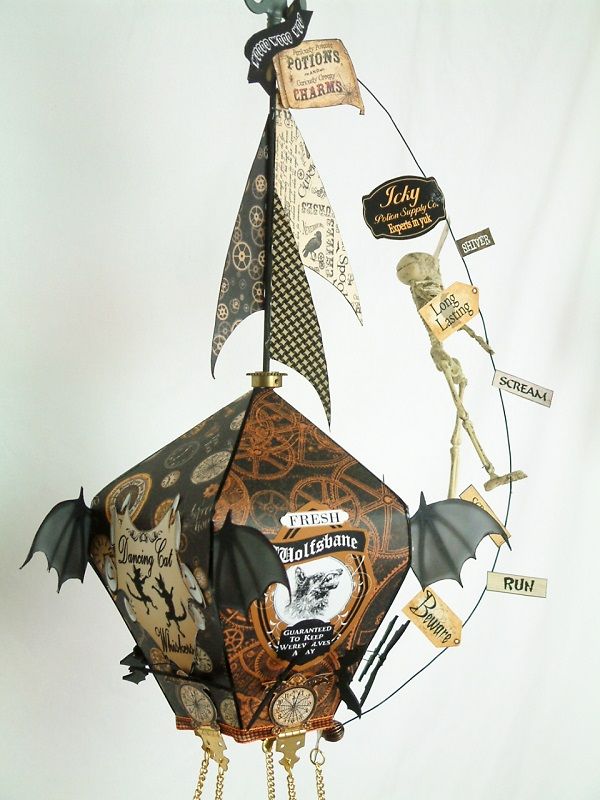
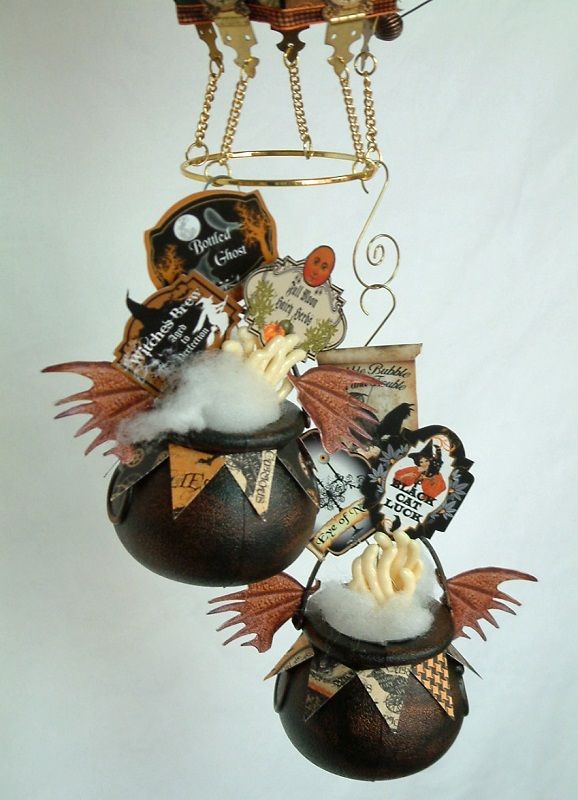
Steampunk Spells & Carnival Curiosities Hot Air Balloons, New Spooky Wings Collage Sheet & Digital Files – Plus VIDEO TUTORIAL

Up, up, up in the air we go
with two new hot air balloons. In
addition to the new balloon examples, I have patterns for you to download to
make your own balloons. Plus a video
tutorial that walks you through making each type of balloon and explains the all
of the decorative details. In the video I
will also talk about the décor and construction of the Parfumerie
balloon I posted a week ago.
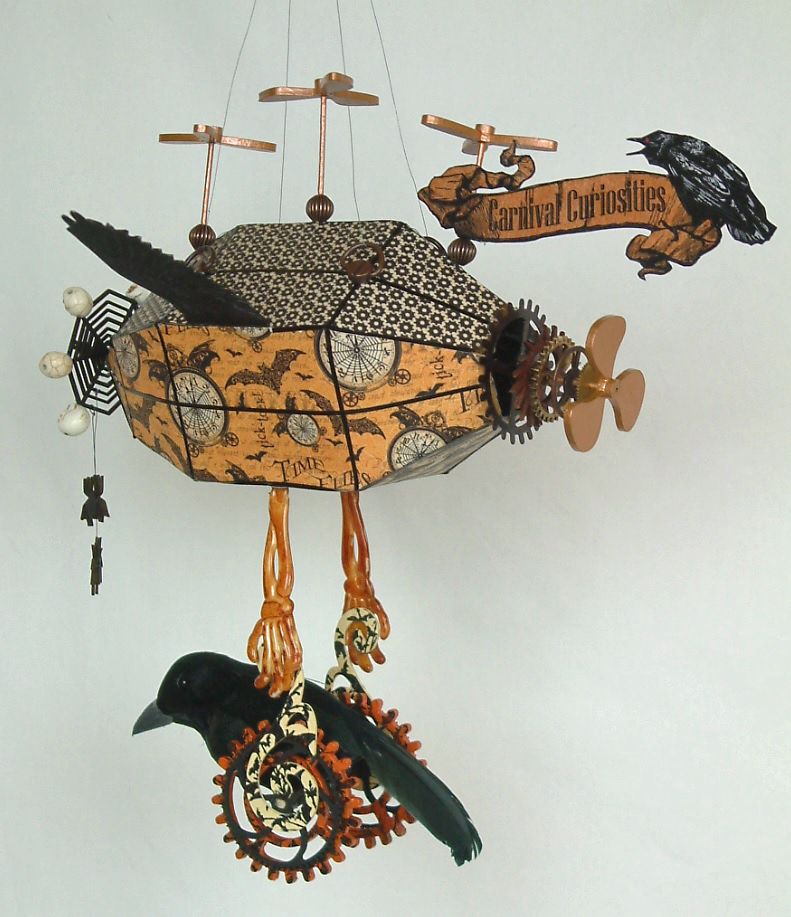
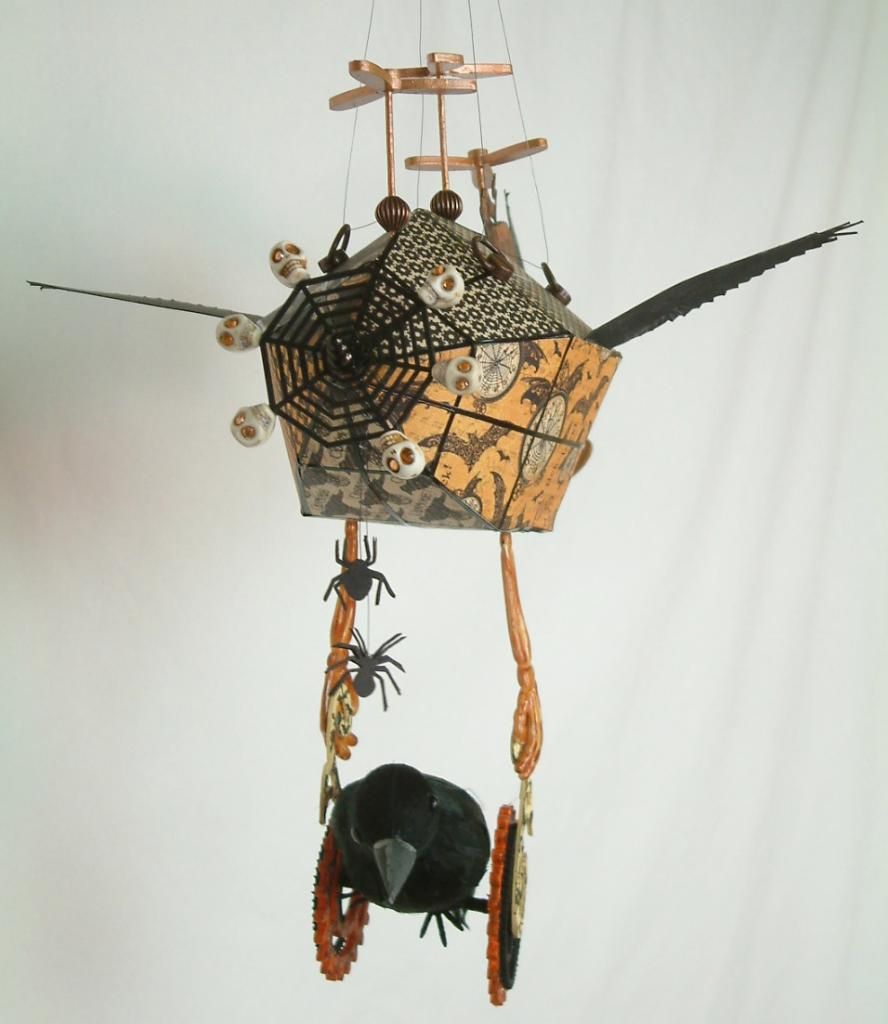
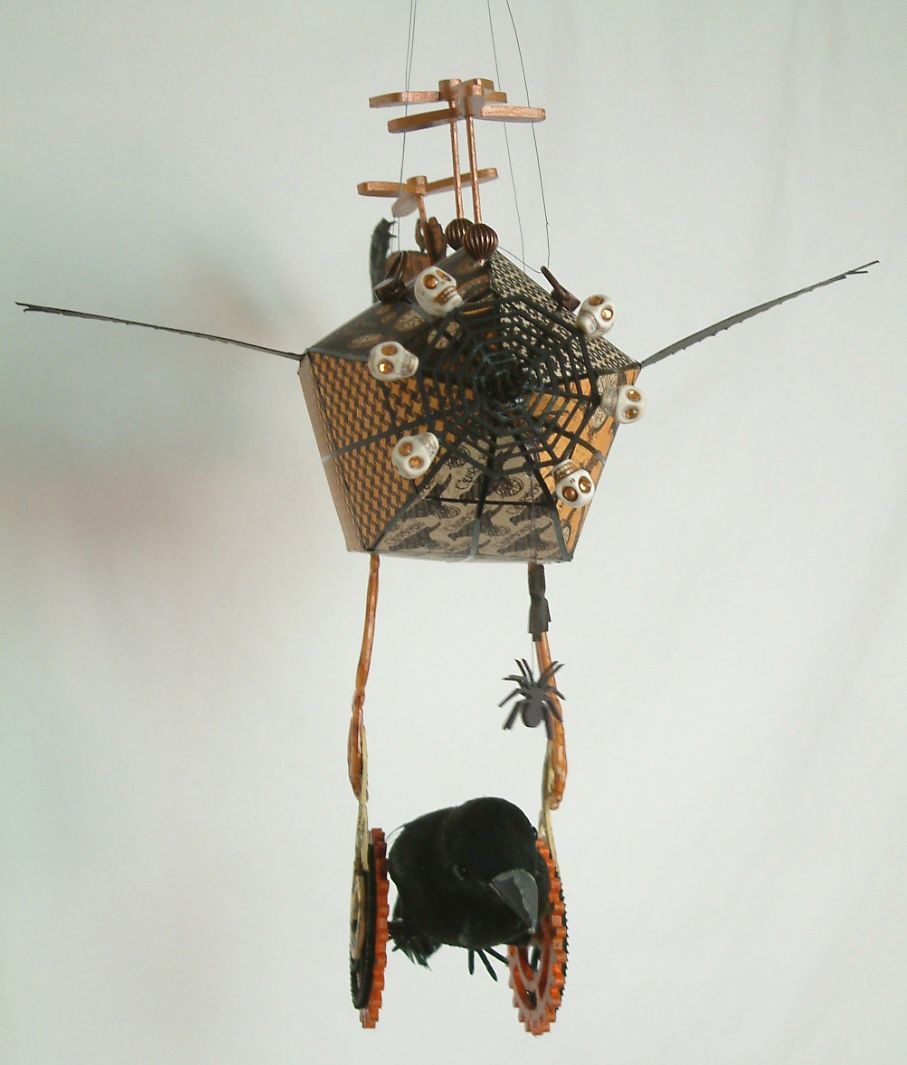
The first new sample is “Carnival
Curiosities” which is a plug for the Halloween
Carnival event that kicks off on September 5th. So those of you who plan to participate can
get an early start if you like and make a balloon for your carnival!

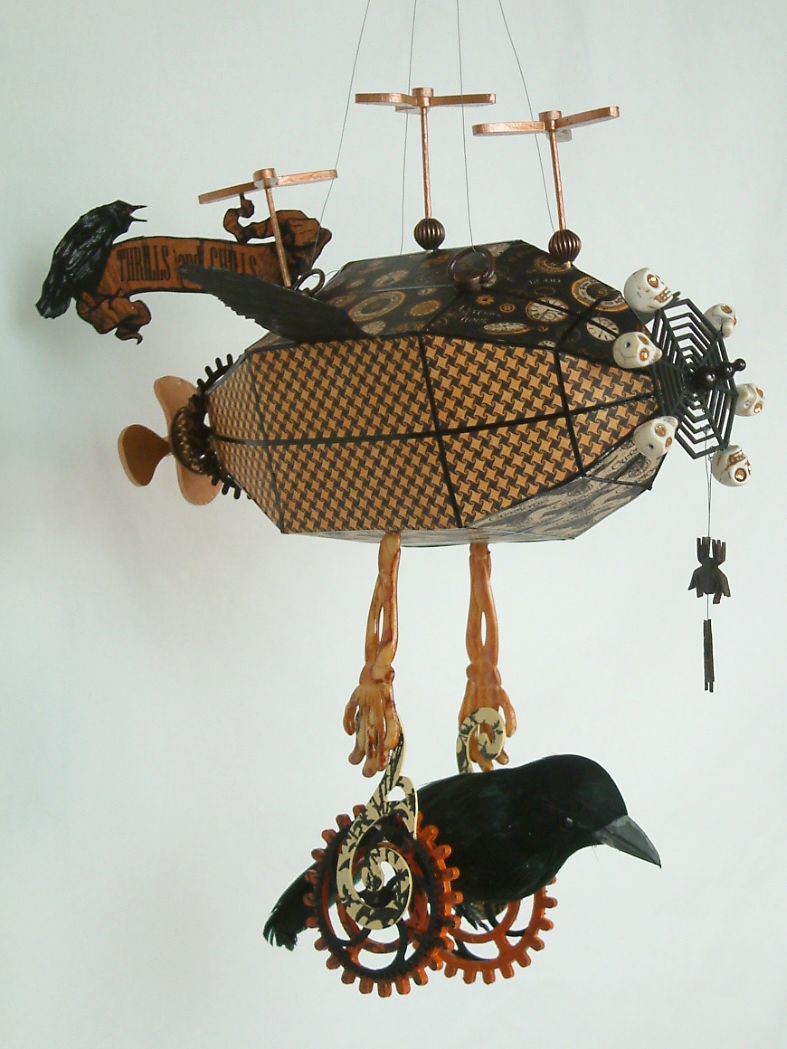
The second sample is
Steampunk Spells made with really cool papers from the new
Graphics 45 line. I’ll be using some
of these papers again for the Halloween Carnival. It's a pretty will ride for the skeleton!

Further down in this post is
a complete list of the products I used for both balloons which are carried by Alpha Stamps.
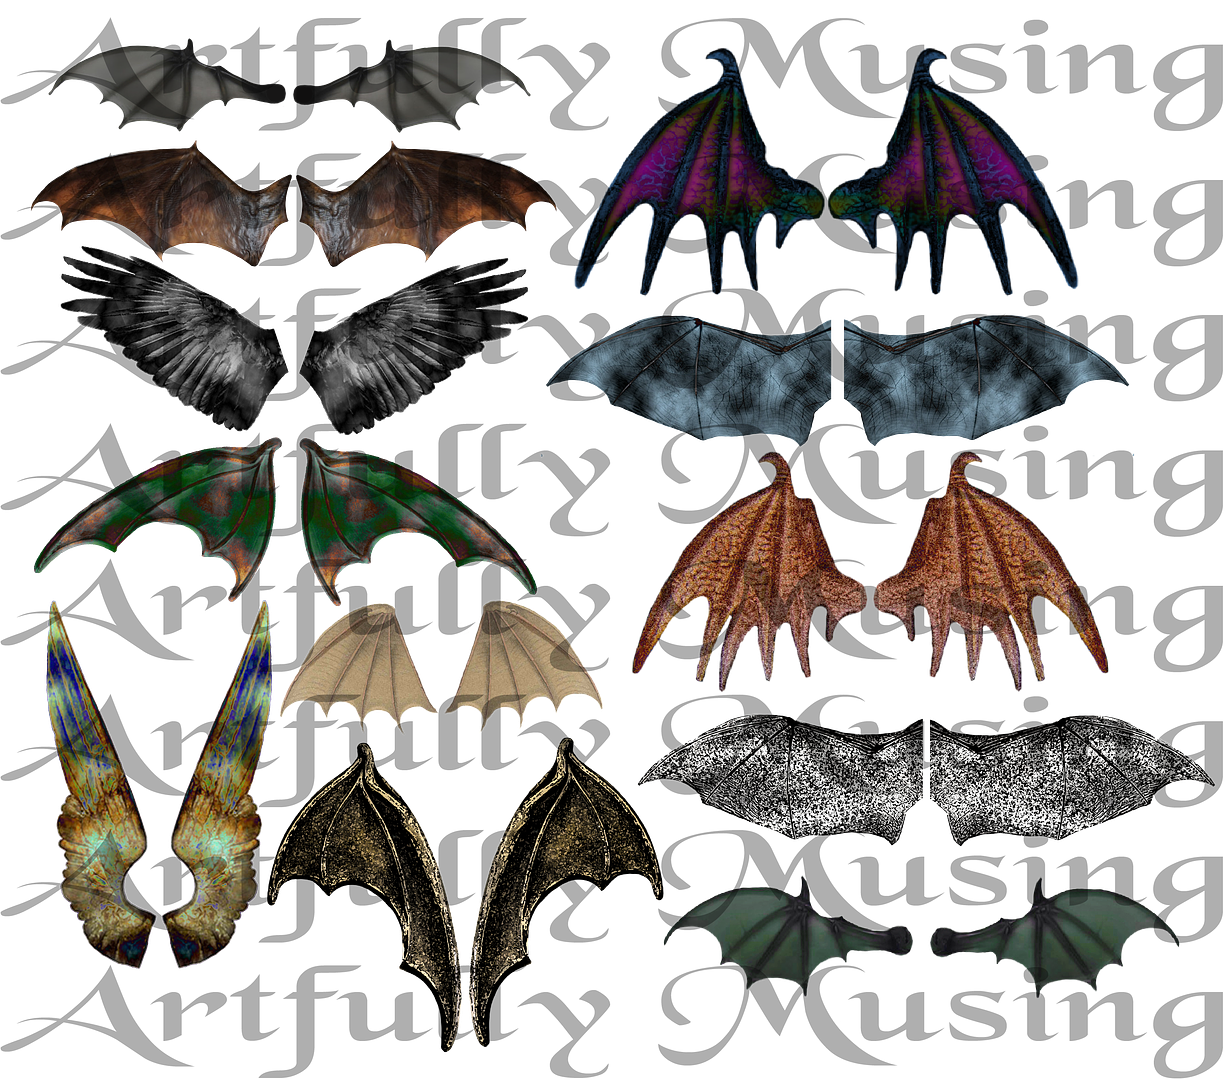
Spooky Wings Collage Sheet & Digital
File Set
You’ll notice that both of
the samples have wings. They wings are
from my new “Spooky
Wings” collage sheet which contains 10 sets of wings.
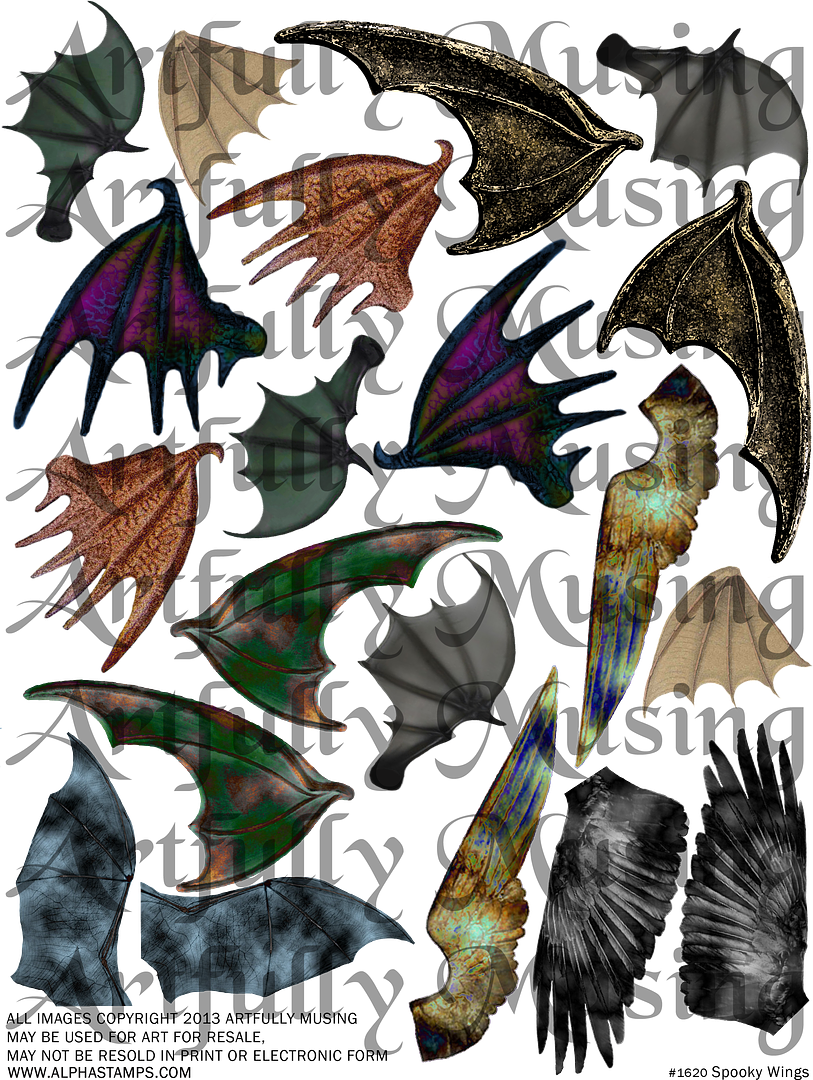
I also have a “Spooky Wings”
digital file set which contains 12 sets of wings (10 are the same as the
collage sheet plus two additional sets).
Digital files are great as they are separate images that you can size and
print as many times as you like or use them in your digital art. You’ll see me use these again in the
Halloween Carnival.
VIDEO TUTORIAL
In
this tutorial I’ll show you how to make hot air balloons from decorative paper.
You can make them as large or small as
you like; the only limitation is the size of the paper. In the video tutorial below I’ll show you how
to use the two patterns I have created to make two different types of balloons.
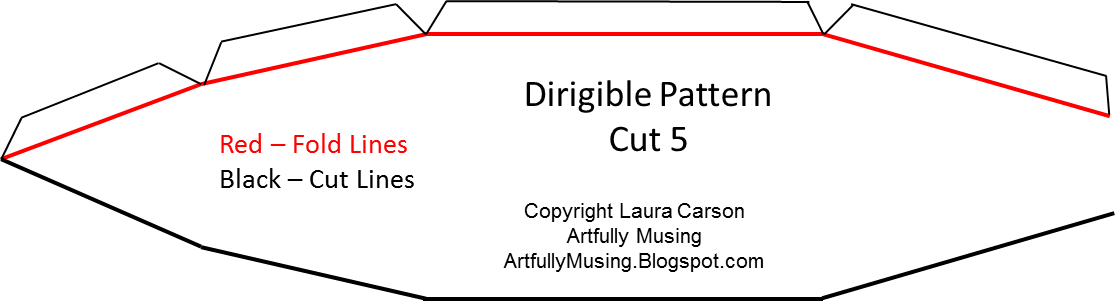
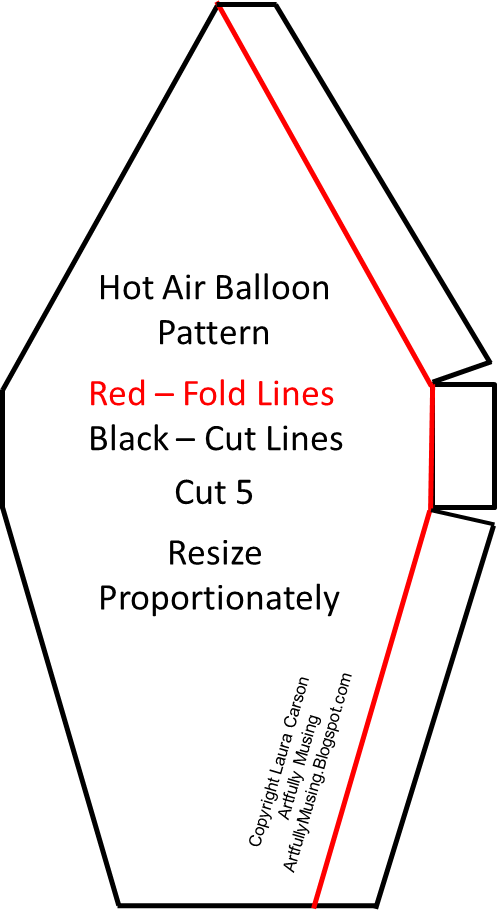
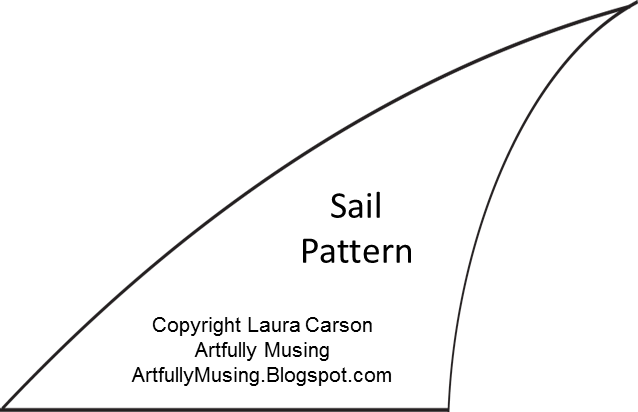
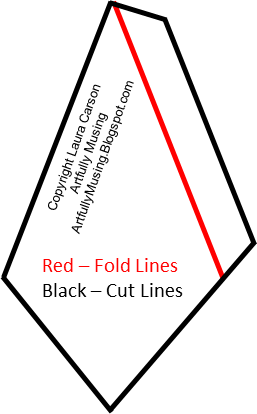
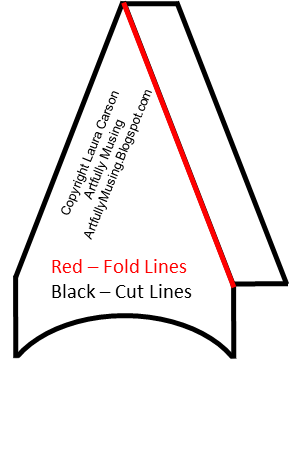
HOT AIR BALLOON PATTERNS
To
download each pattern, click on the image to expand it, right-click and select
Save As.
Alpha Stamp
Products Used to Make the Carnival Curiosities Dirigible Balloon:

Alpha Stamps
Products Used to Make the Steampunk Spells Hot Air Balloon:
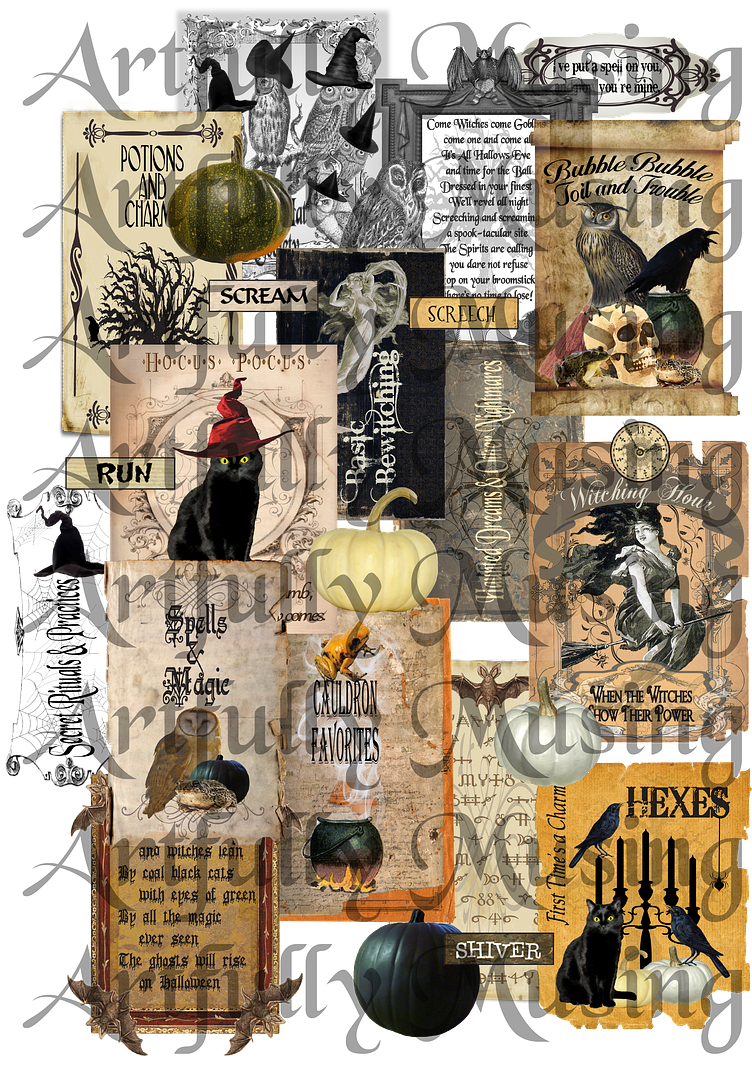
Pretty Potions and Poisons Apothecary Collage Sheet
Image Now Available as Digital File Sets
Digital
files can be resized, rotated or flipped as needed. The files are in .png format. PNG format files have a transparent background so are
easy to layer over other digital images.
Digital images can be saved to your computer and printed as many times
as you wish.
The Potions
& Poisons set contains 46 images.
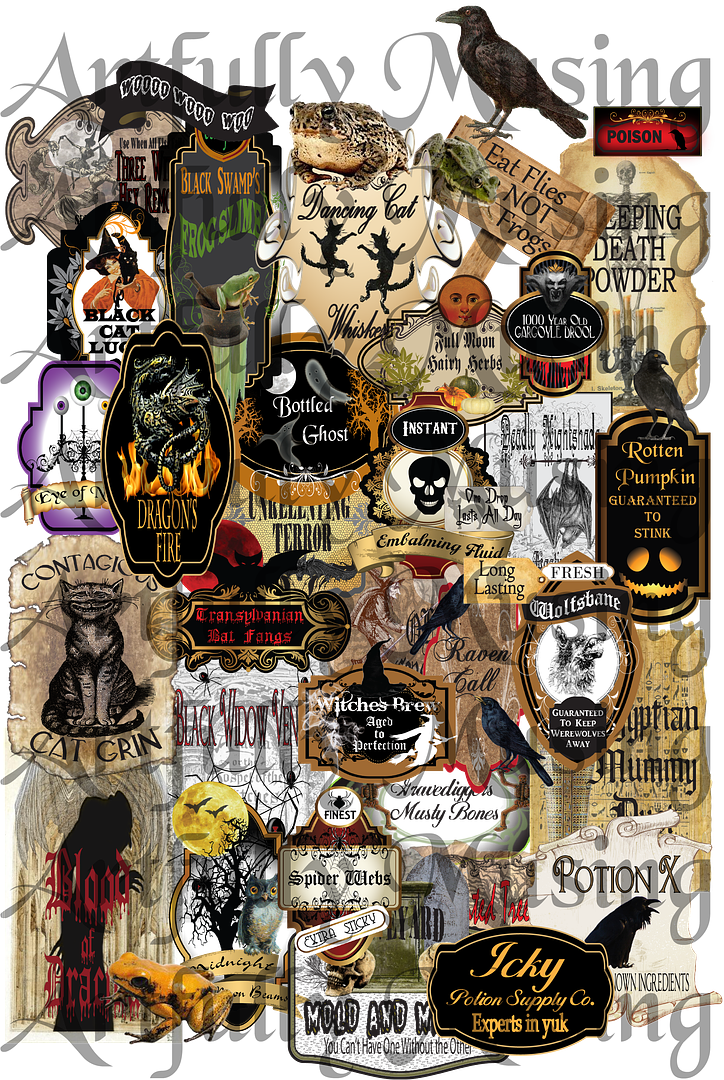
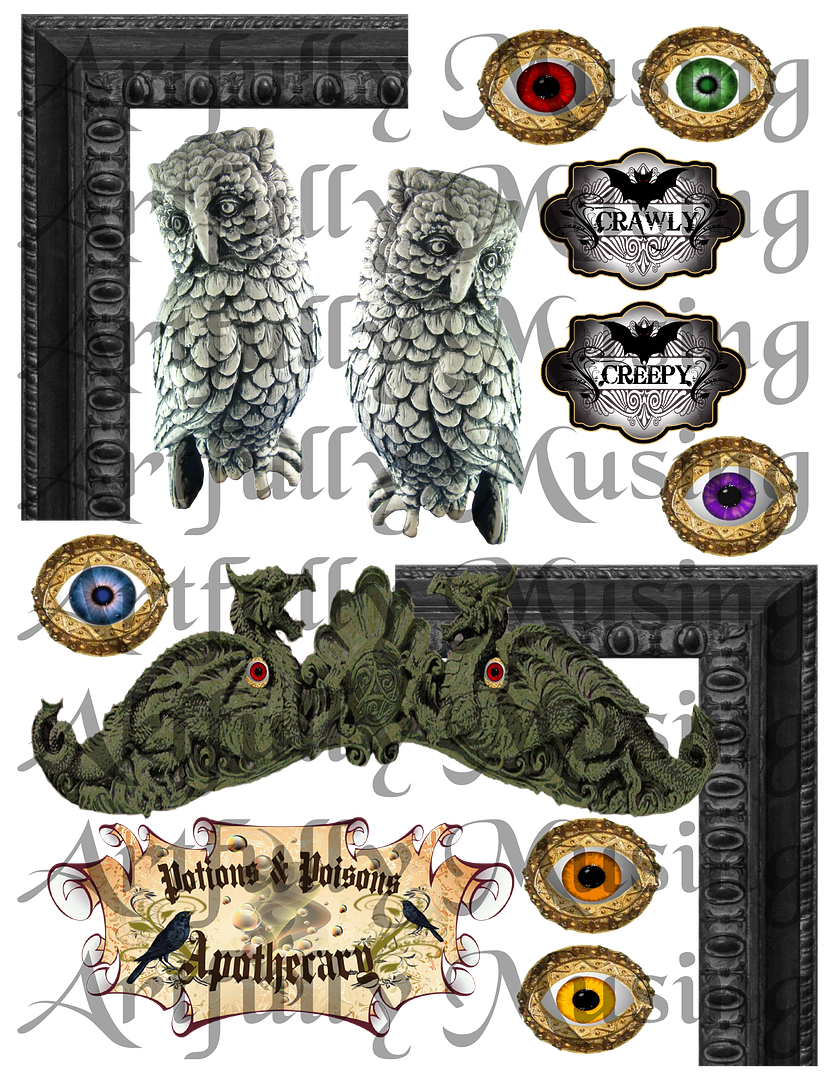
Apothecary
Book Spines Covers and More set contains 23 images.
The
Witches Apothecary Cabinet set contains 14 images.
Thursday, July 18, 2013
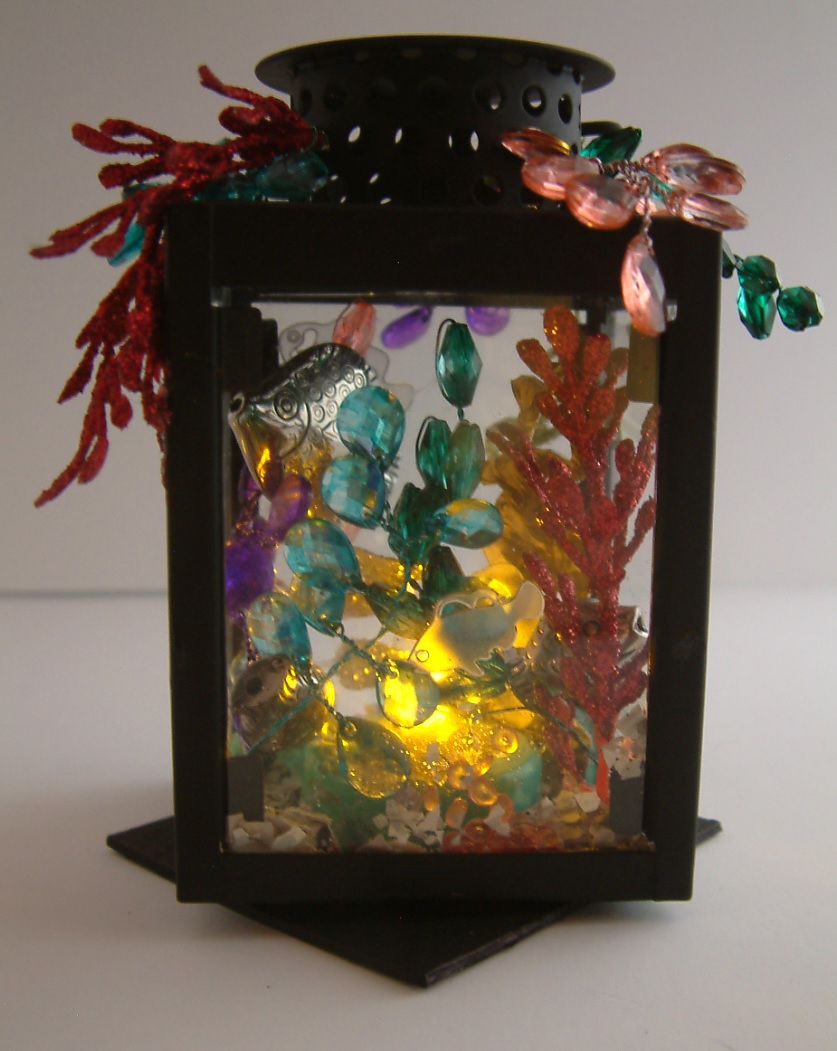
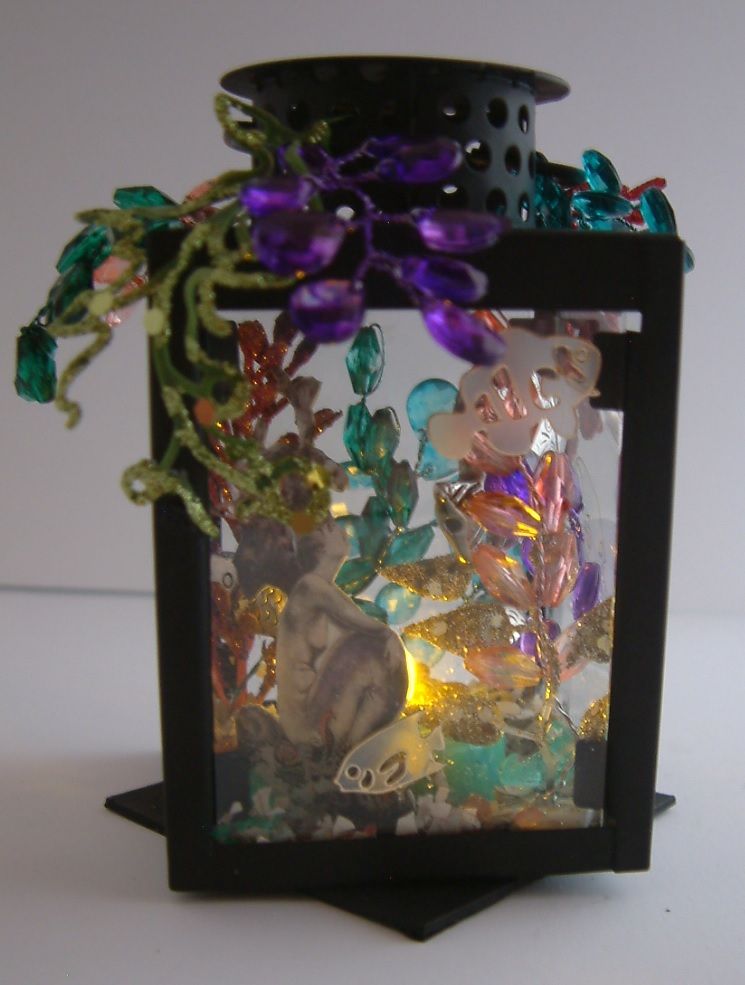
Mermaid Tea Lantern
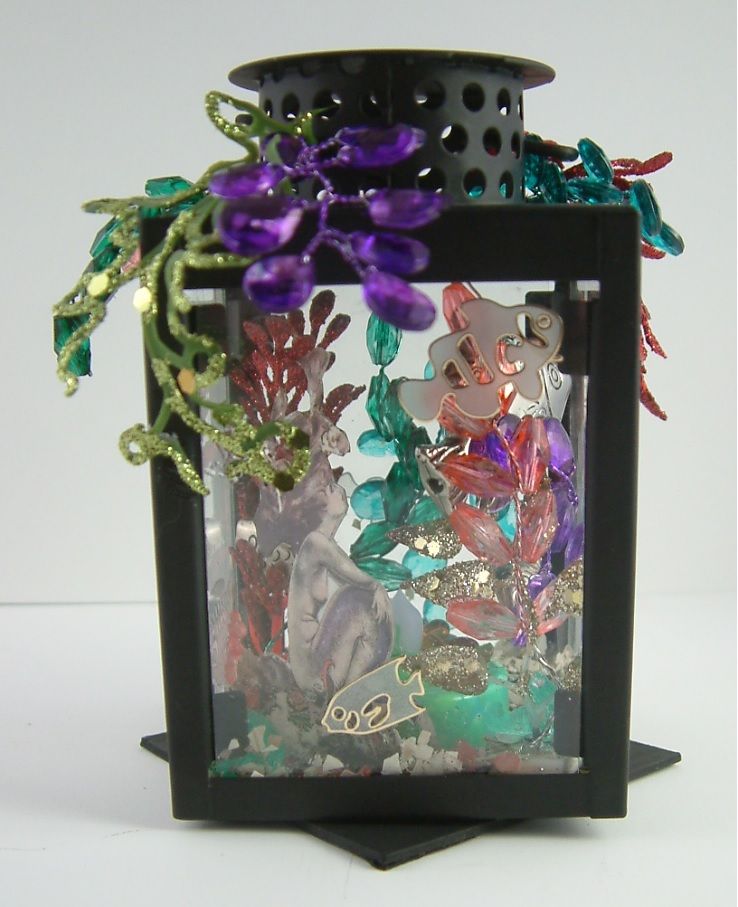
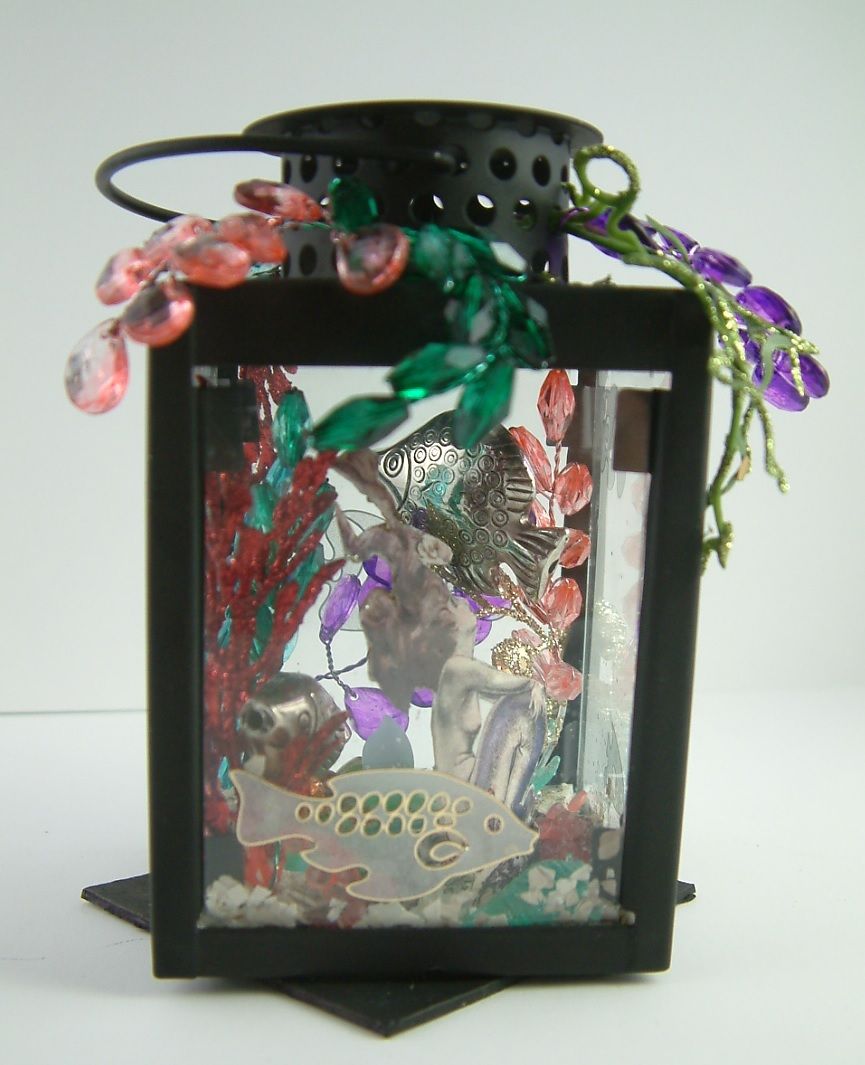
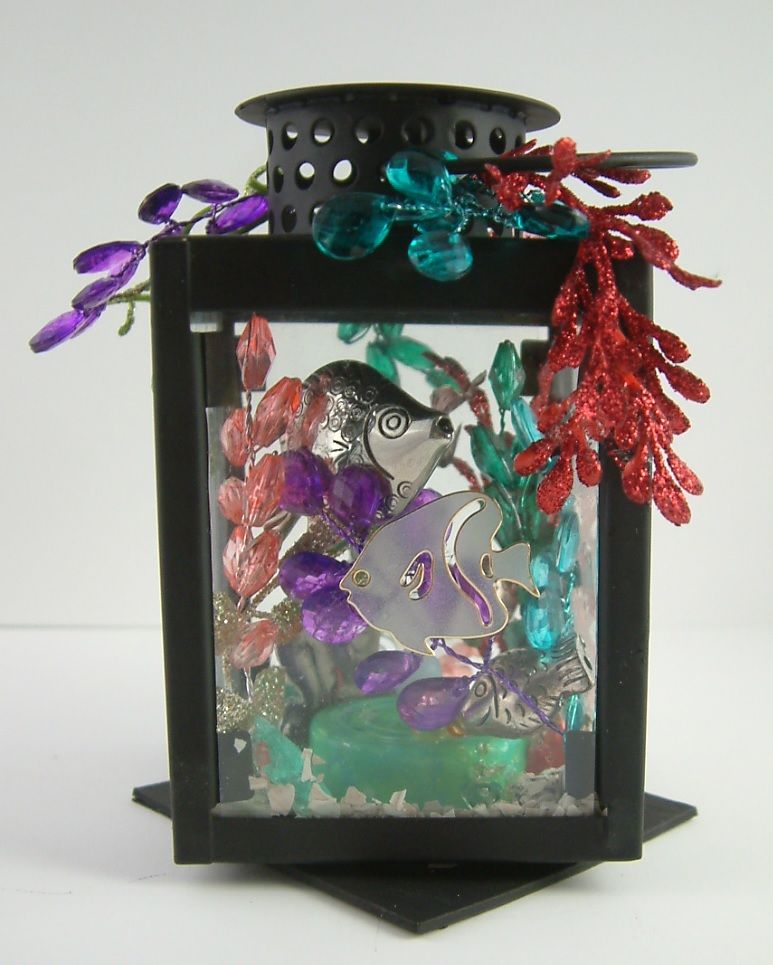
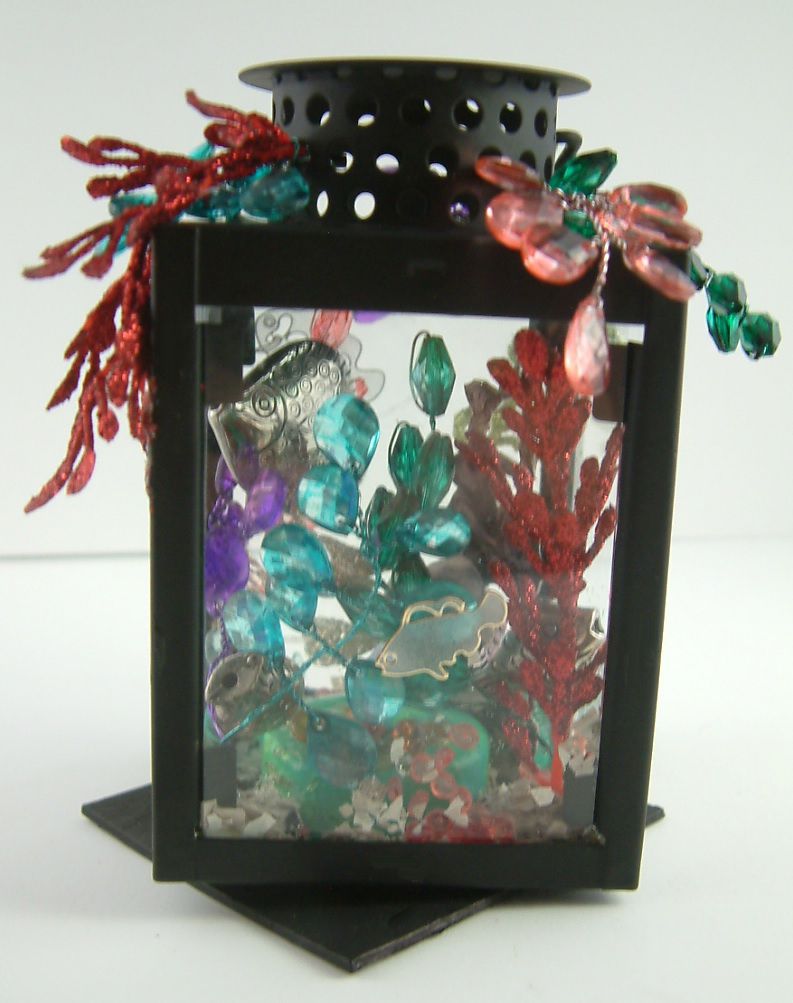
Decorating this small tea lantern was such a fun project. I decided to go with a mermaid
theme (no surprise). I wanted it to look
like a mermaid in a fish tank. The trick
was how to use the LED light which inserts in the bottom of the lantern and be
able to turn it off and on.
I decided to not use the base which holds the LED
light in place in the bottom of the lantern.
Instead I made another base out of heavy chipboard. I made a hole in the chipboard to accommodate
the switch on the bottom of the LED light.
After I finished decorating the inside of the lantern I glued the LED
light to the chipboard base and then the base to the bottom of the lantern. Now everything on the inside stays in place
and I can turn the switch on an off.

In the photo below you can see the original base on
the left and the new base on the right.
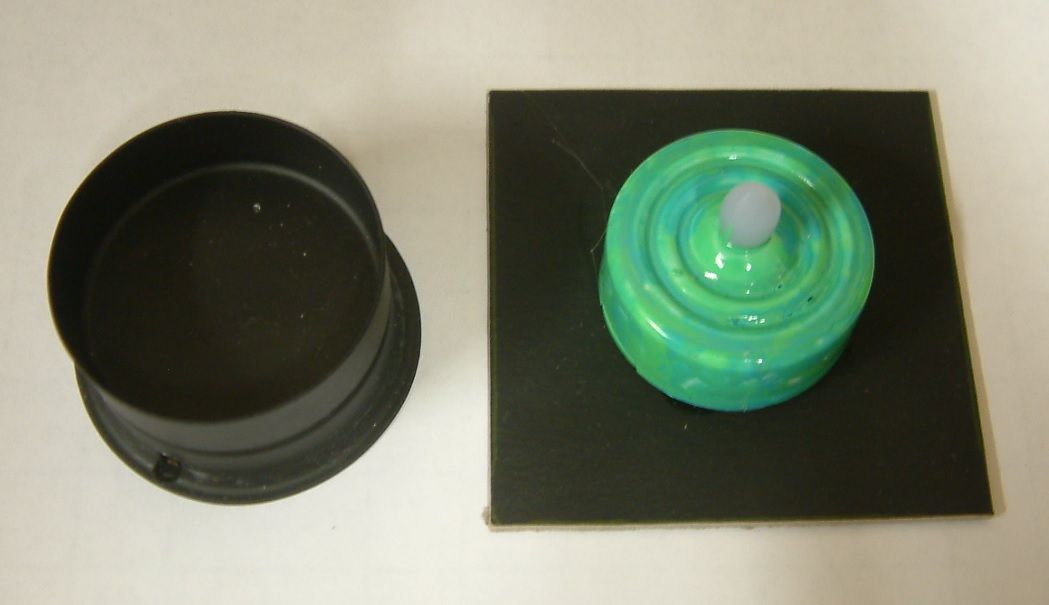
Below you can see the hole I made for the switch.

Monday, July 15, 2013
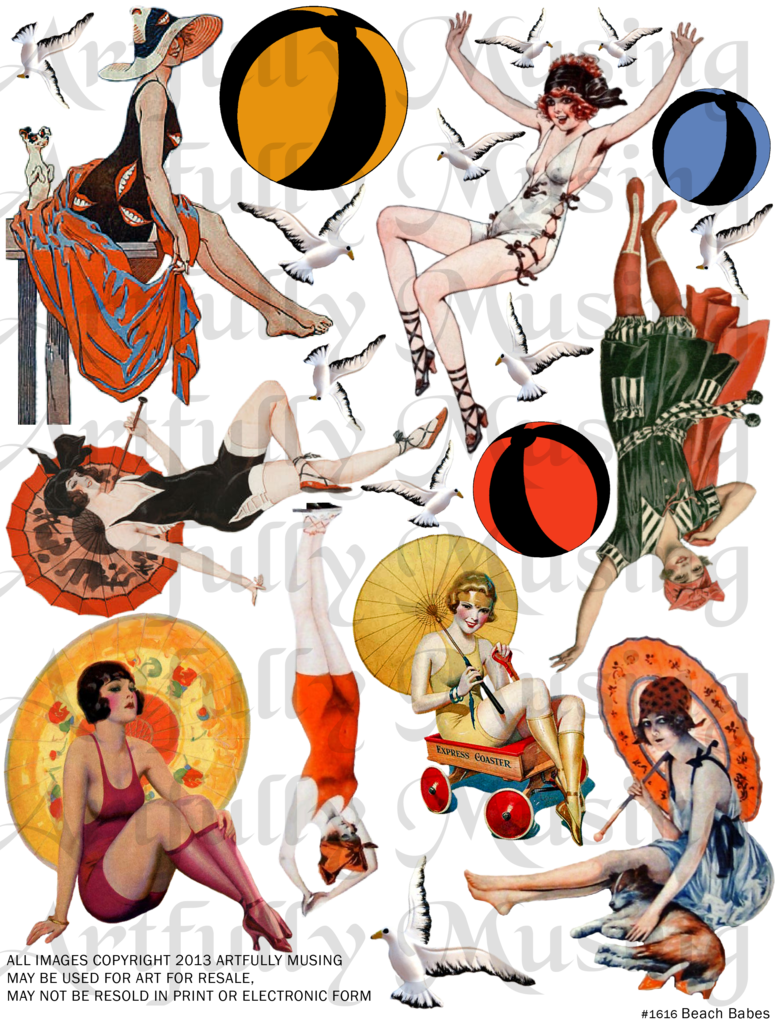
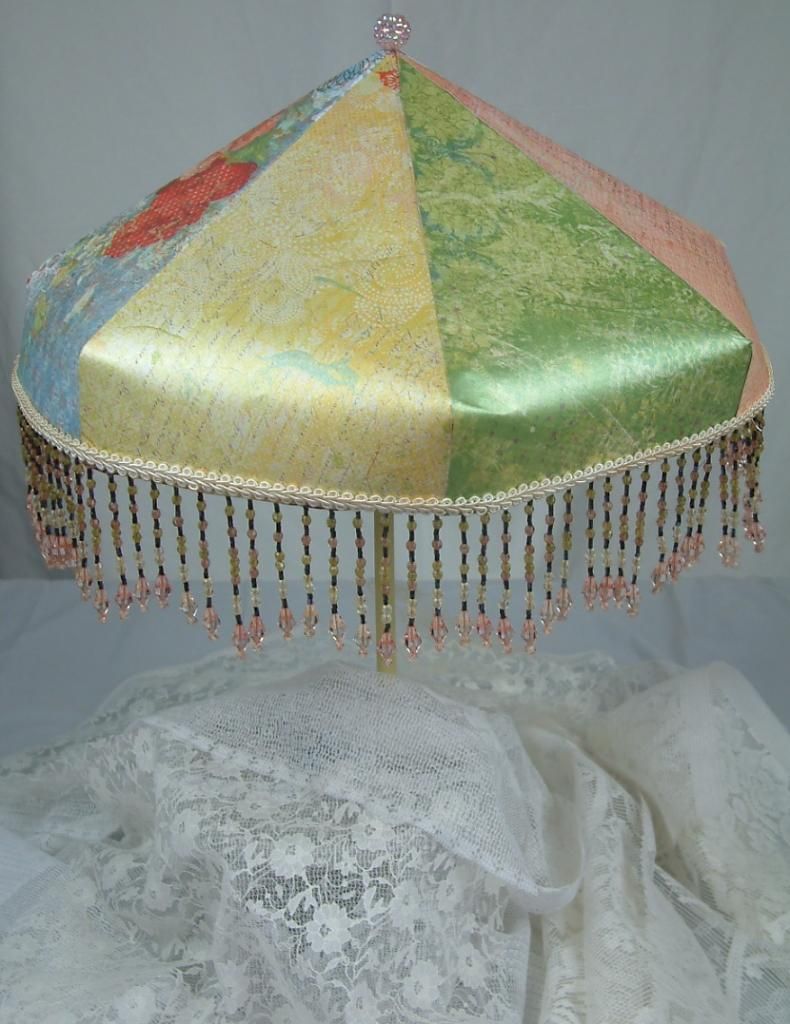
Beach Scene, New Collage Sheet & Paper Umbrella Video Tutorial
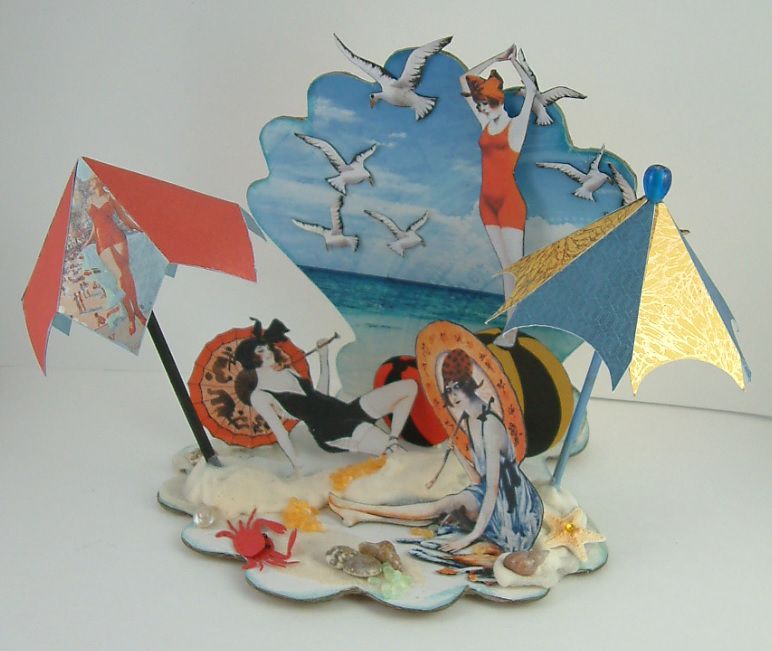
I’ve
had umbrellas on my brain lately. It all
started when I was thinking about the upcoming Halloween
Carnival Event and the umbrellas I used for some of the games. Unfortunately (as it seems is always the
case) the manufacturer is no longer making them. After searching for a replacement, I decided
to figure out how to make them and come up with a pattern. Next, I thought, how fun umbrellas would be for
summer art, and that lead to the beach scene you see above. Well you know me; I couldn’t stop at just one
pattern. By the time I was done I had
come up with 4 different patterns that create 4 different umbrella designs.
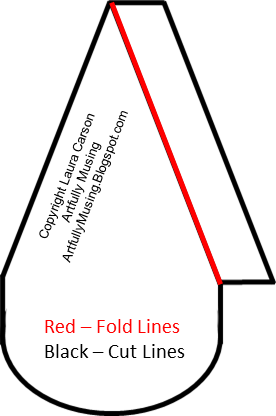
Before
I jump into the umbrella video tutorial let me tell you a little bit about the
beach scene. The construction is pretty
much the same as the Mermaid
Tail Scene in one of my recent posts.
I used 2 chipboard shells to create the base. In the case of the shells, I cut off some of the end of the top shell and I cut a slot in the bottom shell. Next, I glued the top shell into the slot on the bottom shellt.

I
cutout the beach babes and balls and using 2 layers of double-stick foam core
tape I glued them to the base.

I
attached the umbrellas to the base using Styrofoam and E6000 glue.
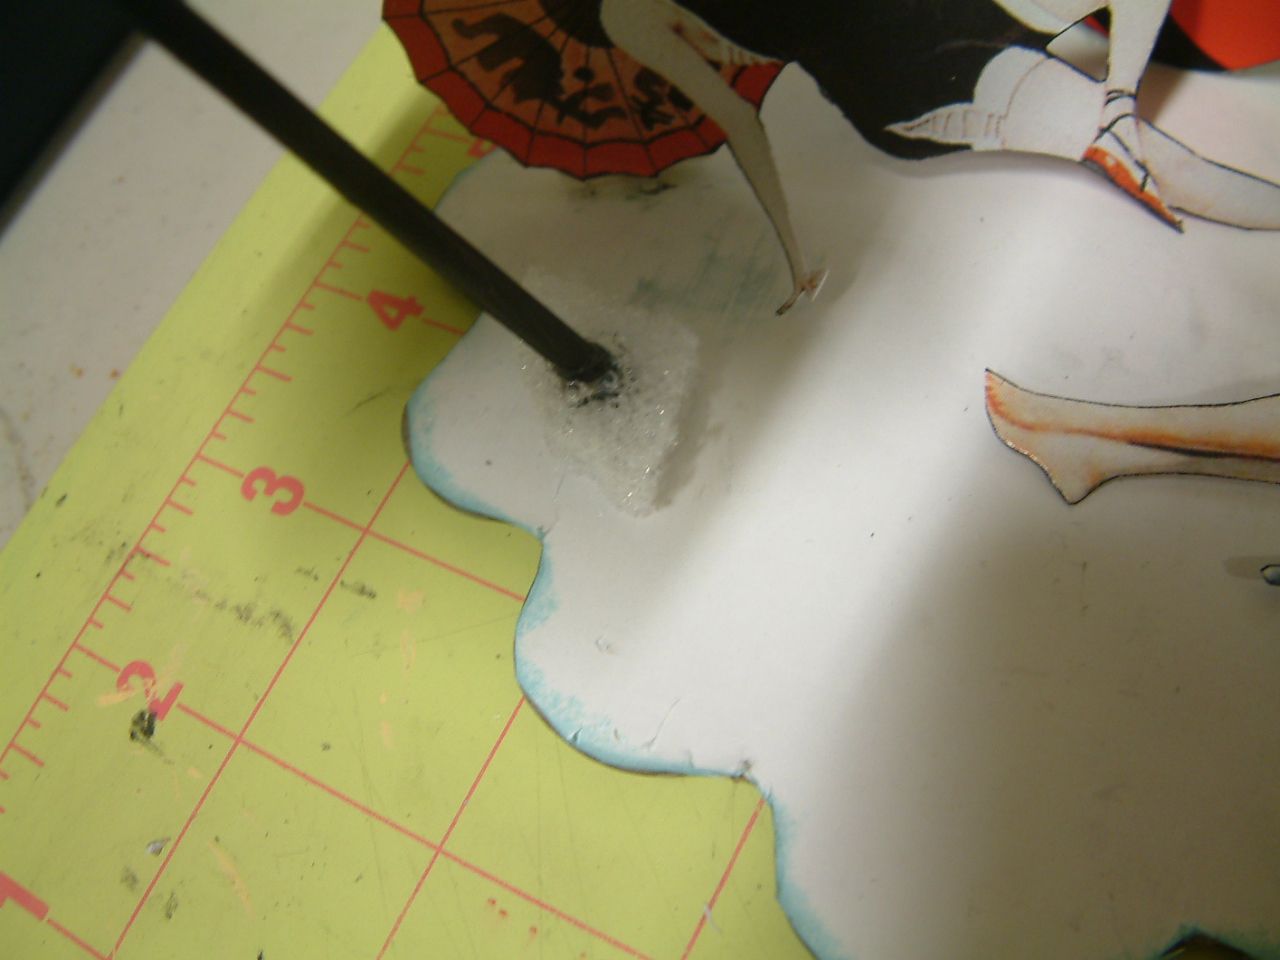
Next, I
drizzled lots of glue onto the base to cover the foam core and Styrofoam. I also added glue in other spots to make it
look like they are sitting on the beach.

I continue
to layer glue and sand allowing the glue to dry between coats until I have the
result I desired.
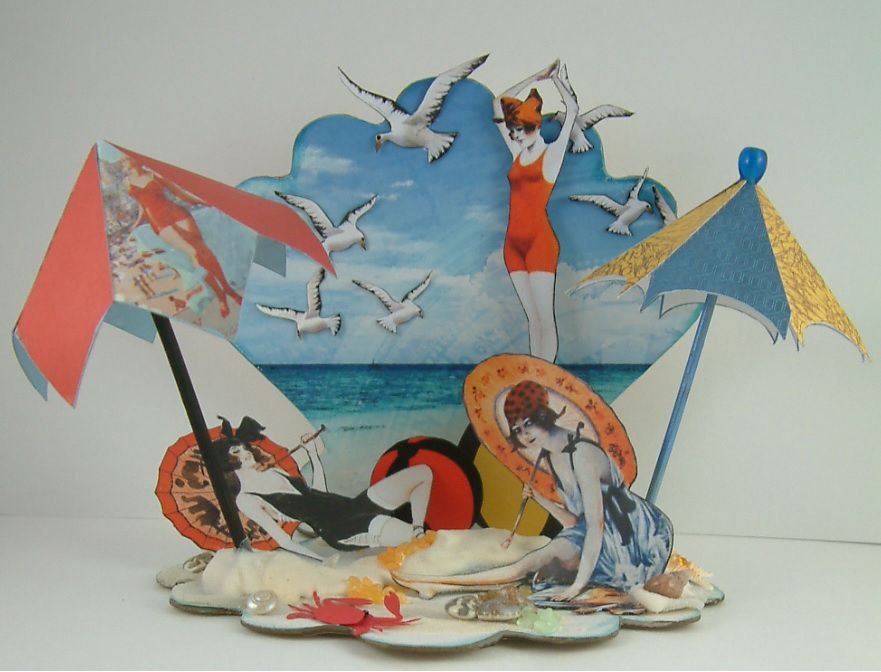
Filled with 1920's women frolicking in the sun

UMBRELLA VIDEO
TUTORIAL
In this
tutorial I’ll show you how to make paper umbrellas. These umbrellas are made from decorative
paper and a wooden skewer. Paper
umbrellas are very easy to make and can be used for your dimensional art
projects or as décor for a party. You
can make them as large or small as you like.
The only limitation is the size of the paper. In the video tutorial below I’ll show you how
to use the four patterns I have created to make different styles and sizes of
umbrellas.

You can make them as large or small as you like. The umbrella below is 15” in diameter. The only limitation is the size of the paper. In the video tutorial below I’ll show you how to use the four patterns I have created to make different styles and sizes of umbrellas.
Supplies
Needed:
Umbrella
Pattern
Decorative
Paper
Glue
Scoring
Tool
Wooden
Skewer
Scissors
Optional:
Bead, trim or other embellishments

Subscribe to:
Posts (Atom)