

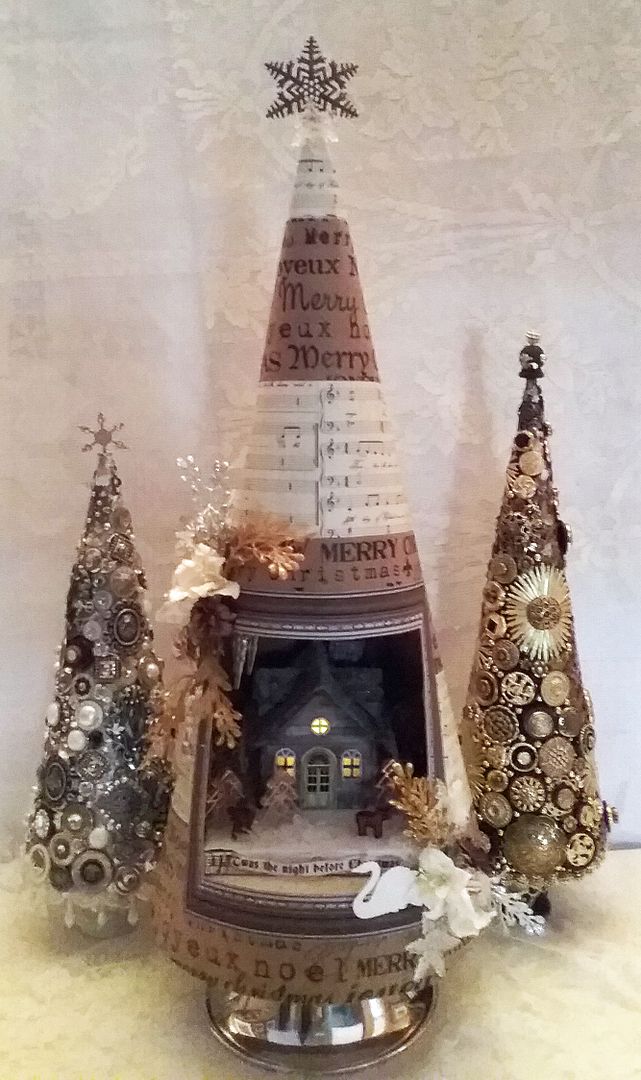
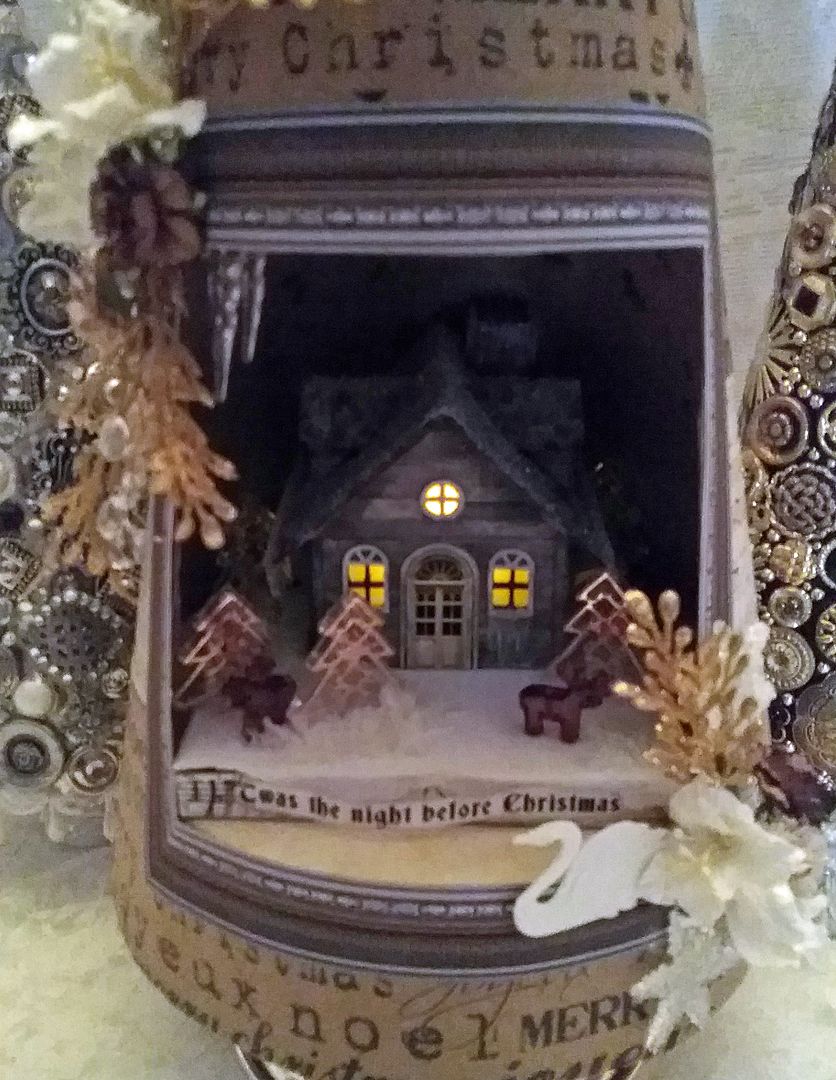
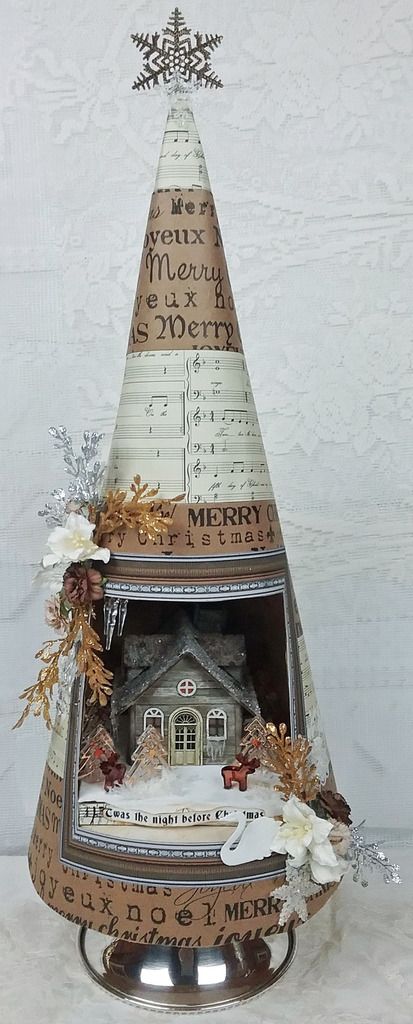
It’s a quiet night as snow falls on a little cabin in the woods. Deer, drawn to the soft light filling the windows and the cabin's warmth, stands motionless in the snow.

This magical scene is made with AlphaStamps new House Ornament Chimney & Dormers and the House Ornament Base. The little cottage in the woods is tucked into a paper tree made using some of AlphaStamps new Christmas scrapbooking papers. I thought it would be a fun change to use a color scheme that is soft and muted rather than my usual colorful projects.
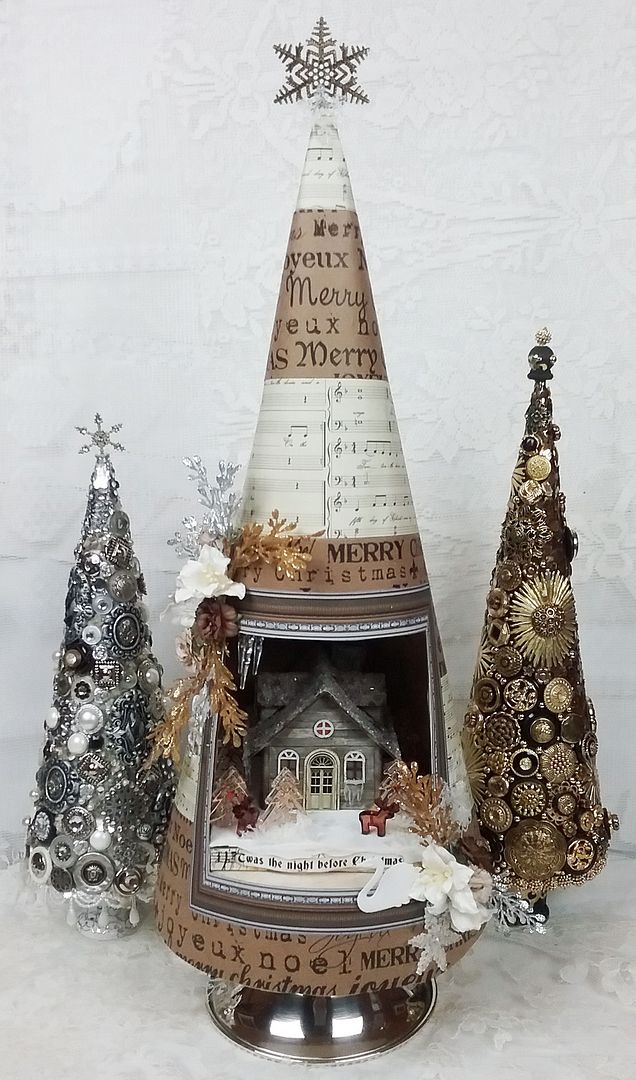
For an added touch, the little cottage is lit with a tea light giving the scene a soft glow.

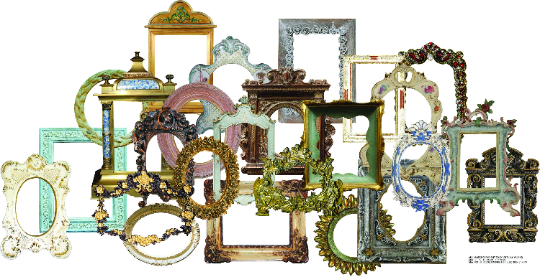
I love using frames in my projects and to add to my two other digital framesets is this new Vintage Frames set, which includes 20 new frames. No doubt you will see me use some of these in future projects.
All of the images in the set can be re-sized for your project as they are high-resolution (300dpi) PNG formatted images. Click on the image below to purchase this digital image set.

THE DETAILS
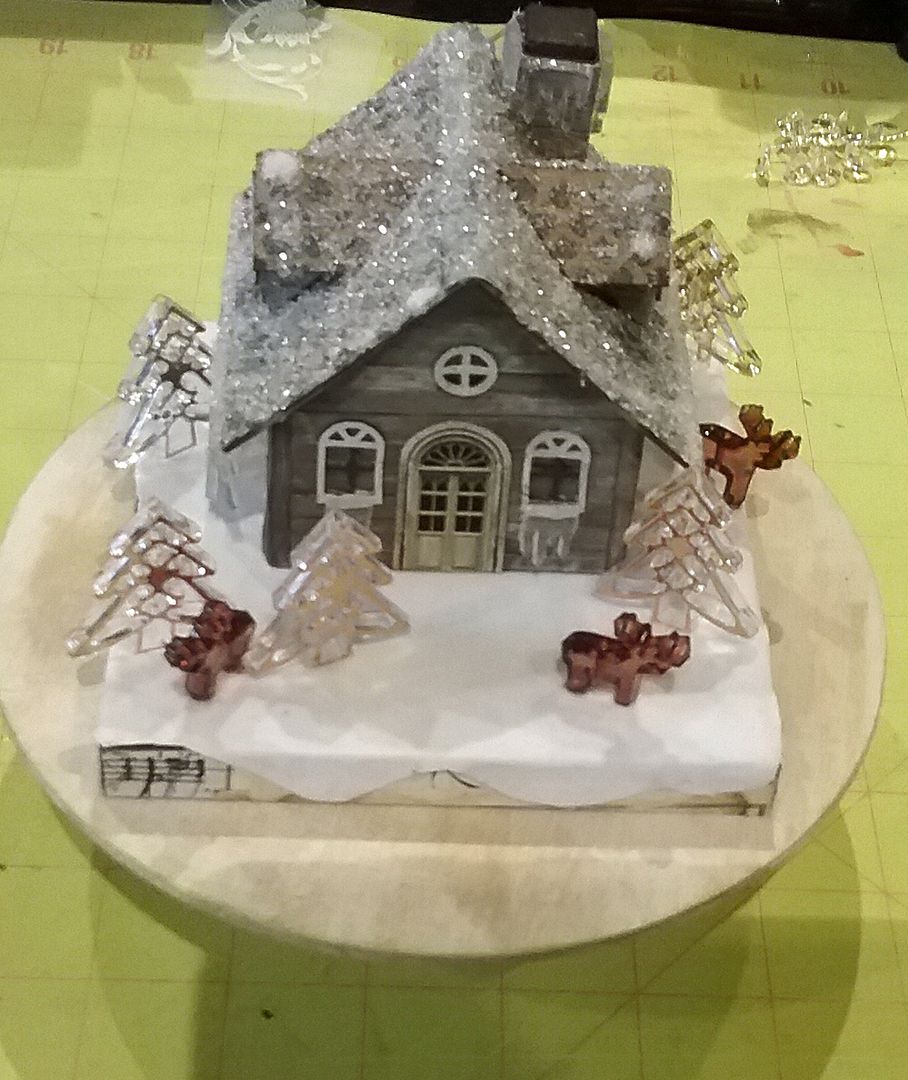
THE HOUSE


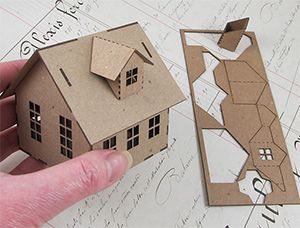
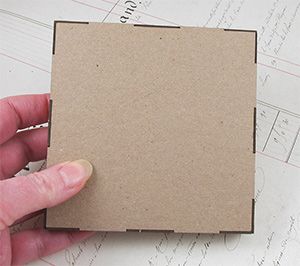
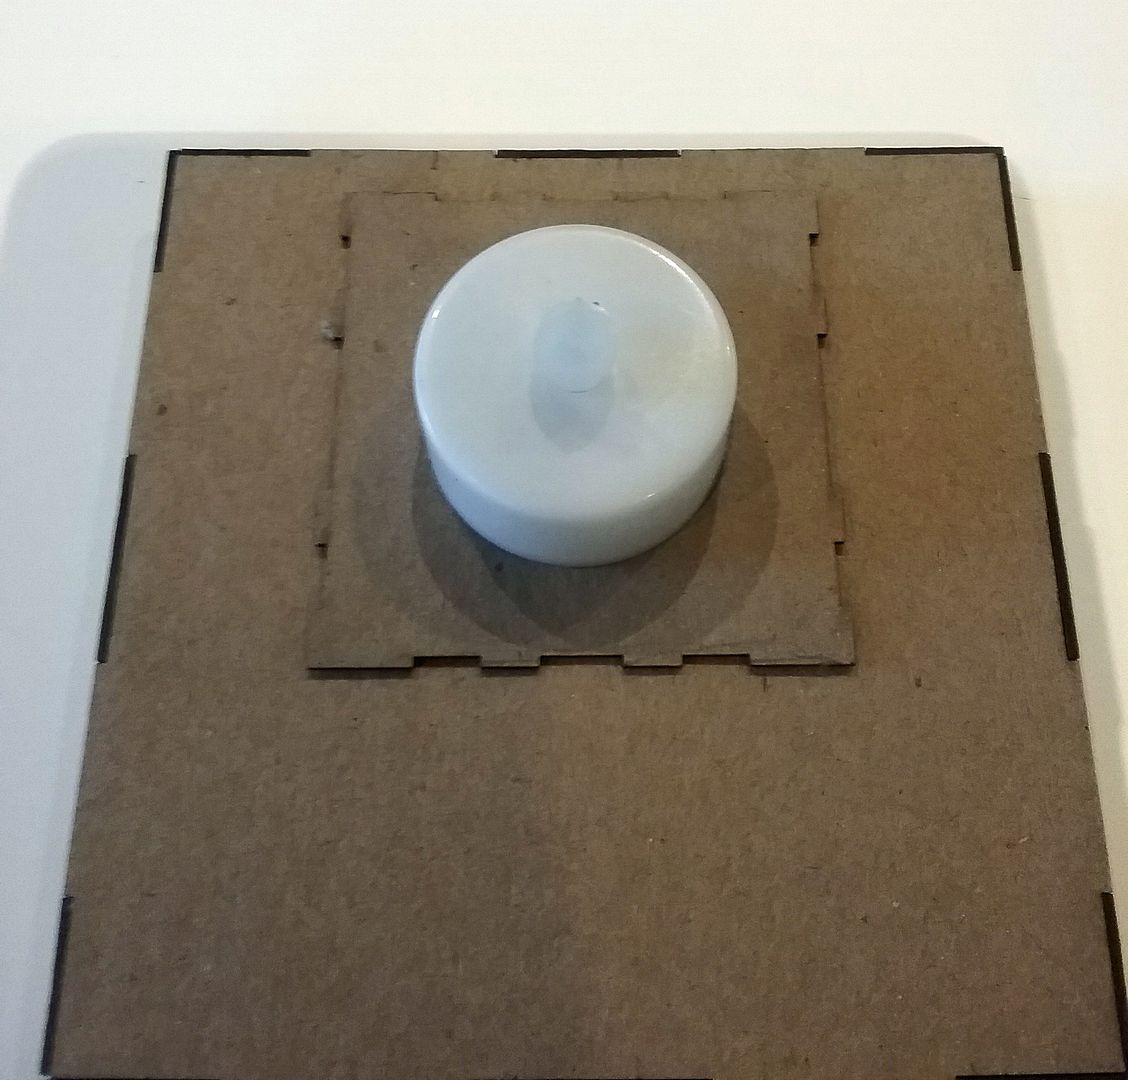
The first thing I need to work out was adding the tea light. Many times I work with sample kits that may be slightly different than the final version. This was the case with this house, as the final version has a trap door on the floor, so you don't need to make a hole like I did to accommodate the light.
In the picture above, you can see the kit and the trap door, which replaces what I did in the picture below.

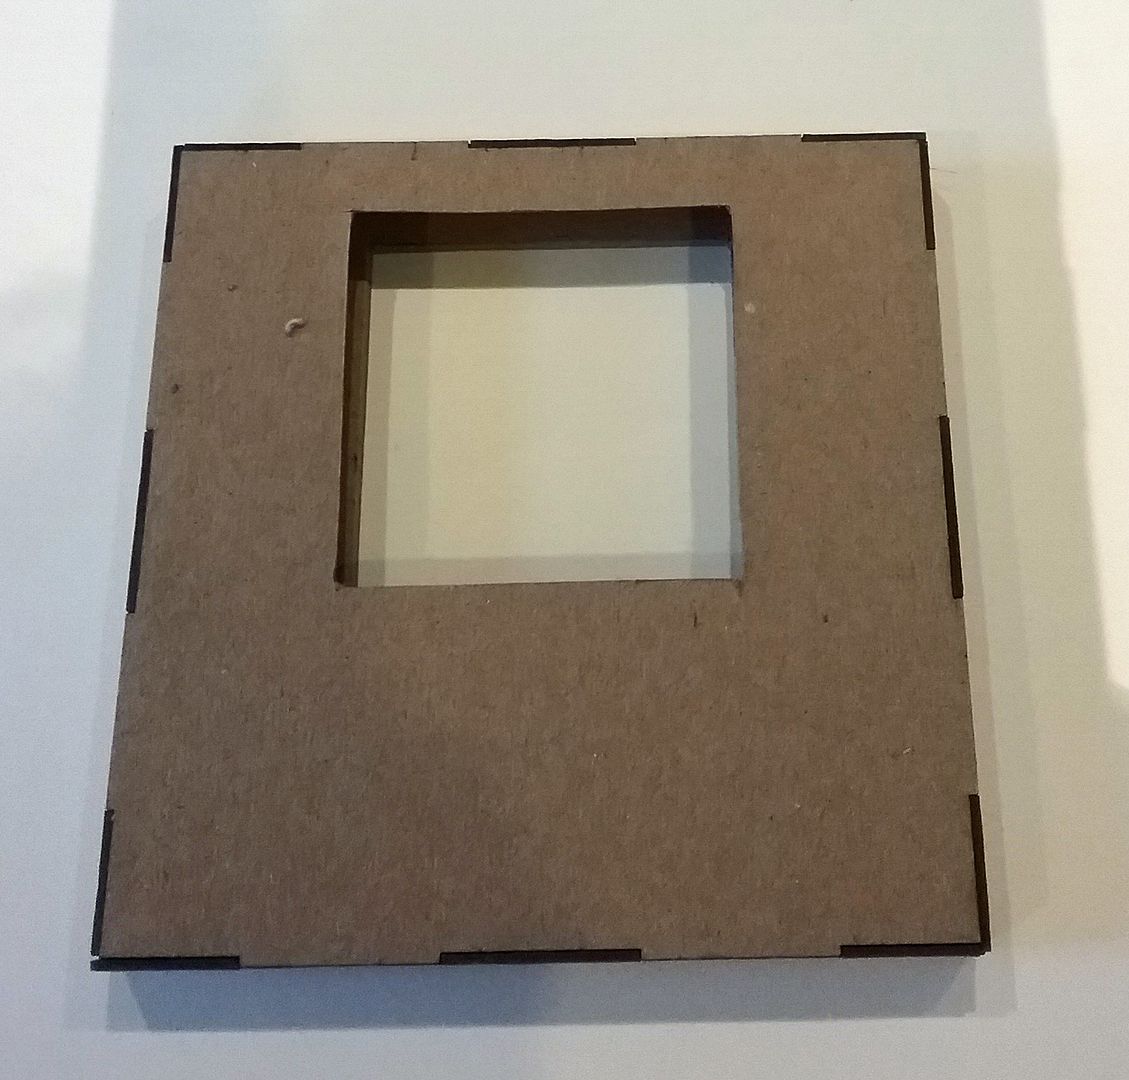
If you want to use the base with a tea light and are gluing the house to the base, then you need to cut holes in the top and bottom of the base in order to reach the tea light switch and replace the battery.
Next, I glued pieces of vellum to the backs of the windows.
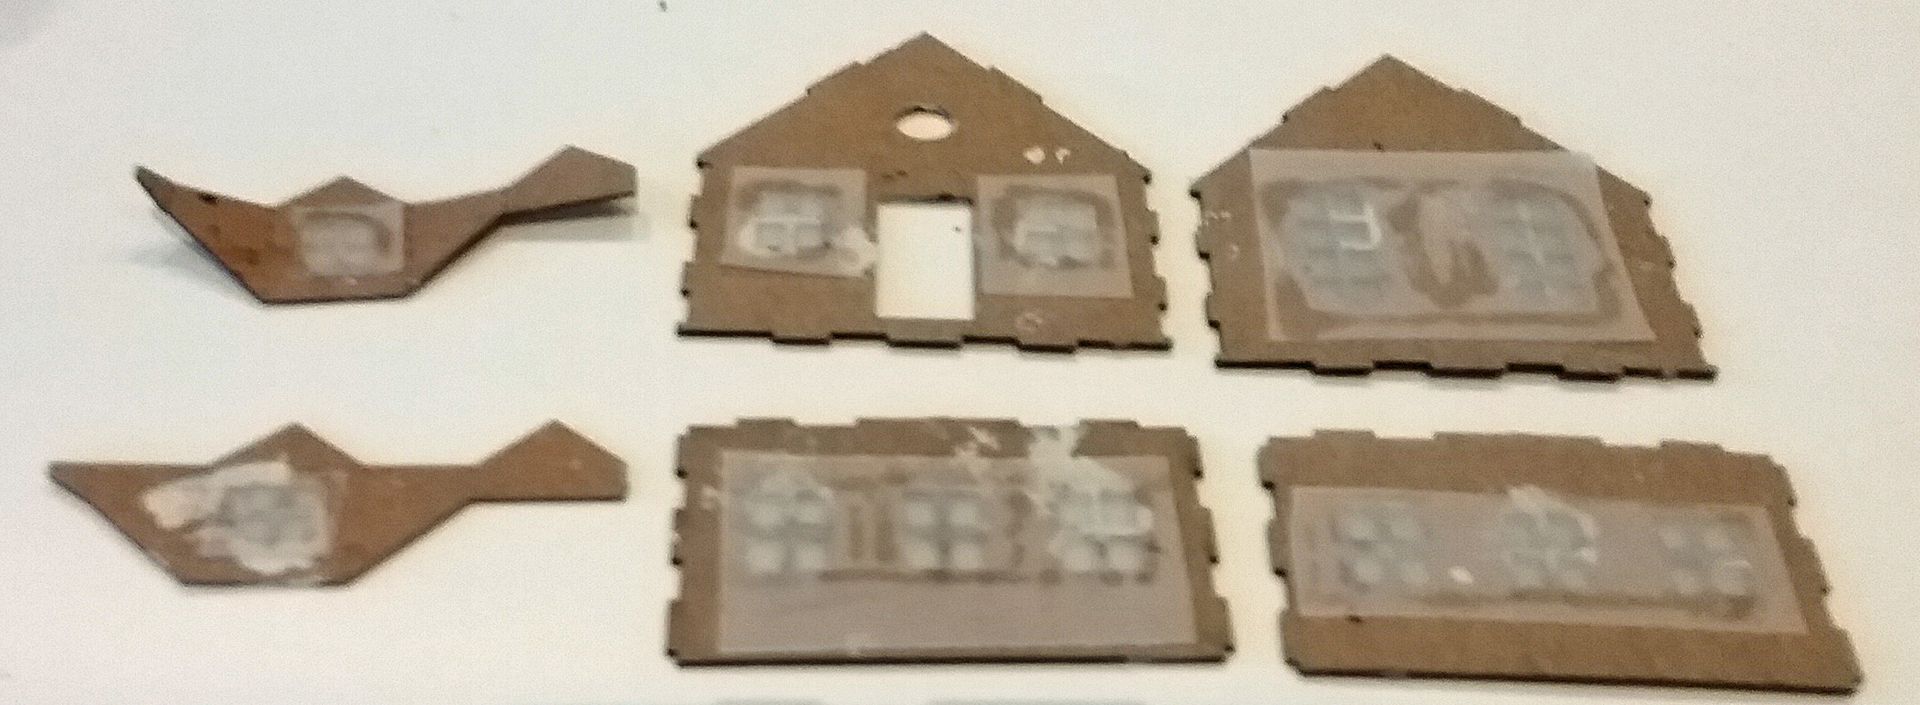
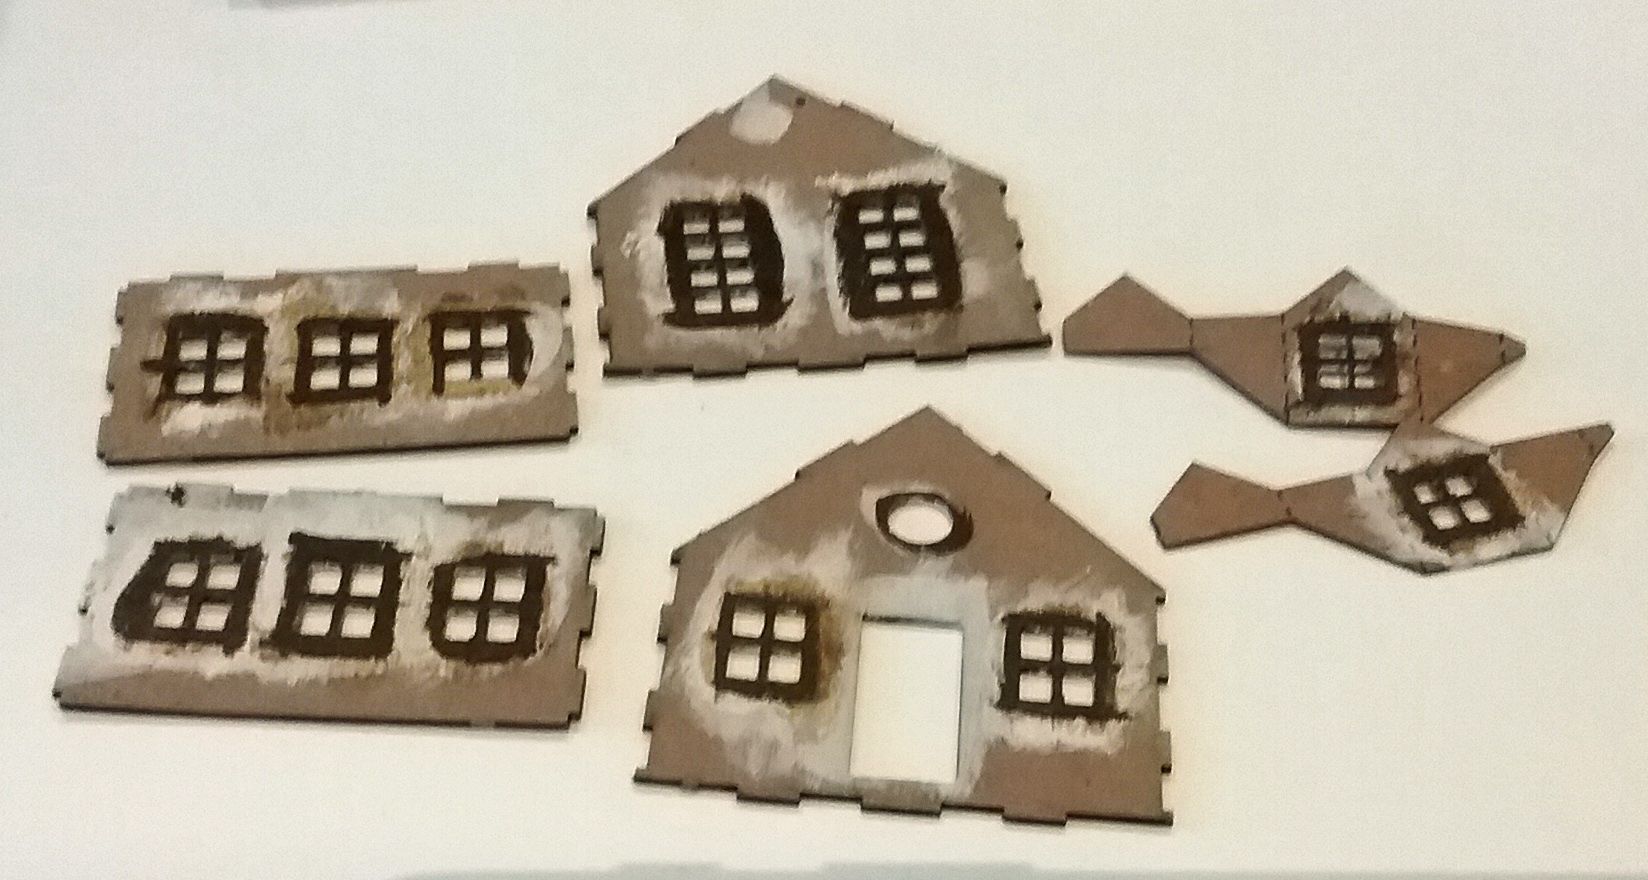
I used the Tiny Shingles Stencil for the roof to apply brown shingles.
NEXT:
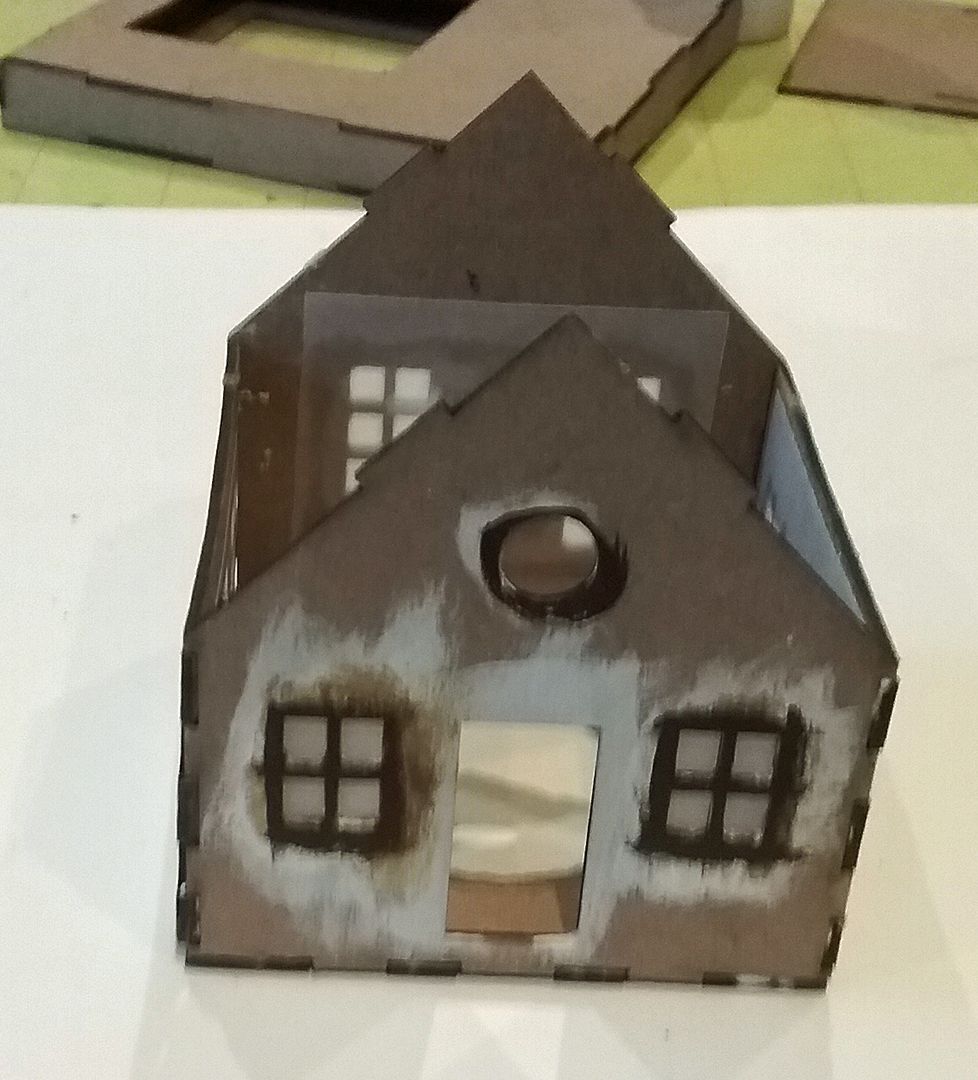
- I added a front door from the Tiny House Trims collage sheet
- Glue on chipboard House Ornament Window Trims
- I glued the roof and dormers on the house
- Glued the chimney to the roof (it is covered in wood paper with the top painted brown)
- Attached acrylic icicles to the sides of the roof and the chimney after I used Glossy Accents to attach Diamond Dust
- I covered the roof, dormers, and chimney with glue with Diamond Dust.
- I added scrapbook paper to the base and then the faux white suede paper.
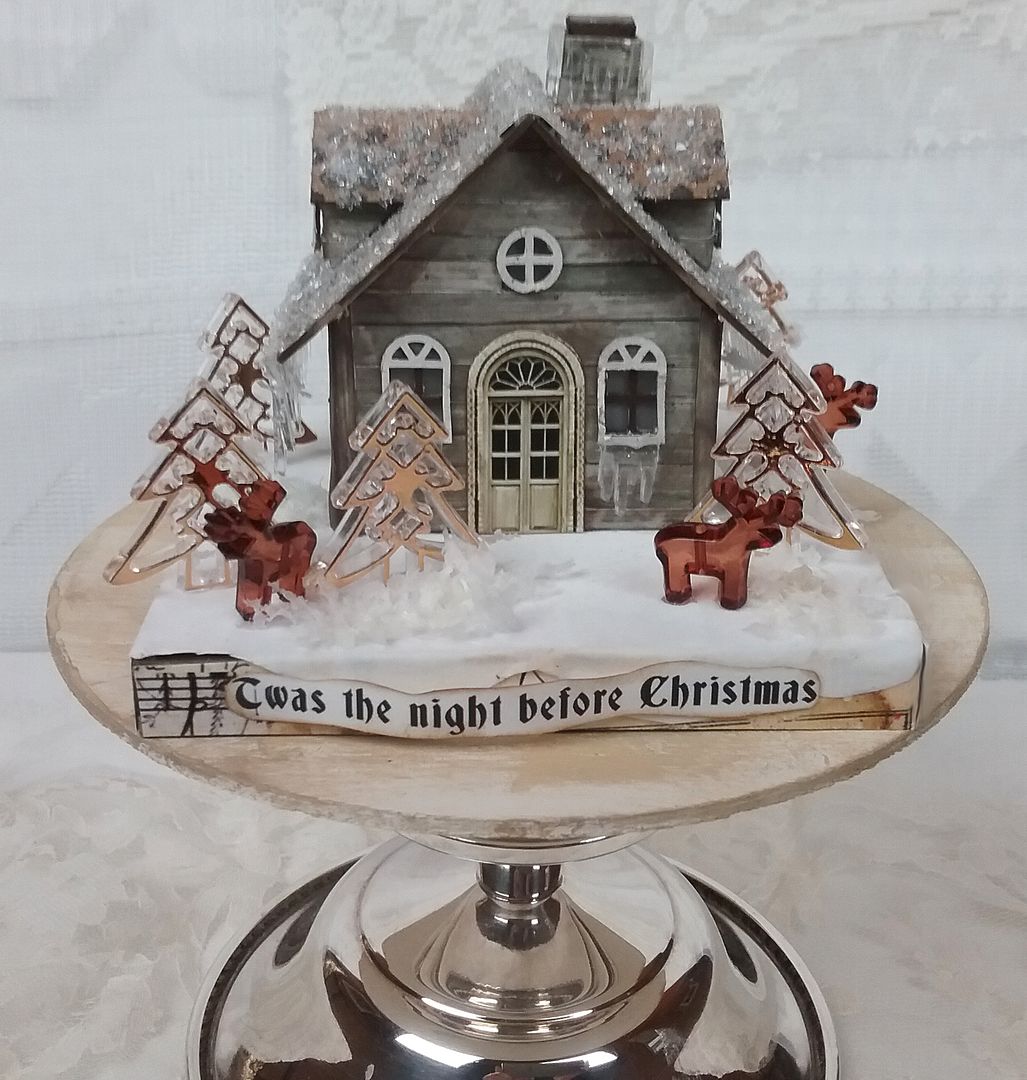
- I glued the trees and reindeer in place and then attached plastic snow from my stash
- “Twas, the Night Before Christmas”, comes from the Mini Christmas Titles collage sheet

HOUSE ORNAMENT WINDOW TRIMS

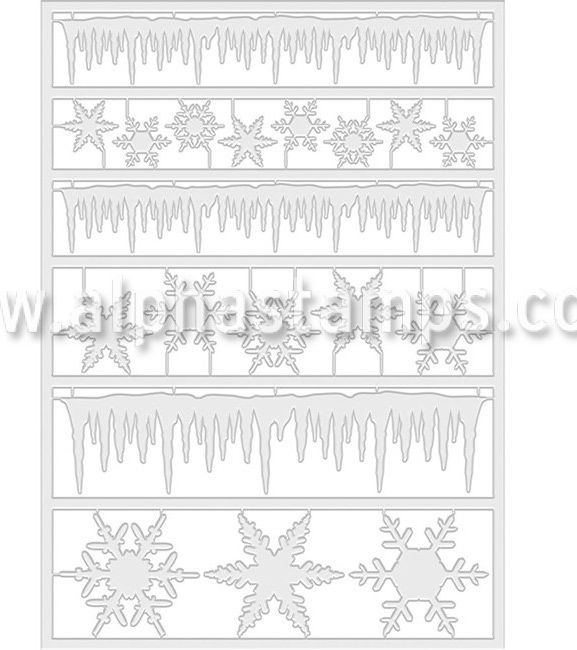
FROZEN CLEAR ICICLE BORDERS & SNOWFLAKES
I used the snowflakes to decorate the outside
I used the snowflakes to decorate the outside
THE TREE
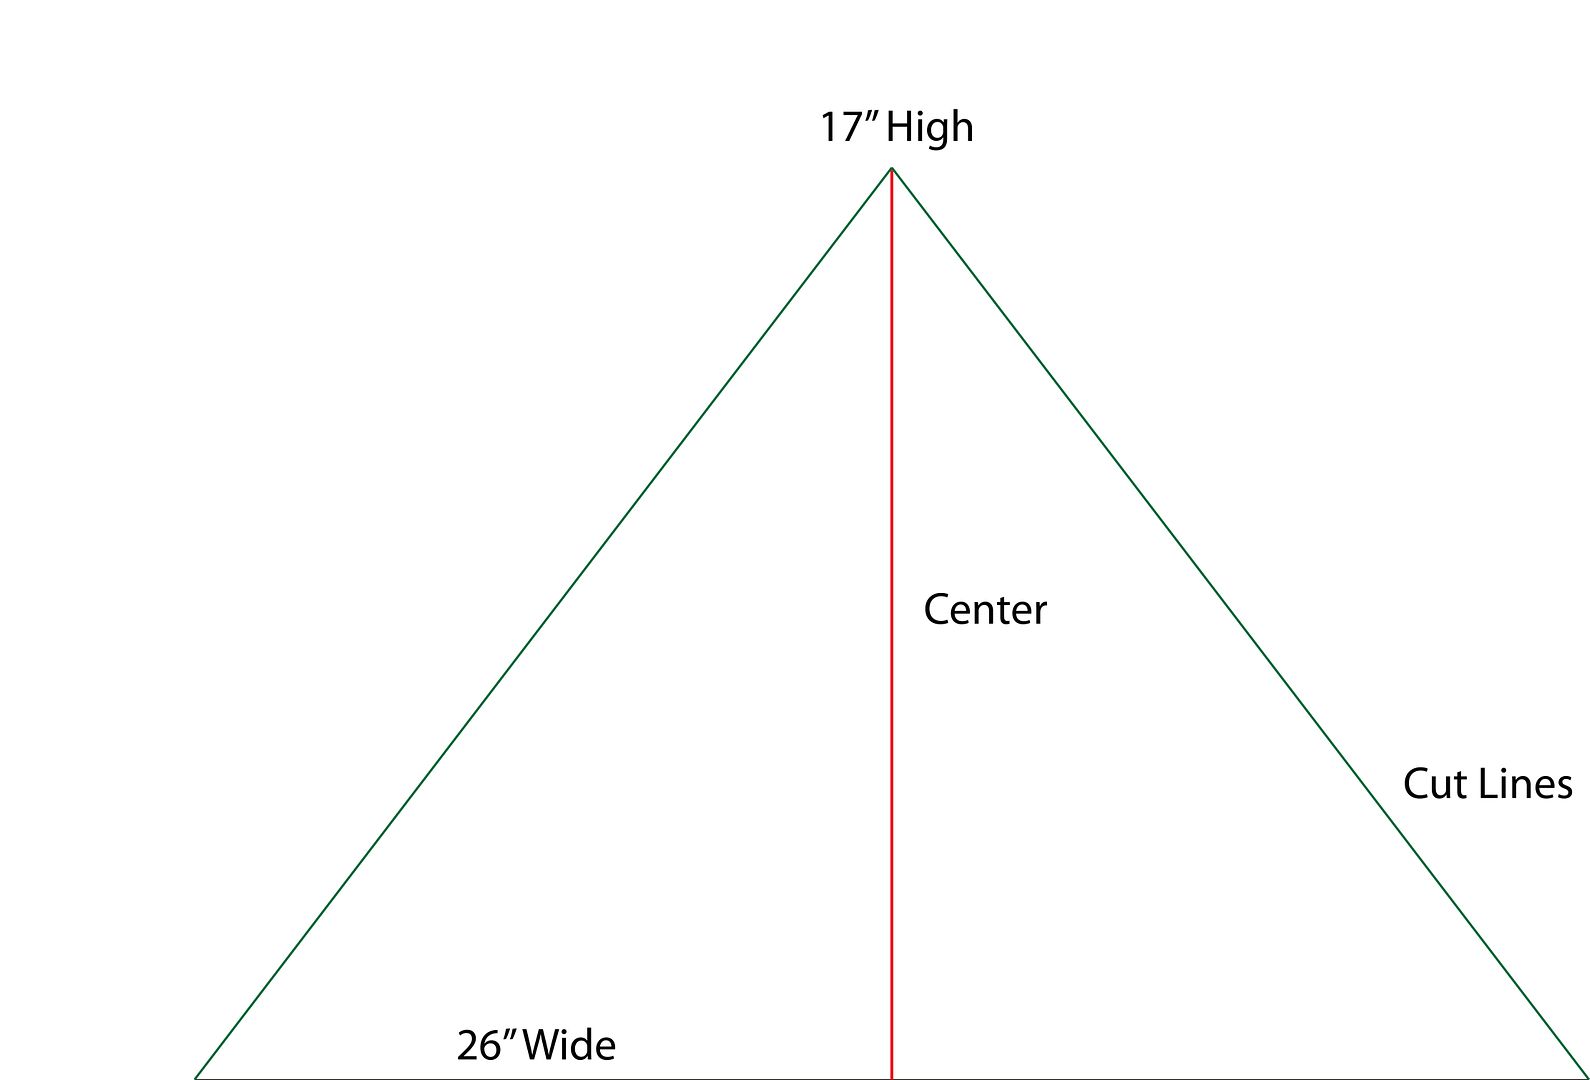
I started by determining the dimensions of the tree. The paper I used for the base is the kind you use to wrap packages for mailing. I choose it because of its size and thickness, plus since it comes in a roll it wants to roll up naturally.
 Things to consider when determining the dimensions of the tree:
1. The size of the base (round wood base) is a guide to the width of the bottom of the tree.
 Next, draw a line from the mark at the top to each edge of the base (green lines). Cut along the lines, and you have your triangle.
 Next, I applied some white rub-on from my stash to the sides of the opening.
PUTTING THE TREE TOGETHER AND ADDING EMBELLISHMENTS
2. The tree needs to be tall enough to accommodate the opening and the base and look balanced.
3. The opening needs to be large enough to see the house and remove it (if you need access to the light).
3. The opening needs to be large enough to see the house and remove it (if you need access to the light).
TREE BASE WIDTH
The circumference of my round wooden base is 21”. You'll want to add extra for wrapping and gluing the edges. Better to have the base too wide than too narrow, as you can overlap the edges more when gluing them together. Also, the tree gets narrower as it goes up from the bottom, so it has to be large enough that when you insert the wooden round base inside, it will fit. The round wooden base will be a few inches up inside the tree, which is narrower than at the base.
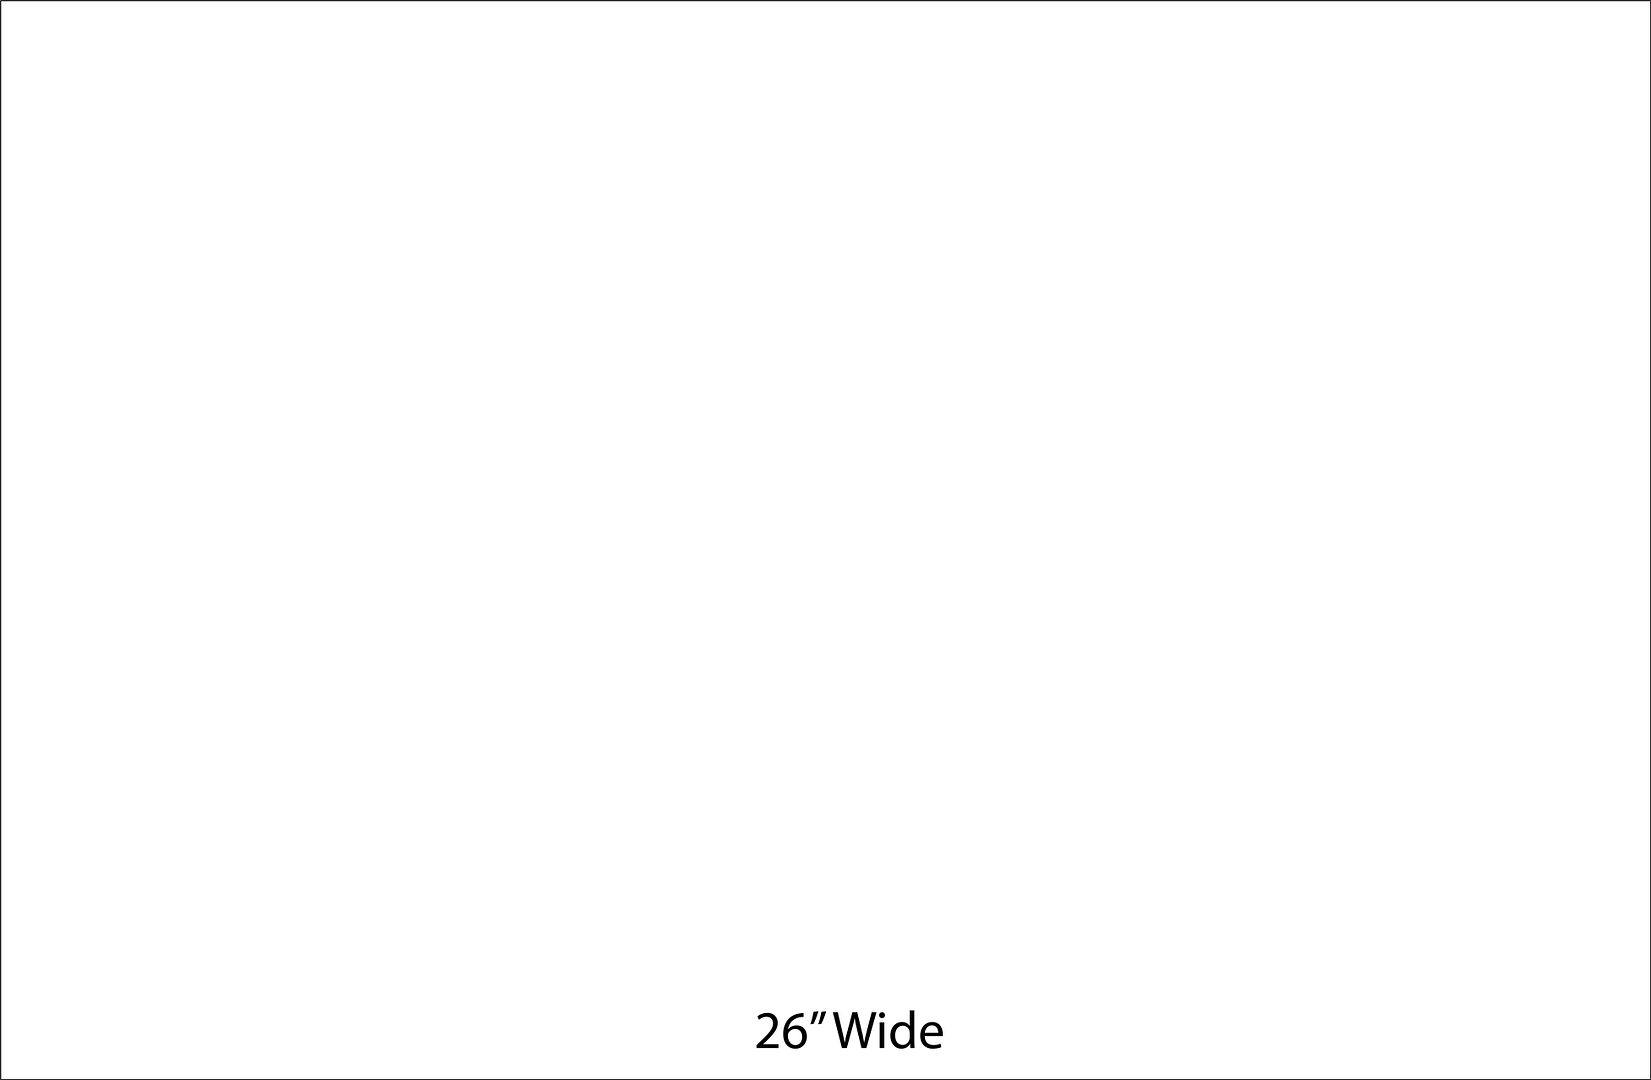
I cut out a piece of wrapping paper that was 26” wide. The height of the paper at this point didn’t matter as the paper was more than high enough.
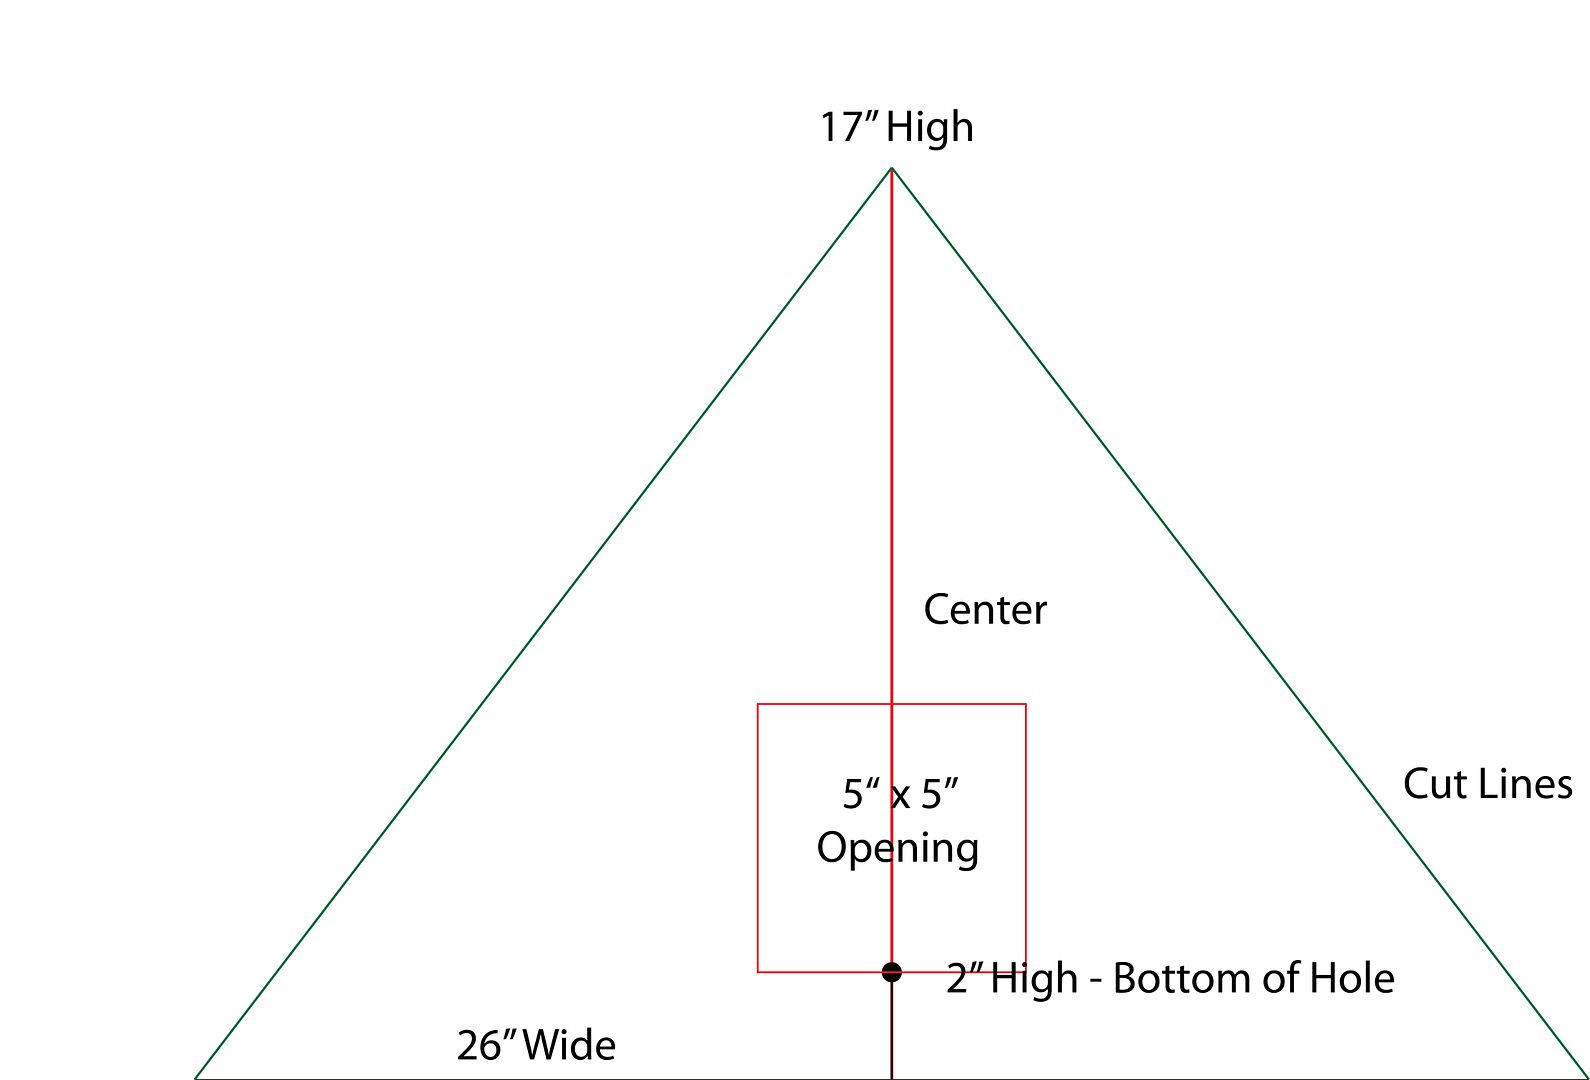
HOLE DIMENSION
For the opening measurement, I used 5” by 5” large enough to see the scene and remove the house and chipboard base to access the light.
HOLE PLACEMENT
The size of the hole and its placement are factors in determining the tree's height. I decided I wanted the hole to start 2" above the bottom of the tree. The round wooden base will be glued inside the tree just a little bit lower than the bottom of the opening. The 2" of the tree at the bottom covers the candlestick holder and the very top of the silver bowl. See in the picture below where the hole will be. Also, notice how the hole is centered.
TREE
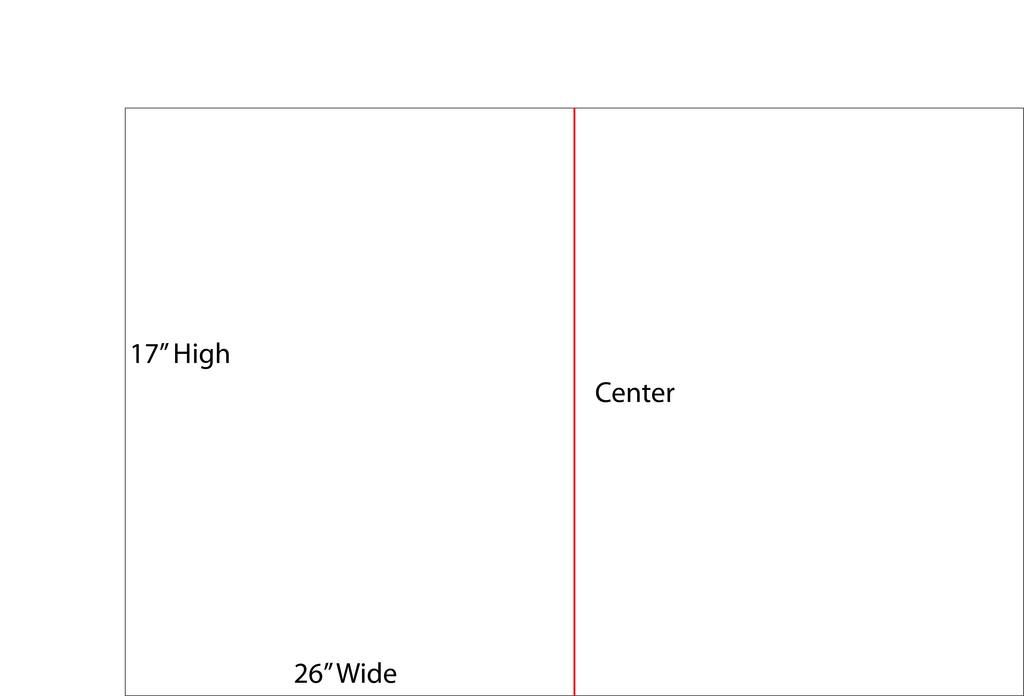
I decided to use 17” for the height by kind of trial and error method. I had allowed 2" for the bottom plus 5" for the hole, which was a total of 7". To determine how much more to add to the height, I rolled the paper into a tree shape and decided what height looked the best. Too short and you won’t have enough room in the tree for the house; too tall and the piece looks unbalanced (too much tree above the opening). I decide to add another 10" to the tree height, which gave me a total of 10".
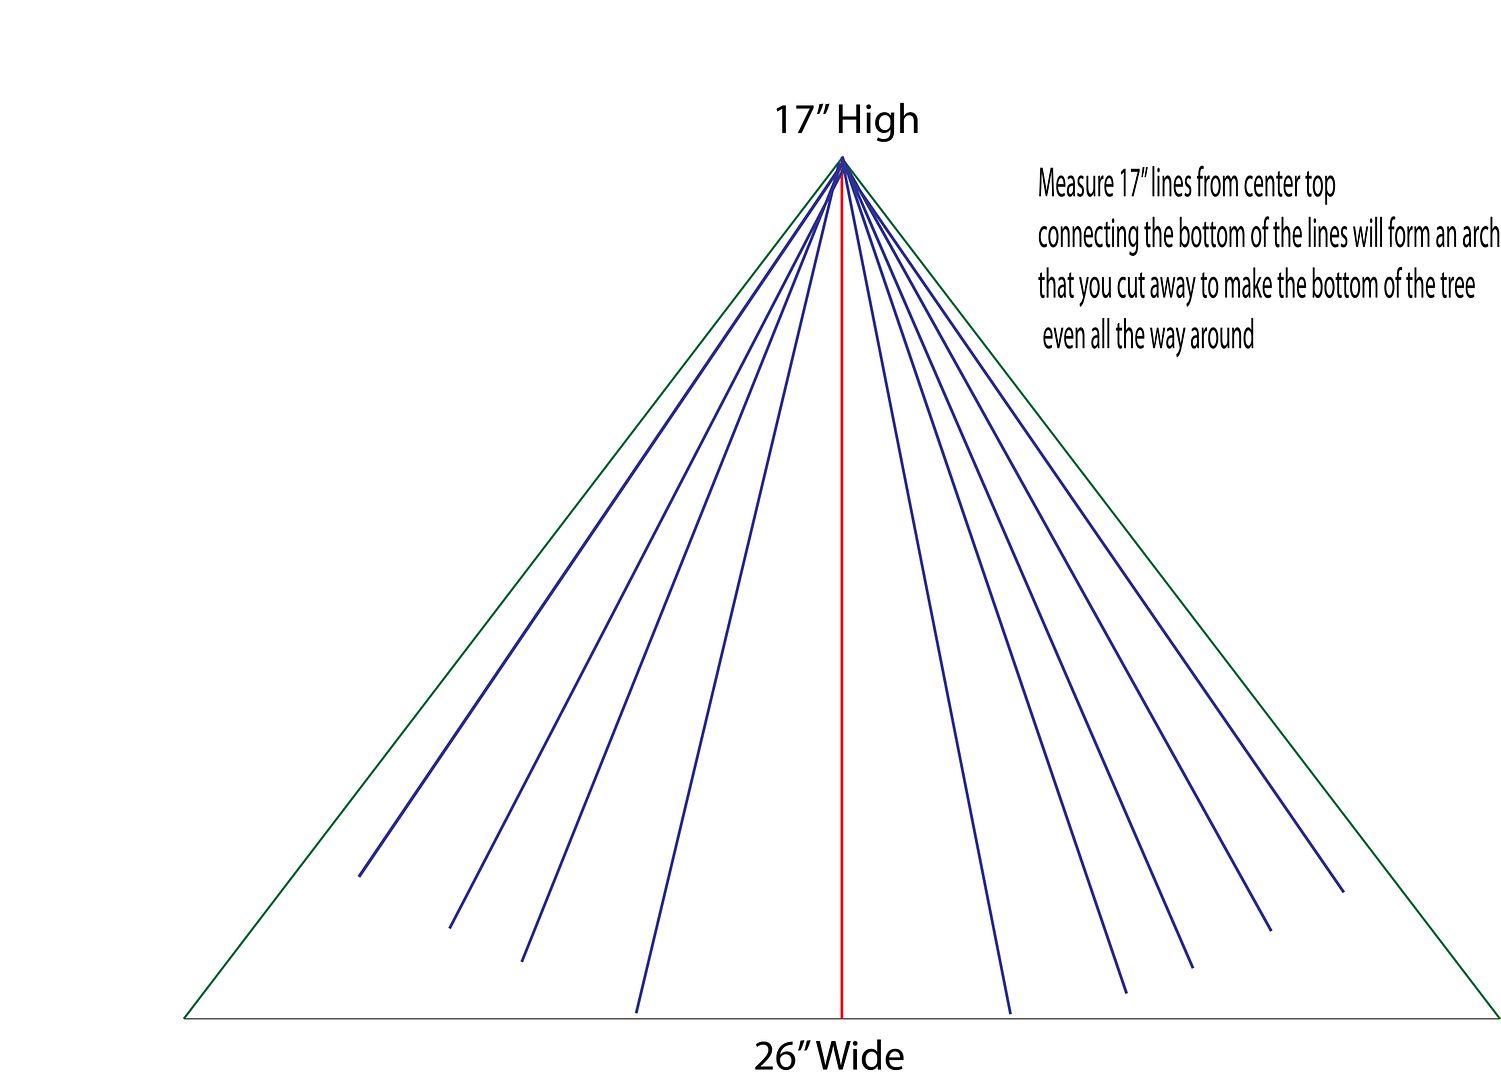
Next, I cut out a triangle. From the center of the base, measure up 17" and mark.
ADD DECORATIVE PAPER
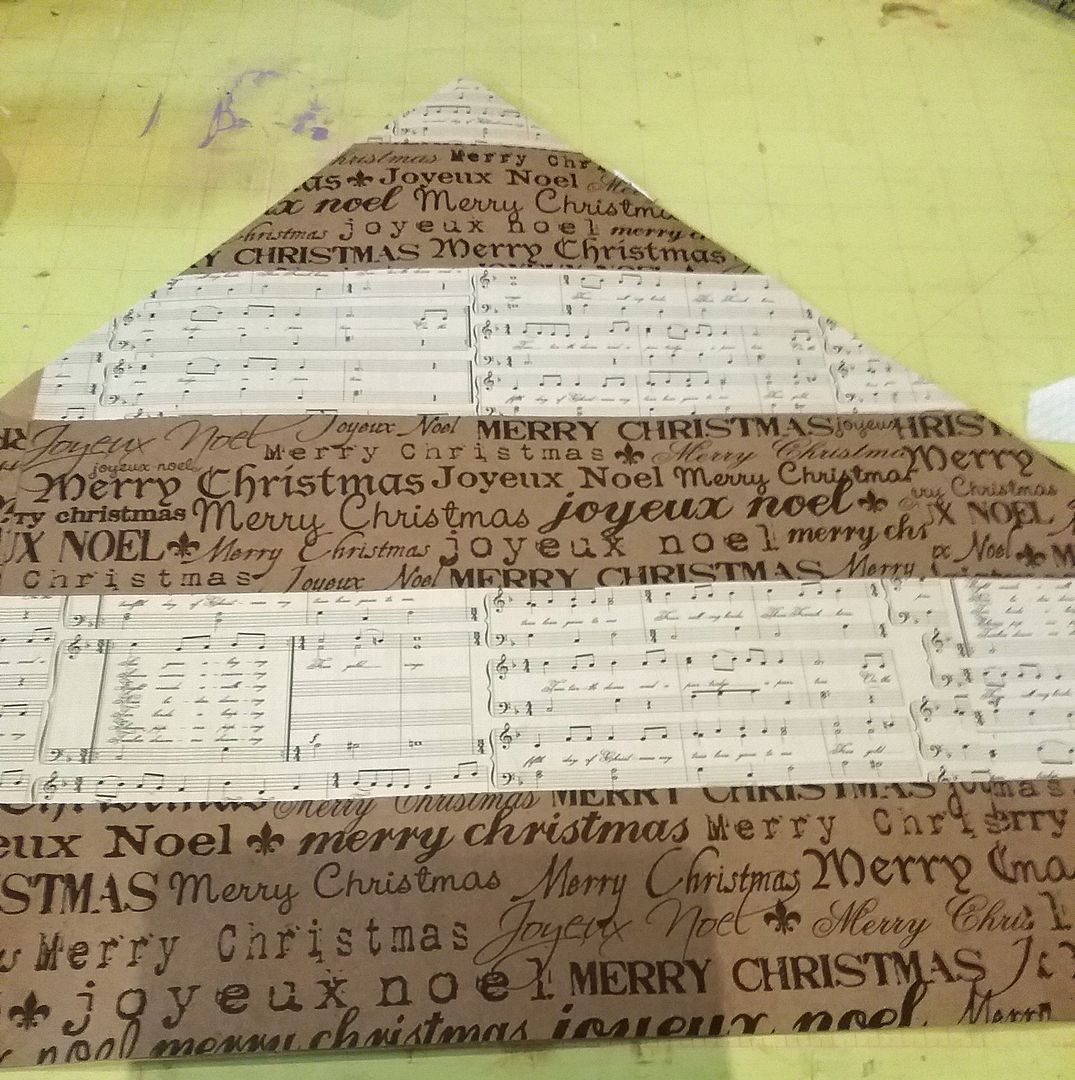
I decided to cut 2 different papers into strips and glue them to the wrapping paper at an angle.
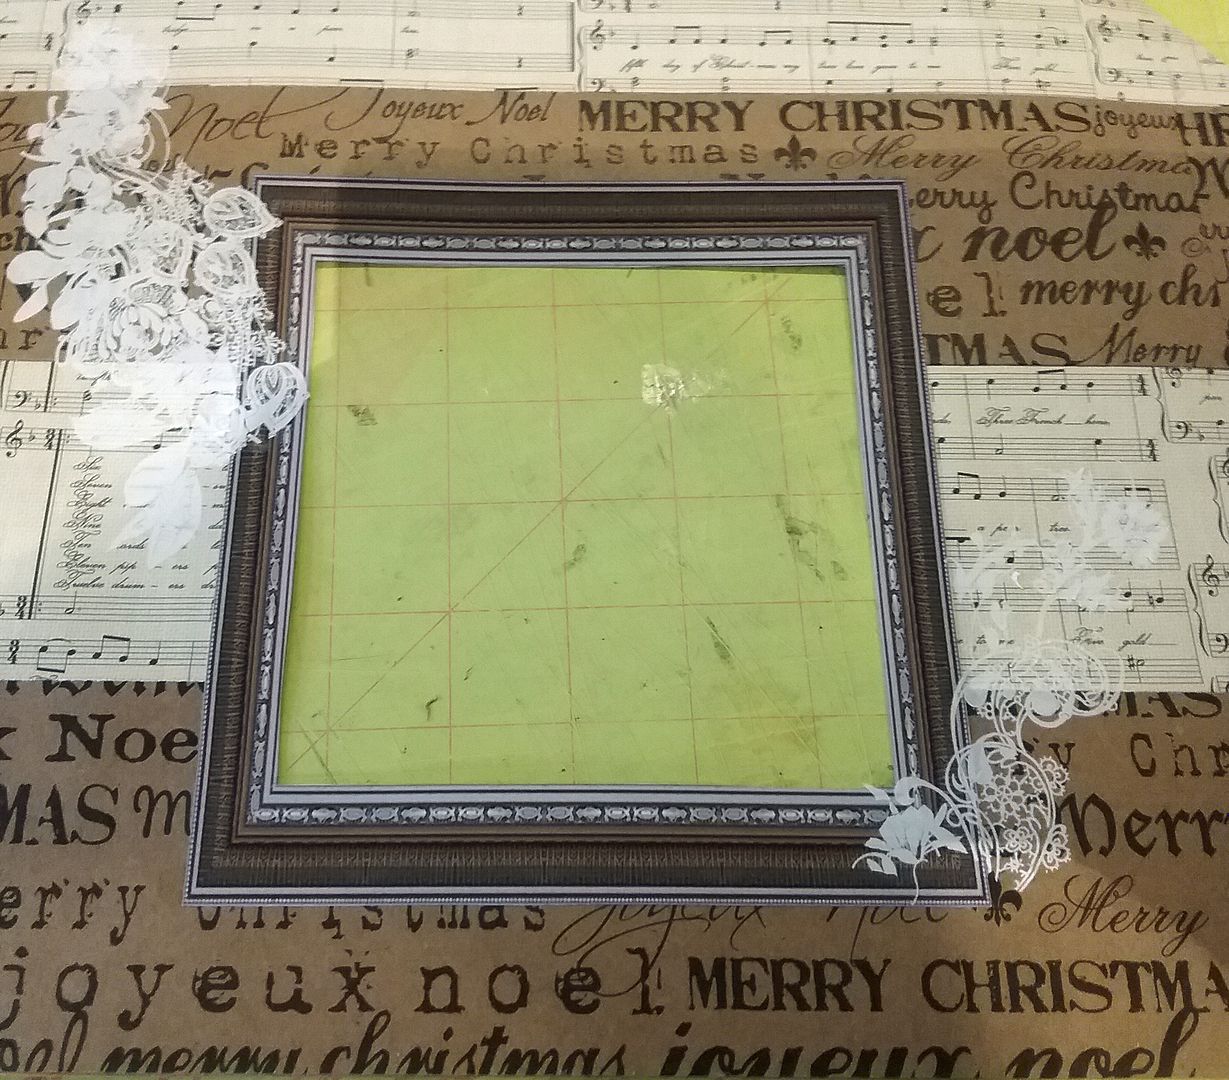
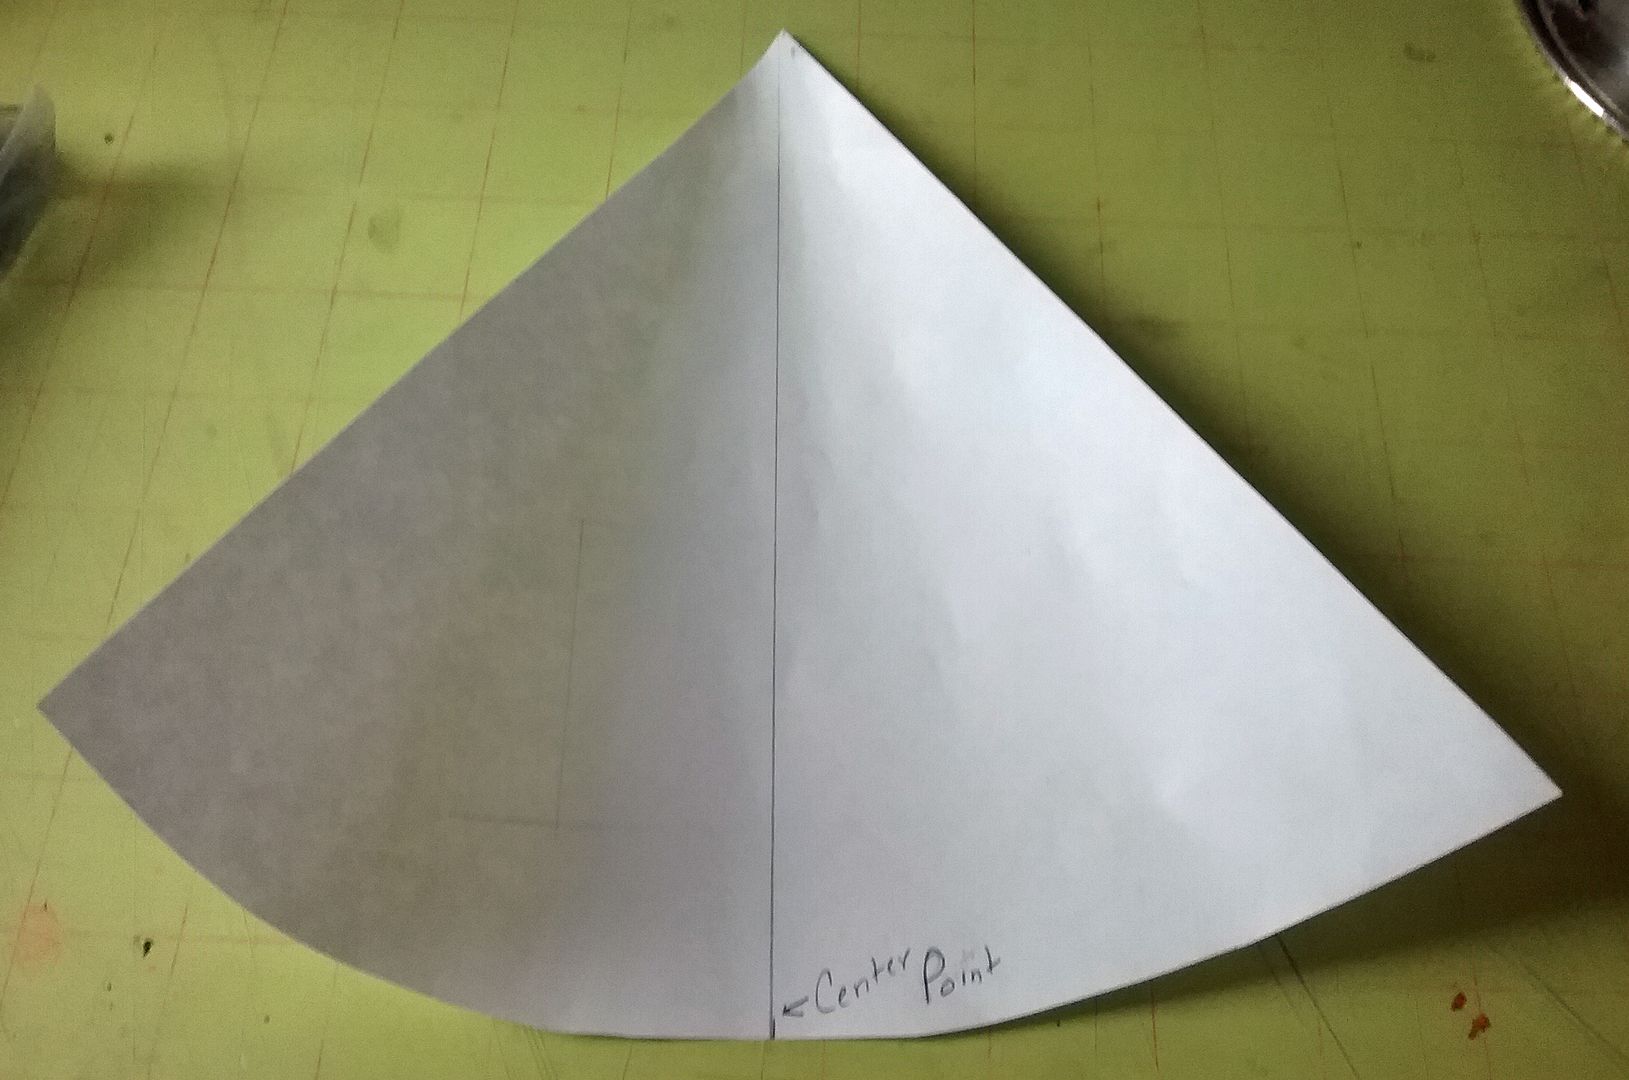
I marked and cut open the hole (see the diagram below), then glued the frame from the Vintage Frames download set over the hole. Since the frames are .png files, you can size them to fit your hole.
MAKING THE BOTTOM OF THE TREE EVEN
Before gluing the tree edges together into a cone shape, you need to level out the bottom of the tree, as it will not be even on the bottom. The bottom of the triangle shape needs to be rounded. Using the height measurement (17”), measure from the top point to the base and mark, moving along the base marking 17" inch or so. Once you have marked the entire bottom of the tree, use those marks (blue lines below) as a guide to cut away the paper, and you will have a rounded bottom which will be even when you glue the edges together.
PUTTING THE TREE TOGETHER AND ADDING EMBELLISHMENTS
Glue the edges of the tree together (they should overlap), forming a cone shape. Being mindful of the diameter of the base. I suggest checking that the base will fit in the bottom before gluing, in this case, 2" up from the bottom (I clipped and marked mine before gluing). Remember that 2" up in the cone it is not ad large around as it is in the base. In the case of my tree, the round wooden base was 21" around, but my base at the bottom is bigger, so 2" up, it is 21" around.
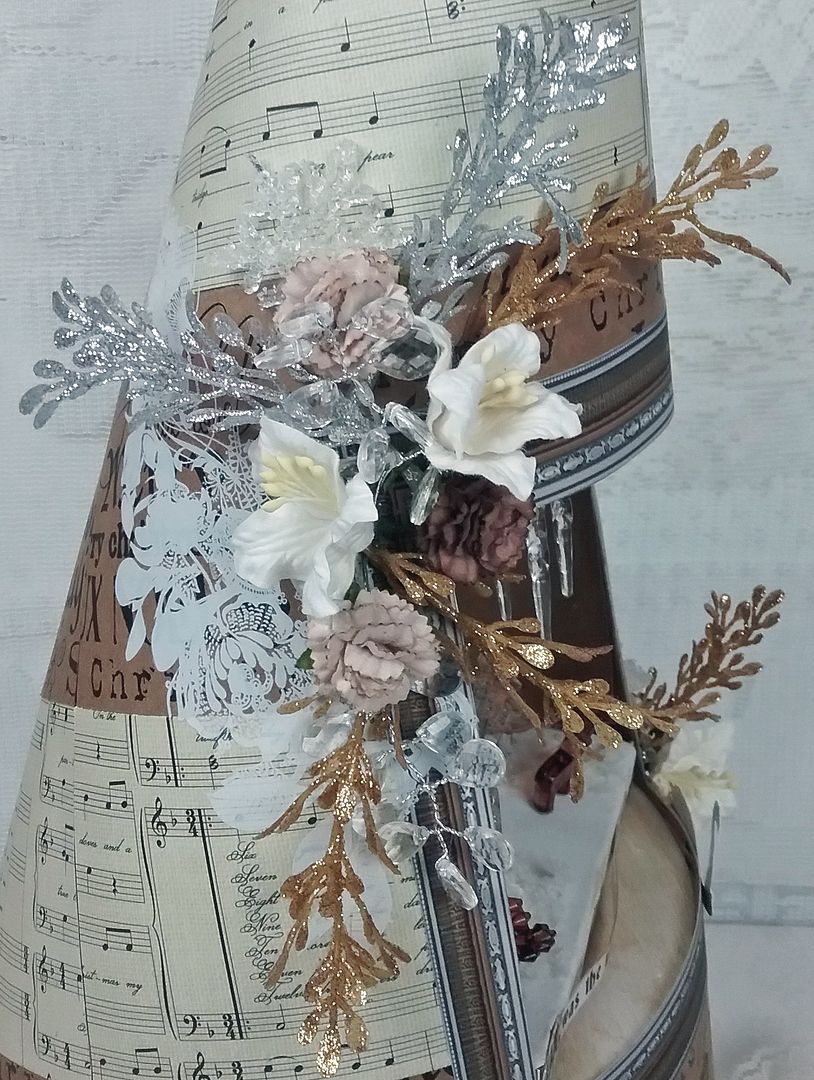
I added more of wrapping paper to the inside of the tree to cover the seam where the sides are glued together. The color of the wrapping paper worked fine for the color scheme I was using. I also glue gold and silver stars to the inside of the tree.

Next, I added all of the embellishments to the sides of the frame. At this point, I had not yet glued thee the round wooden base inside the tree.
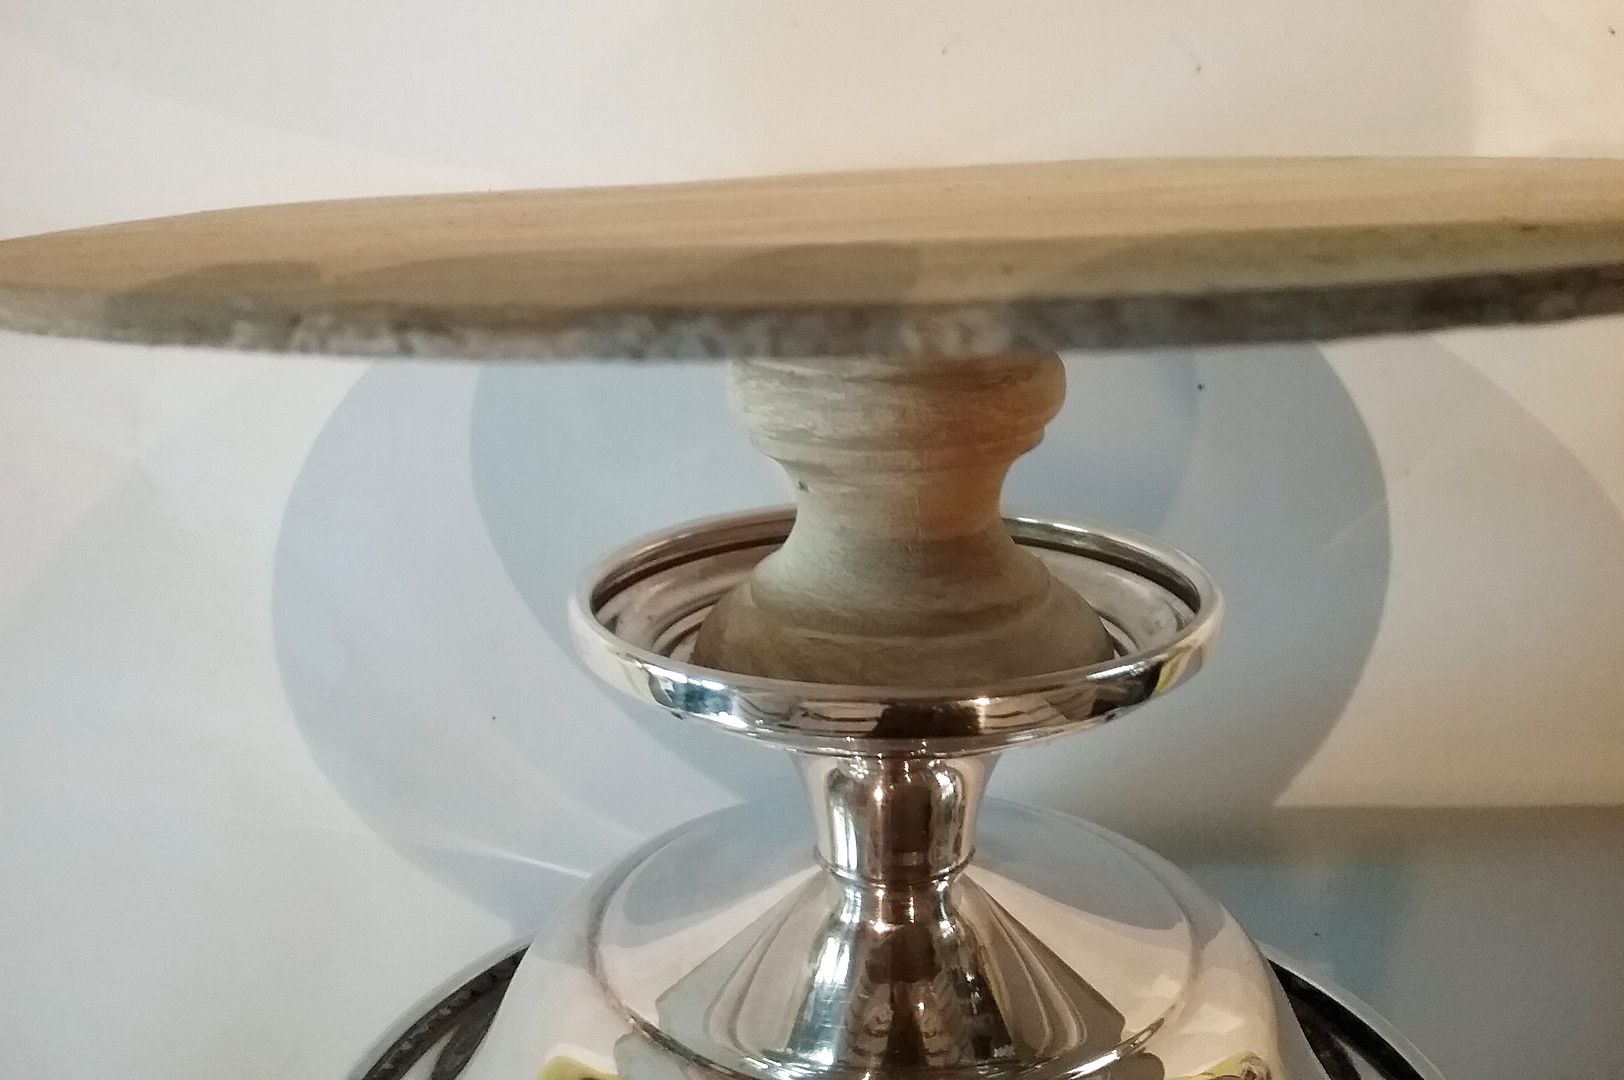
THE STAND
The round wood base is from my stash. I glued a wooden candlestick holder to the round wood base. The combination chipboard house and base are NOT glued to the round wooden base. By not gluing it in place, I can remove it via the opening in the tree and turn the light on and off.
I had originally thought that I would just use the candlestick as the base, but it didn’t make the stand high enough to appear at the right height in the opening, and I didn’t think it had enough sparkle.
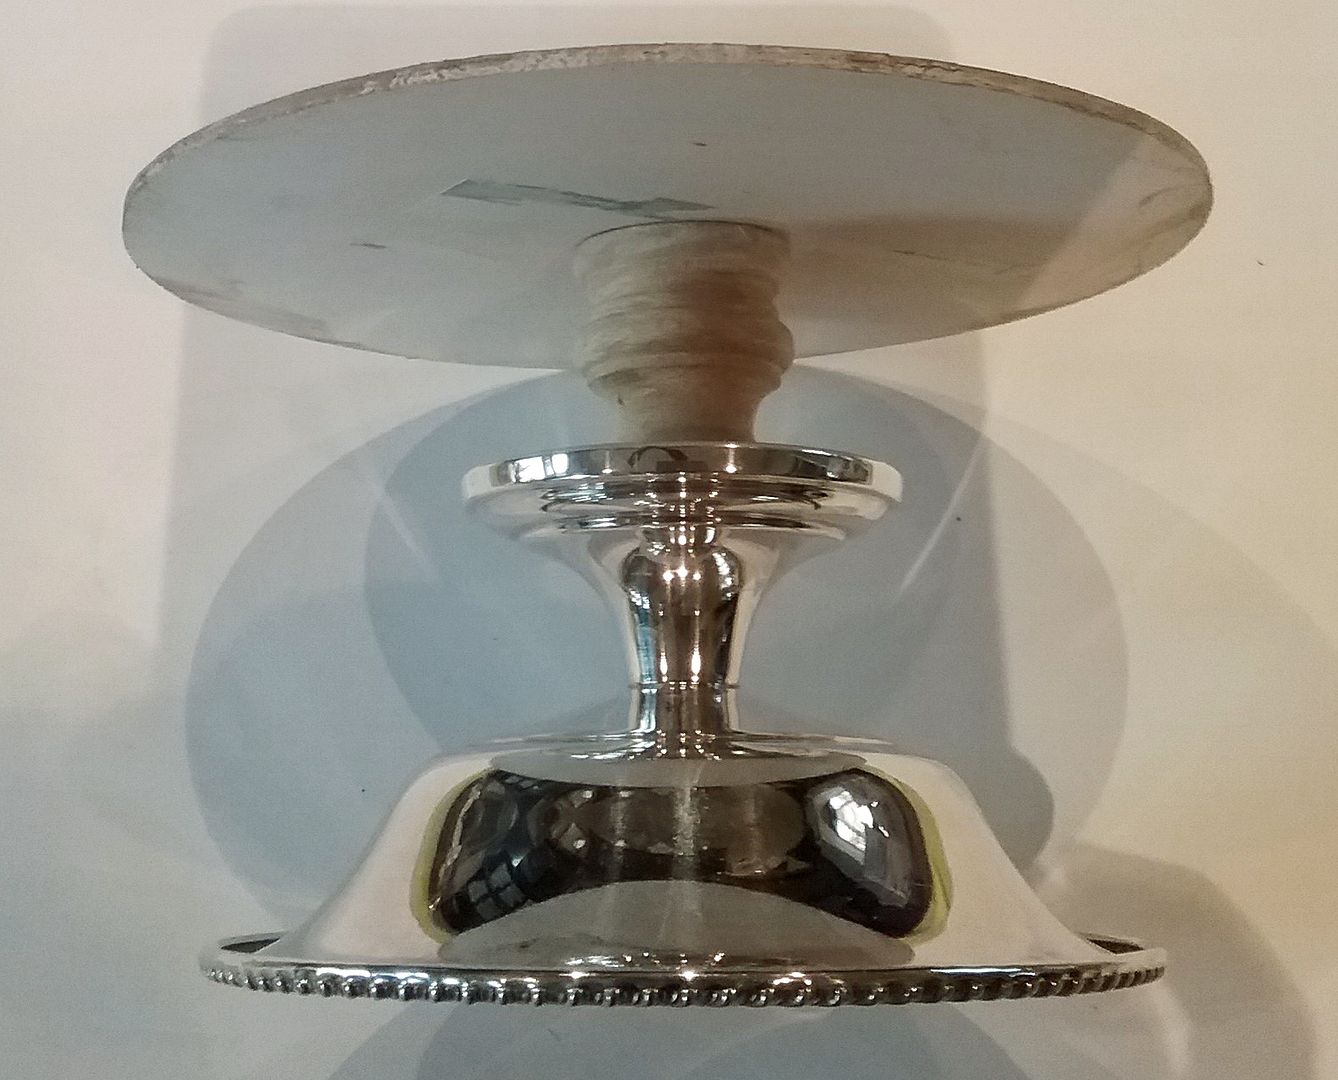
The final touch was the filigree star at the top with an acrylic snowflake (with Diamond dust).
Notice in the picture below of the finished tree; I can remove the house to access the light switch.

DETAIL MASTER SUPPLY LIST
Mini Christmas Titles Collage Sheet
Tiny House Trims Collage Sheet
Black & Kraft Christmas Text Scrapbook Paper
Classic Christmas Postcards & Music Scrapbook Paper
Christmas Delivery 6 x 6 Paper Pad
White Suede Paper
House Ornament
House Ornament
House Ornament Base
House Ornament Window Trims
House Ornament Chimney & Dormers
Tiny Shingles Stencil
Candlestick Holder
3mm Gold & Silver Stars
Acrylic Christmas Bead Mix
Frozen Clear Icicle Borders & Snowflakes
LED Tea light
Giant Snowflakes – Bronze
Twinklets Diamond Dust
5mm Star Sequins
Clear Acrylic Bead Sprays - Asymmetrical
Mulberry Paper Lilies - Red & White Mix
6 comments:
I have to tell you that I have Thoroughly Enjoyed reading your posts and seeing the developments of your various projects.
You have the most Amazing way of re-thinking things and your ideas are Creative, Original and Inspiring! WOW- and Thank You!
I look forward to seeing more of your work in the New Year and until then- Have a Very Merry Christmas! :D
elizabeth
WOW ... this is just amazing!! I love it! Thank you so much for sharing your beautiful creation.
Hugs and Merry Christmas.
Karen B. ~ Todolwen
very beautiful, thank you
merry Christmas to you
Beautiful. I love the way you did the little house.
Marilyn
Laura,
This is beyond brilliant! I so love each detail and really love the color palette you chose! Thank you so much for sharing all of your steps- I hope to try this on my own at some point!
Sending wishes for a wonderful Christmas for you and your family!
And continued good health and creativity!
Love and hugs to you,
Jackie ")
I just found you through an older tutorial for the Alchemists Workshop. Love your creativity, it's very inspiring :)
I'm looking forward to reading your older posts over Christmas and new ones next year.
Have a great Christmas!
~ Joy
Post a Comment