

Creating an hourglass out of two bottles is a unique project
and so simple. There are many
possibilities for a project like this.
Just about any holiday or theme can apply. Another option is to create one to celebrate
a special occasion like a birth, anniversary or wedding. Or maybe just as a piece of art.
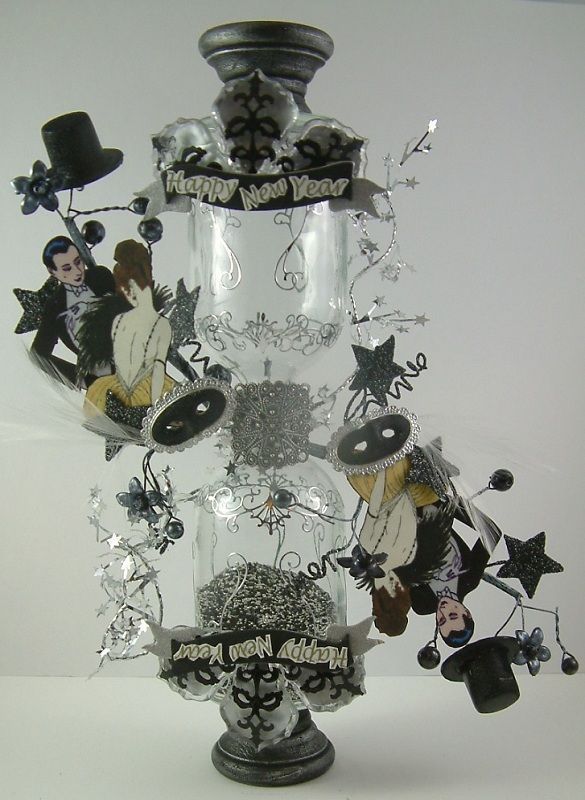
For this tutorial I have created two New Year’s hourglass examples using two
different sizes of bottles.
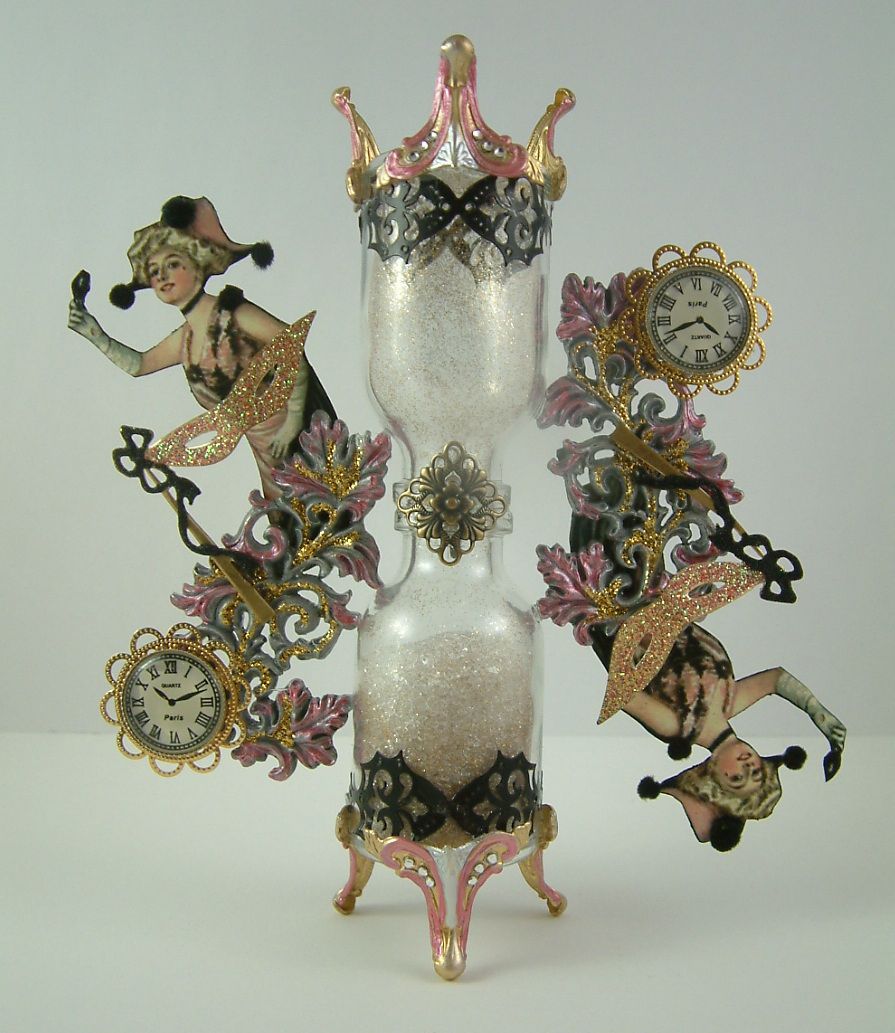
The first hourglass's (pictured below) finished size is 6” tall by 4 ½” wide.
ASSEMBLY OF THE FIRST
VERSION (Pink and Black)
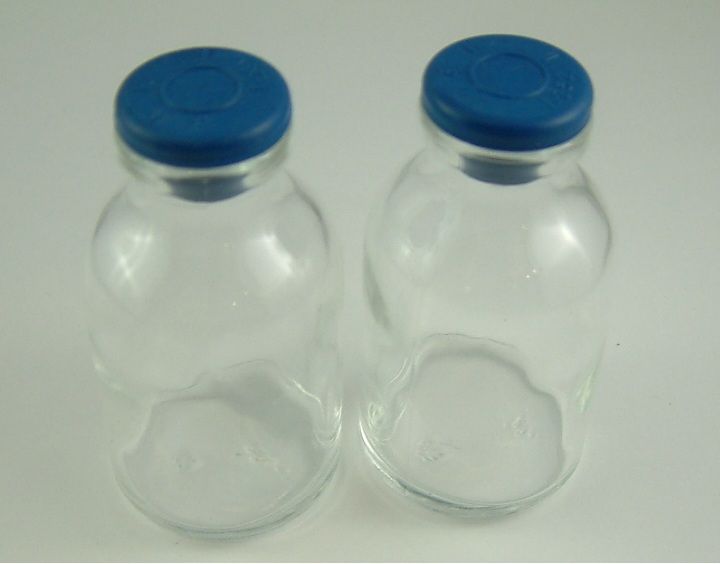
I chose these slope
shoulder bottles for the project as when combined they have an hourglass
shape. The bottles come in two sizes.
The bottles I used for the first hourglass are 2 5/16” tall x 1 ¼”
diameter and are the smaller of the two sizes.
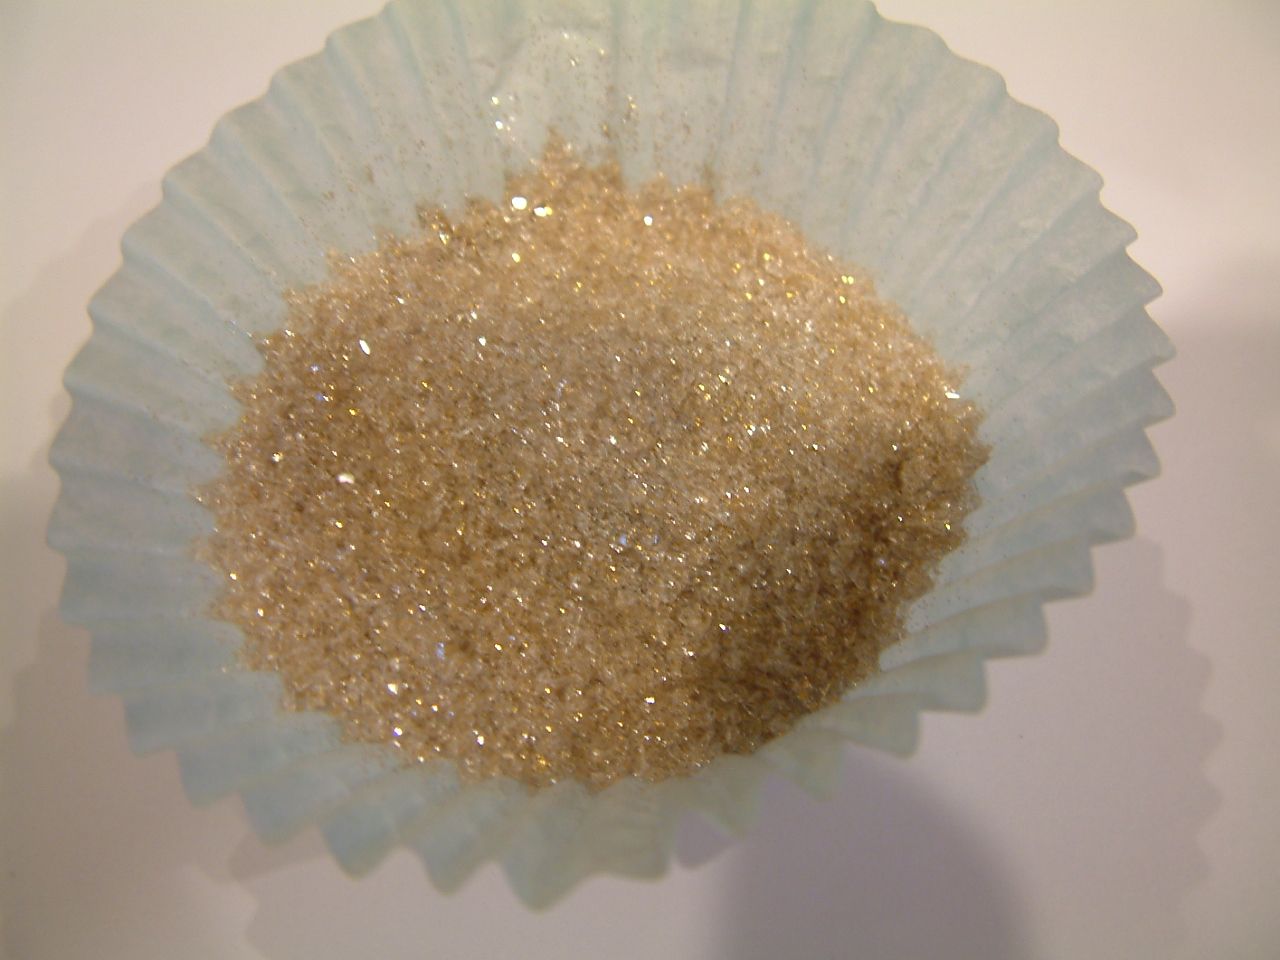
Instead of using sand I created a mixture of Diamond Dust and gold
glitter. You can use whatever you like
(sand, glitter, microbeads, etc.) just as long as the individual grains or
beads are small enough to pass easily between the openings of the two bottles.
 Instead of using sand I created a mixture of Diamond Dust and gold
glitter. You can use whatever you like
(sand, glitter, microbeads, etc.) just as long as the individual grains or
beads are small enough to pass easily between the openings of the two bottles.
Instead of using sand I created a mixture of Diamond Dust and gold
glitter. You can use whatever you like
(sand, glitter, microbeads, etc.) just as long as the individual grains or
beads are small enough to pass easily between the openings of the two bottles.
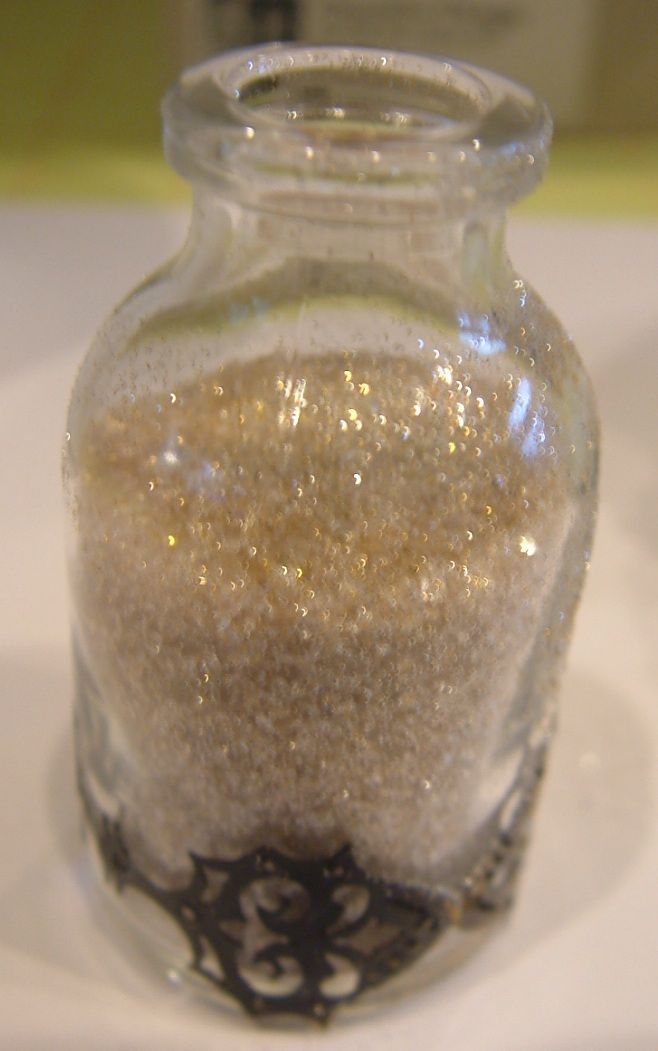 I added the mixture to one of the bottles. Some of the glitter sticks to the sides of
the bottle giving the glass extra sparkle.
I added the mixture to one of the bottles. Some of the glitter sticks to the sides of
the bottle giving the glass extra sparkle.
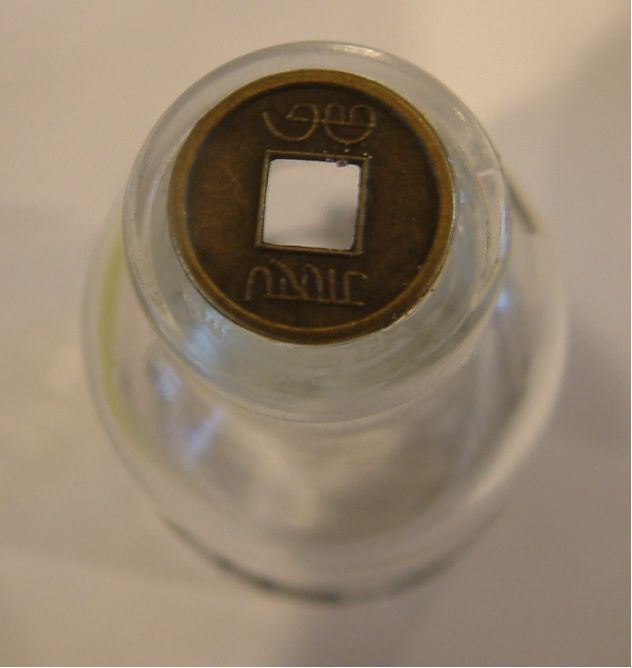
 To slow down the flow of the mixture between bottles, I glued a small Chinese
coin to the top of the empty bottle.
It is the exact size to fit on the inside rim of the bottle. You can use any flat object with a hole just
as long as hole it is bigger than the inside rim (so it doesn't fall into the
bottle). It can also be larger than the outside rim of the bottle.
To slow down the flow of the mixture between bottles, I glued a small Chinese
coin to the top of the empty bottle.
It is the exact size to fit on the inside rim of the bottle. You can use any flat object with a hole just
as long as hole it is bigger than the inside rim (so it doesn't fall into the
bottle). It can also be larger than the outside rim of the bottle.
 I used E6000 glue to attach the coin.
Allow it to completely dry. Then use the glue to attach one bottle to the
other. Next, I glued the two bottles
together using E6000 glue and allow it to dry.
I used E6000 glue to attach the coin.
Allow it to completely dry. Then use the glue to attach one bottle to the
other. Next, I glued the two bottles
together using E6000 glue and allow it to dry.
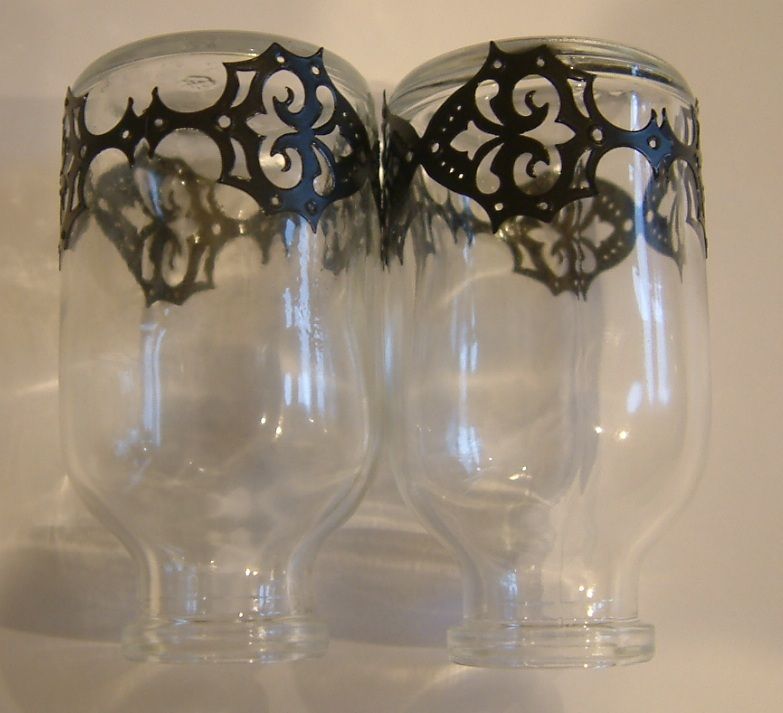
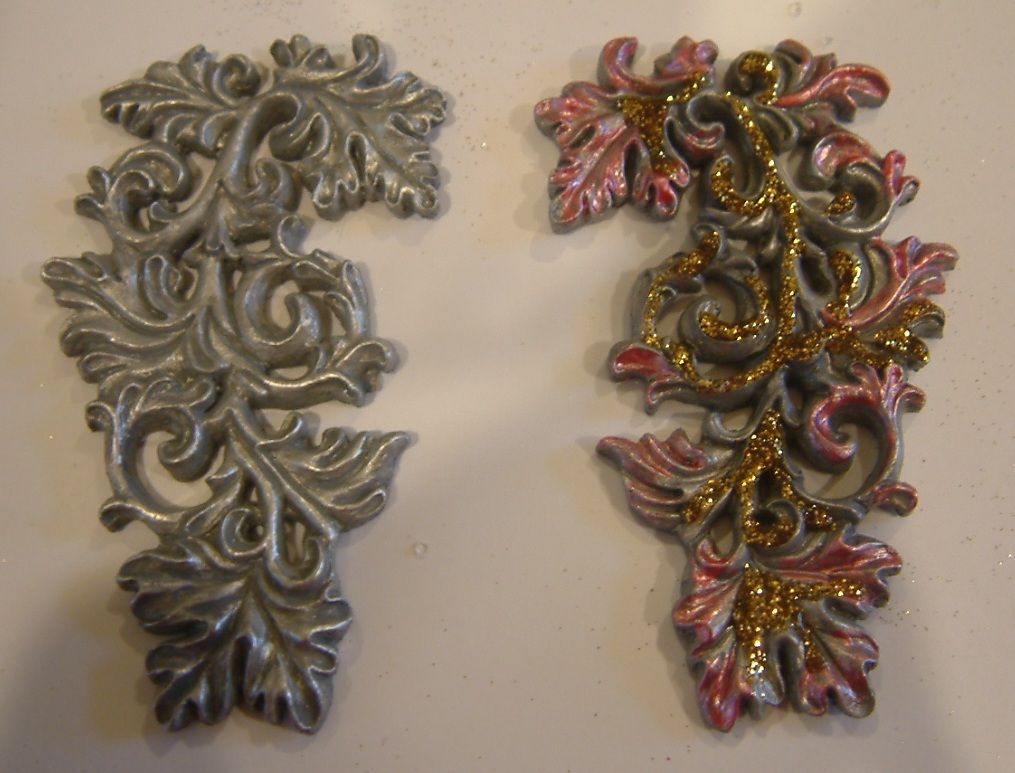 You all know by now that I like to add lots of embellishments to my
project. With an hourglass, the surface
for embellishment is very limited. I
solved the problem by adding elements that give me more surface area. These leaf
flourishes worked perfectly. They
were originally silver. I used Flamingo
Liquid Pearls and Goldenrod
Stickles to add coordinating color and sparkle.
You all know by now that I like to add lots of embellishments to my
project. With an hourglass, the surface
for embellishment is very limited. I
solved the problem by adding elements that give me more surface area. These leaf
flourishes worked perfectly. They
were originally silver. I used Flamingo
Liquid Pearls and Goldenrod
Stickles to add coordinating color and sparkle.
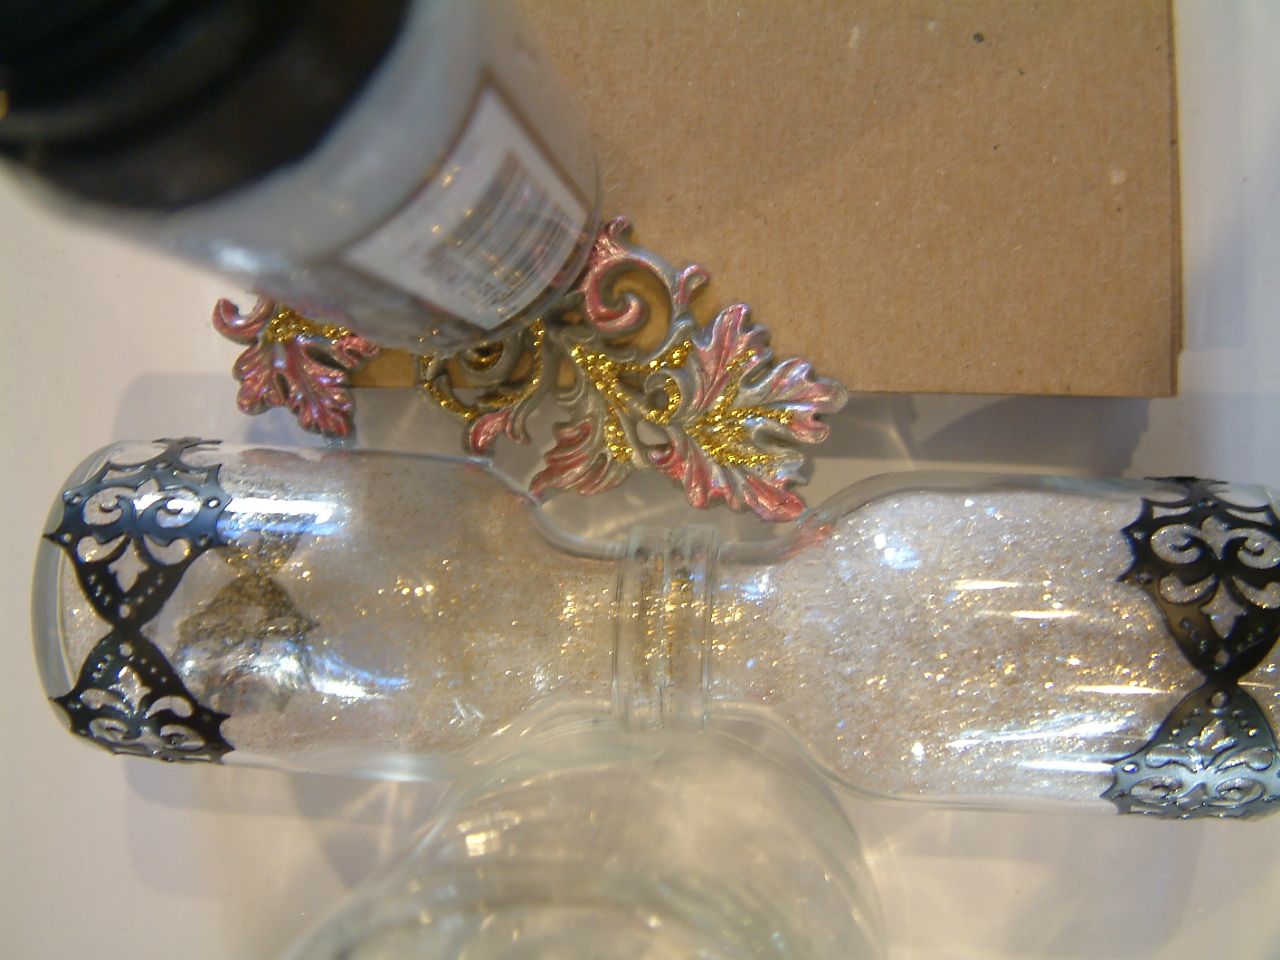 I glued the flourishes to each side of the bottles using
E6000 glue. Since the contact areas
between the flourishes and the bottle are really small, you need to use strong
glue, giving it adequate time to dry before proceeding. You can see in the picture that I supported
the flourish using a stack of chipboard.
I also added some weight on top of the flourish to keep it
straight. I placed a bottle on the other
side of the hourglass to keep it from rolling.
I let it dry 24hrs before attaching the flourish to the other side. My climate is very dry so you may need more
time if you live in a wet climate.
I glued the flourishes to each side of the bottles using
E6000 glue. Since the contact areas
between the flourishes and the bottle are really small, you need to use strong
glue, giving it adequate time to dry before proceeding. You can see in the picture that I supported
the flourish using a stack of chipboard.
I also added some weight on top of the flourish to keep it
straight. I placed a bottle on the other
side of the hourglass to keep it from rolling.
I let it dry 24hrs before attaching the flourish to the other side. My climate is very dry so you may need more
time if you live in a wet climate.
 Alpha Stamps Products Used For the Second
(Black and Silver) Hourglass:
Alpha Stamps Products Used For the Second
(Black and Silver) Hourglass:
Once the flourishes were firmly in place I started adding
other embellishments. The mask is brass
and I jazzed it up with black and pink glitter.
The clock is a button that is glued to a piece of gold filigree. I added a piece of filigree to the seam
between the bottles.
The last step was to add the feet. You want to add them last as you don’t want
extra pressure on the feet while you are adding other elements.
The feet are made to attach to a corner. I used needle nose pliers to bend the feet to
fit around the curve of the bottle. The feet
don’t have to fit perfectly flush; just enough to create contact points for the
glue. Again I used E6000 glue and
allowed the feet plenty of time to dry.
Make sure that all your feet are on the same level so that your
hourglass stands up straight. Because of
the size of the bottle and the size of the feet, I used three feet on each
side, spaced equal distance apart.
I painted the feet with Flamingo Liquid Pearls and Silver Alcohol
Mixative. As a final touch I added clear
rhinestones.
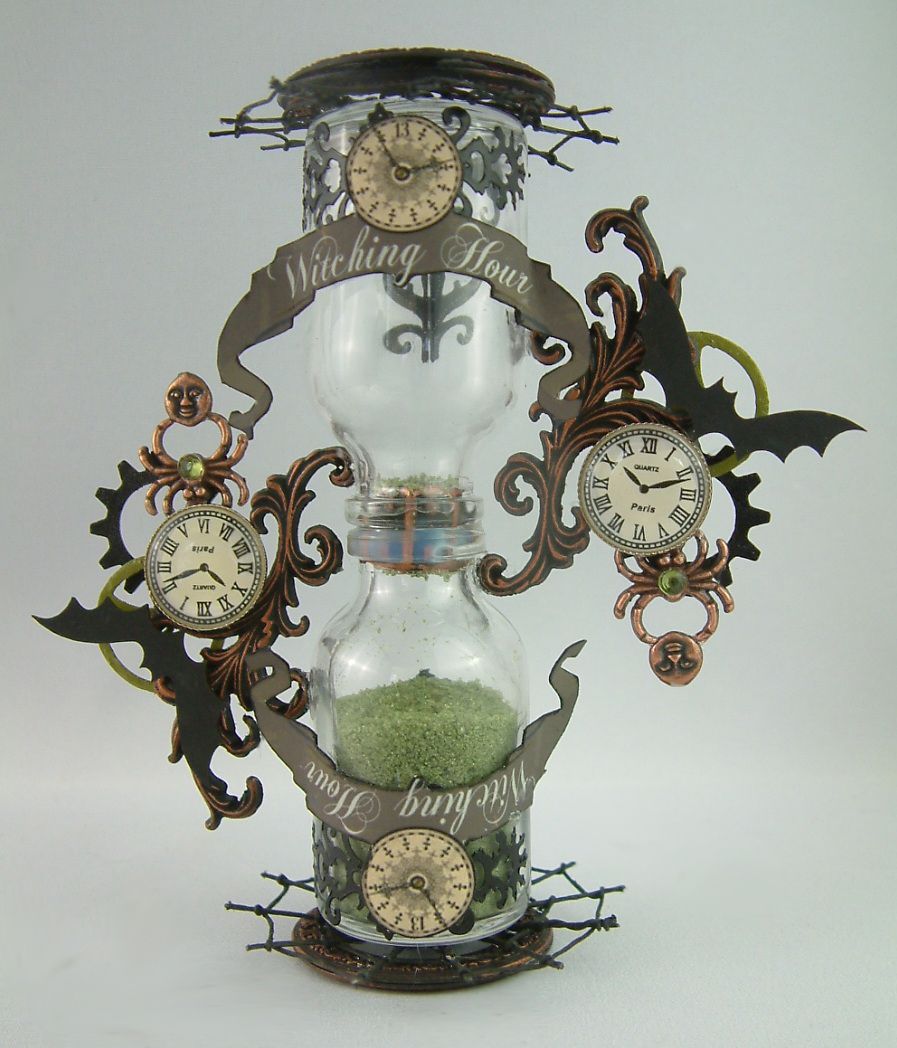
THE SECOND HOURGLASS
(Black & Silver)
This second hourglass is much larger than the first. For this one I used the larger 3” 11/16” tall
by 2” diameter slope-shoulder
glass bottles. The finished height
of the hourglass is 10”.
The construction of the hourglass is exactly the same as
the first bottle. For this bottle I used
a mixture of silver and black microbeads inside the bottles. Since the opening of these bottles is larger
than the first bottles, I used a small washer to limit the flow of the
microbead mixture between the bottles.
Instead of feet I used two wood egg
cups as stands.
I wrapped the star
tinsel and falling
star wired sprays around the necks of the bottles. The wired sprays gave me a place to attach
the images. I used Glossy Accents to
coat the top hats with black glitter.
The masks are brass that I first painted silver with Silver Alcohol
Mixative Ink and then added black glitter and white feathers.
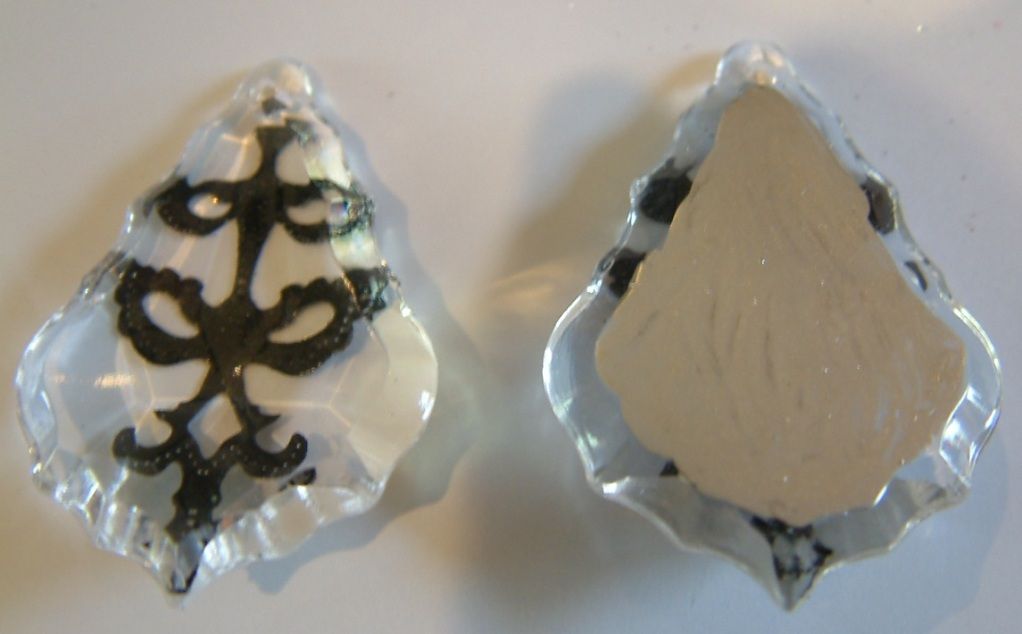
I painted the backs of acrylic chandelier crystals with Silver
Alcohol Mixative Ink and added stickers to the front. I glued them together in sets of three using
E6000 glue before attaching them to the bottles.
Alpha Stamps Products Used For the First
(Pink and Black) Hourglass:
- Slope Shoulder Glass Bottle (Small)
- Dazzles Swirls, Flourishes & Borders Black Sticker Set
- 15mm Chinese Coins
- Lightweight Round Filigree
- Clock Face Buttons – Medium
- Antique Silver Leaf Flourishes
- Brass Box Feet – You will need 6 feet
- Antique Gold Square Filigree
- New Year’s Collage Sheet
- Liquid Pearls – Flamingo
- Stickles Dry Fine Glitter – Black Diamond
- Goldenrod Stickles
- Alcohol Ink Mixative – Silver
- Slope Shoulder Glass Bottle (Large)
- Acrylic Top Hats
- Falling Star Wired Sprays
- Metallic Stickers Fans – Silver
- Clear Acrylic Chandelier Crystals
- Layerable Chipboard Banner Set
- EggCup
- Star Tinsel - Silver
- Pink Fans Collage Sheet
- Art Deco Cocktails #1 Collage Sheet
- Alcohol Ink Mixative – Silver
- Stickles Dry Fine Glitter – Black Diamond
HAPPY NEW YEAR!!!
19 comments:
These are amazing! Thanks for the tutorial!
Leslie
WoW!! These bottle are stunning! Thank you so much for sharing the tutorial!
hugs
Karen B. ~ Todolwen
I am blown away with your creative talents! These are amazing and spectacular hourglass art pieces. Worthy of being in a fine art gallery! Blessings with Peace and Joy for all of 2013...
Just extraordinary Astrid! Beautifully crafted.
Love these!Thank you Laura for the tutorial!
how very clever! i love it! I've always been enamoured with hour glasses, now to go get the bottles.
Thanks for sharing your tallent
hugs
Caroline
So beautiful! Thank you for the tutorial.
Happy NY to you as well..Lovely hour glass... I wish I had your talent..
Amazing creations, thanks for the tutorial, very inspiring work :)
You are so amazingly talented Laura! I love everything you make and your imagination for creations is a notch above everyone else!
hugs Karen
OH OH OH!!!! I have so patiently (Shhhhh I'm lying don't tell anyone LOL) for you to do this Tutorial!!! All three Hourglasses are absolutely beautiful!! I definitely love the Black and Silver one the best!! This is definitely something I will be making.
Just BEAUTIFUL!!!
Happy New Year to everyone!
Take care,
Diane
Just amazing-these are so beautiful. The tutorial is very easy to understand-thank you.
Love Chrissie xx
Wow. Really beautiful and amazing artful
Wow!! These are amazing! The ideas you come up with are always awesome.
I am going to attempt one of these. Thank you so much for the tutorial.
Happy New Year my Friend
Tracie
Big "WOW" factor! This hourglass is absolutely gorgeous! So many fabulous details! Thank you for sharing a great tutorial! Happy New Year!
Just beautiful. Wishing you a wonderful 2013
Nicole/Beadwright
These are so beautiful. Amazed again. x
What an astonishing piece of work, Laura! So imaginative. They look so opulent and vintage. Quite beautiful and whimsical. Thanks for a fascinating tutorial, and for the downloadable pdf too!
Shoshi
You are a talented ARTIST! I have always had the love for altering and making my own with recycle, reuse and upcycling things and objects most people toss . This is a GREAT idea and has inspired me to make my own.. Thank you!
Blessings and admiration
LTolley
Post a Comment