

In November I posted a tutorial on “Creating a Stained Glass Look Using a Glass Slide”. Embossing transparency film is another option to creating the look of stained glass although I don’t think is sparkles quite as nicely as real glass. But with transparency film, you can print and emboss any digital image, whereas with glass, you are limited to rubber stamps.
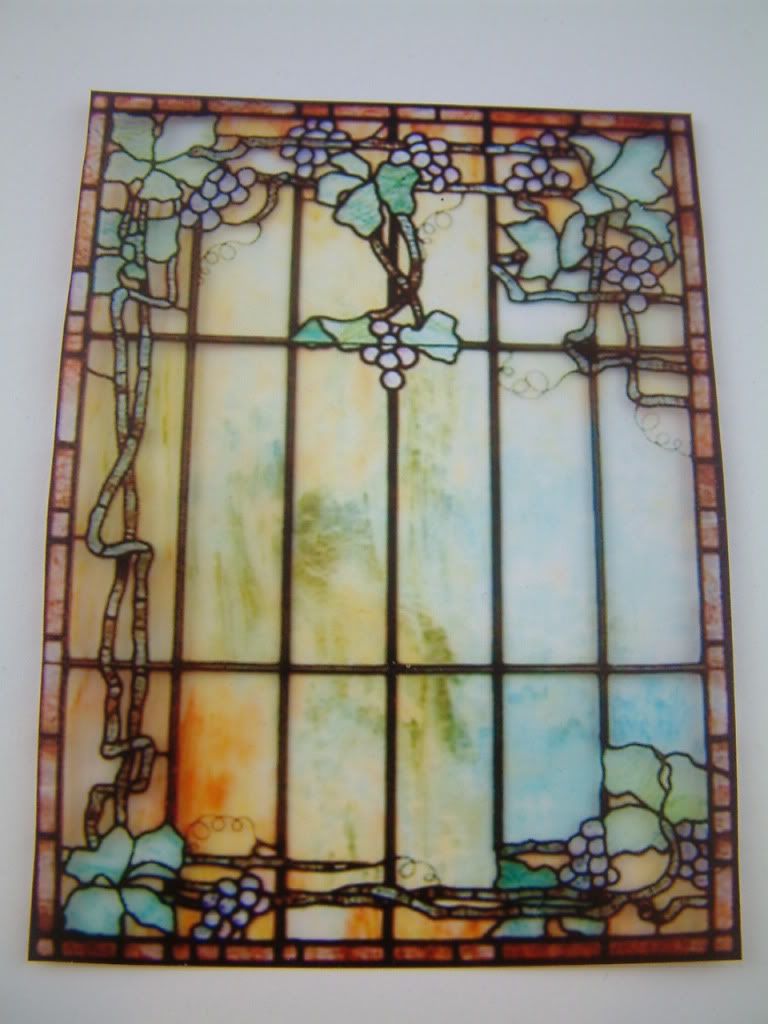
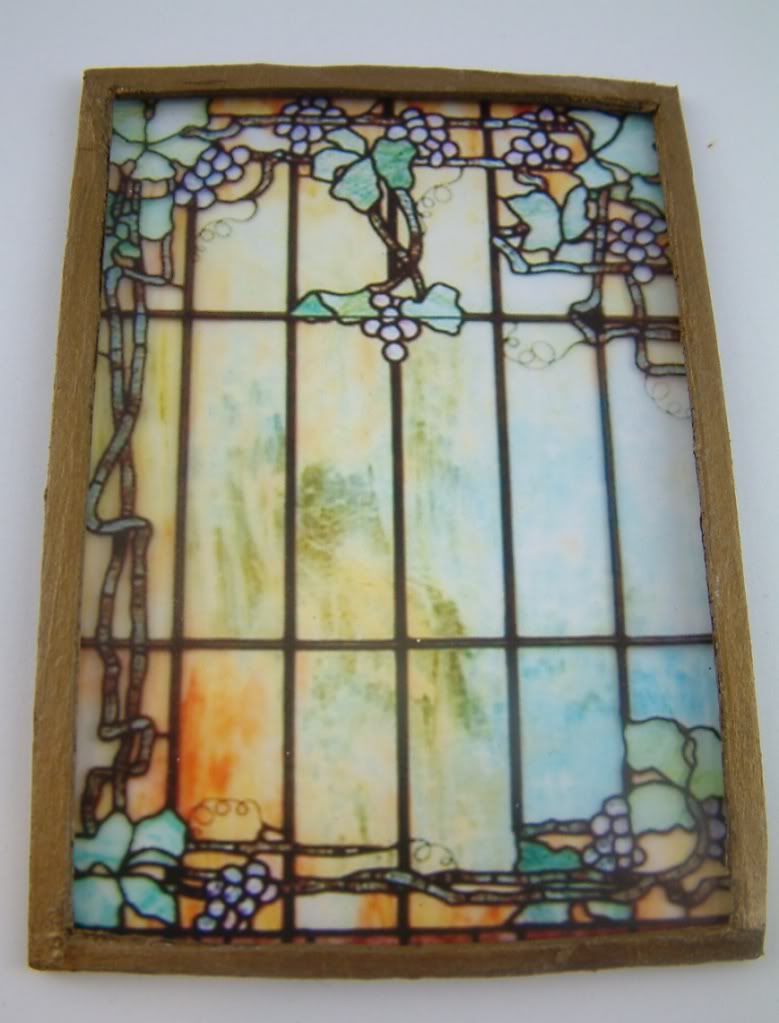
The base of the ATC below is an image of an art nouveau stained glass window that I printed on transparency film and embossed. So that you could better see the colors on the transparency, the first image of the piece is photographed on white paper. The second image is photographed with the light behind the piece. Be sure to click on the image to see all the details.
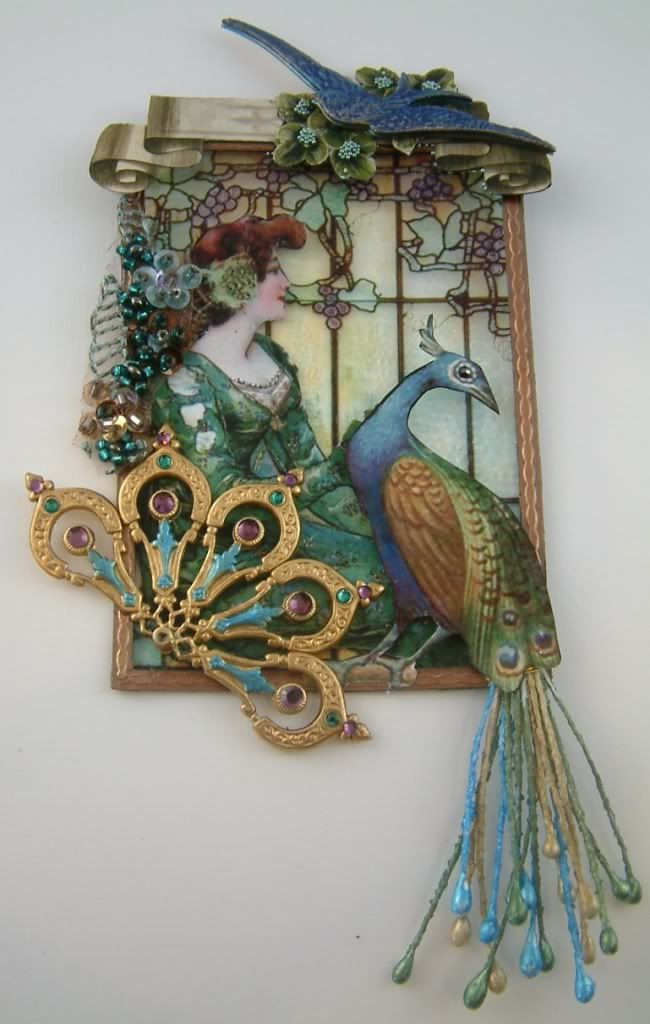
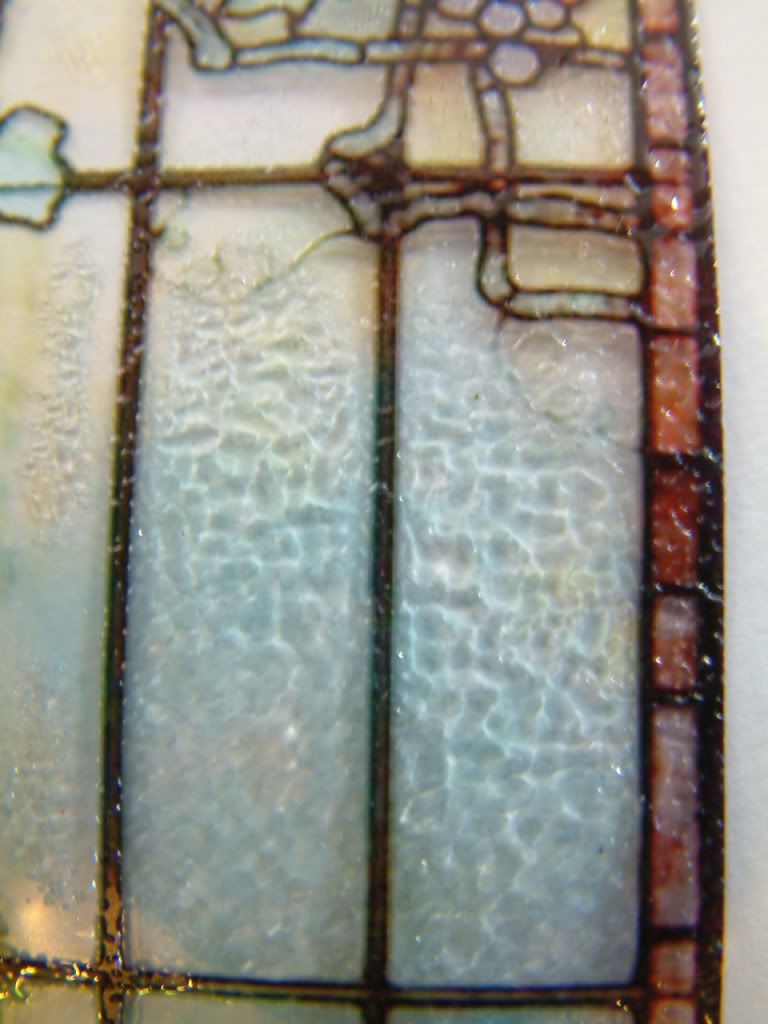
The image below shows the piece with the light behind it. You can see the rippling effect of the embossing that looks like old stained glass.

What you will need:
- Transparency Film for Inkjet Printers
- Clear Embossing Powder
- Heat Gun
Optional:
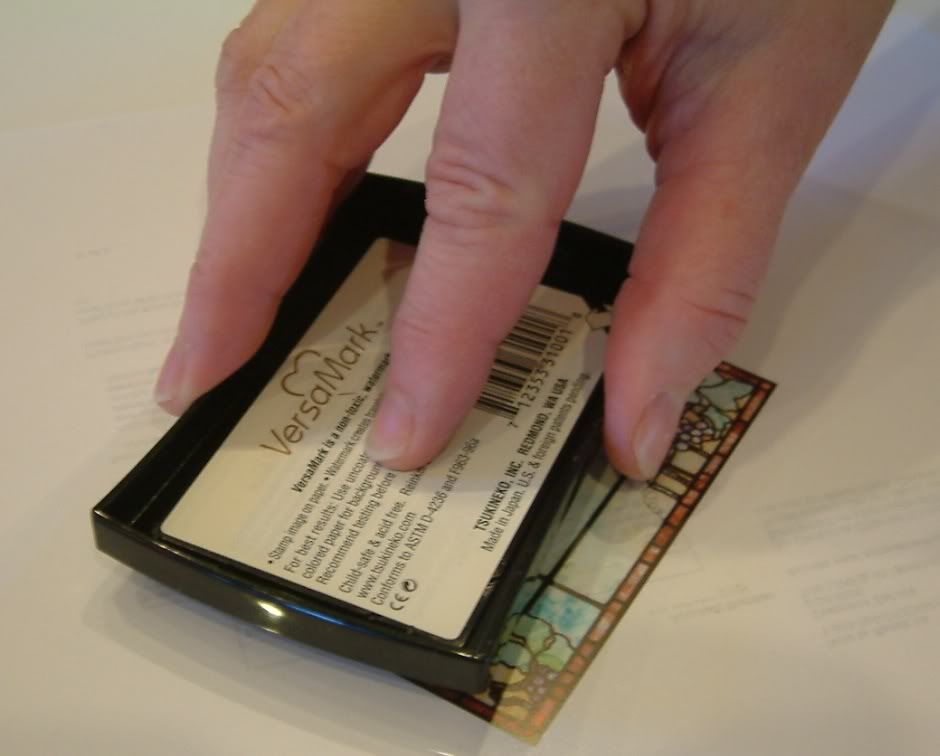
- Versamark Stamp Pad
- Versamarker Pen
There are two options when working with transparency film. You can use a rubberstamp and Staz-On ink to stamp and emboss the image on the film or you can print the image on the film using an inkjet printer. This tutorial covers printing an image. With either method make sure the transparency film is made for use in an inkjet printer so that it will standup to the heat of the printer and the heat gun. You can purchase transparency film at office supply stores like Office Max and Staples as well as online stores like Amazon. The film comes in letter sized sheets (8 1/2“ x 11 ½”).
Transparency Film
You can purchase transparency film at office supply stores like Office Max and Staples as well as online stores like Amazon. The film comes in letter sized sheets (8 1/2“ x 11 ½”).
Versamark
You can purchase Versamark stamp pads and Versamaker pins at most craft stores and online craft and scrapbooking stores.
PRINTING AND EMBOSSING YOUR IMAGE
- Transparencies usually have a smooth side and a rough side. Stamp or print your image on the rough side.
- If you are printing multiple images only print on about a quarter of the transparency film at a time. The ink needs to be wet for the embossing powder to stick. If you print too many images, by the time everything has printed, the first images printed will be dry so the embossing powder won’t stick. Once you have embossed your images you can cutoff the part that is used and run the unused portion through the printer again.
- If your printer feeder doesn’t pull the transparency film, use removable double stick tape to adhere the film to a sheet of paper and try again. Some transparency film comes with a white strip on one end to make it easy for the printer feed to grab the film.
- Before you start to print have your embossing powder ready to sprinkle on the image the moment it comes out of the printer. You don’t have much time before the ink dries.
- Use a heat gun to melt the embossing powder. Keep the gun moving and don’t over heat the transparency film or it will begin to warp.
BEFORE EMBOSSING
AFTER EMBOSSING
When you finish embossing you can go back and add paint and or ink to your piece. I added purple alcohol ink to the grapes in the art nouveau piece as I thought they would look better darker.
OTHER OPTIONSIf your printer ink dries too quickly to get a good result:
Let the image dry completely. Use a Versamark pen to coat the desired areas. Next, apply embossing power and heat to melt. Versamark provides a clear tacky surface that embossing powder sticks to.

If you want to add additional embossing:
Use a Versamark pen to coat the desired areas. Next, apply embossing power and heat to melt.
If you want to emboss the entire image:
Print the image on the transparency film and wait for it to dry. Use a Versamark stamp pad to coat the entire image. Next apply embossing power and heat to melt.
CREATE A FRAME FOR YOUR EMBOSSED TRANSPARENCY IMAGE
To frame the image you need to sandwich the transparency film between two pieces cardstock or chipboard. For the art nouveau piece I cut two 2 ½” x 3 1/2“ pieces out of thin chipboard (one for the front and one for the back). I then cut a hole in the center of each piece leaving a thin border and painted the chipboard. The size piece you cut and the hole you cut in each piece will depend on the size of your project and how much of the image you want to expose. Make sure that you cut the embossed transparency image slightly larger than the opening so you have room to apply glue to the edges.
Chipboard Frame (make 2 pieces one for front & one for back)

Transparency Glued Between Two Pieces of Chipboard
You are finished and ready to add images and embellishments. The images and embellishmentsl add stability to the piece.
PRINTING THE IMAGE WITHOUT EMBOSSING
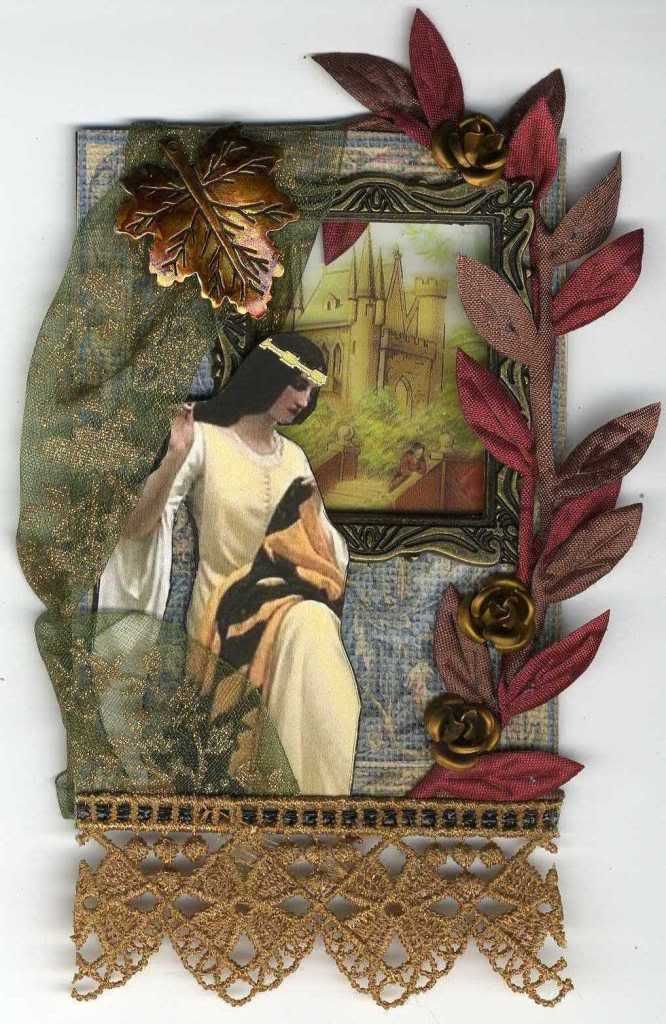
If you are looking for more of a matte finish, don’t emboss the transparency. Below is an ATC titled “The Lady of Shalott”. In the poem by Alfred Lord Tennyson, the lady of Shalott sits by a window and weaves. She is cursed and cannot look out of the window at the view of Camelot or she will die. I wanted to create the effect of a window so I printed the picture of the castle on transparency film but did not emboss the image.
Click here to download PDF file of this tutorial.
17 comments:
Hi Laura
Really Really beautiful! Thank you for the How to.
Hester
Great tutorial, thanks for sharing!
wow.....this looks amazing, so much detail.Thank you for the tutorial
hugs
This is absolutely gorgeous! Thank you for sharing your technique.
Laura this is just so beautiful! Thank you for sharing your how to's. You truly are talented!
XXX
Becky
Awesome Laura,
I printed on transparency film before but never thought to emboss it. Brillant!!!
Just amazing and beautiful Laura,
Thanks for sharing, truly lovely.
Hugs,Laura. xoxx
Your creativity never ceases to amaze me Laura! Thank you for this wonderful tutorial.
Laura this is absolutely gorgeous.
I want to come back and watch this very soon.
Hugs, Suzy
Thank you! I have done this for other projects, but will try it with ATCs now too.
Amanda
this is so gorgeous! i want one lol. oh i really do want one. where can i get a picture of the art stained glass that you used? Please email me at sancan_12 @ yahoo.com
thank you,
Sandi
This is beautiful, must try it out in a project.... thanks for being so generous as always in making the most fabulous tutorials.
Beautiful work and tutorial! A lot of ideas is shinning in my brain. I have to go create now. Thanks for sharing.
WOW, this is amazing, thanks for the tutorial and looks so authentic.
Very nice! Would you by any chance be willing to upload a video tutorial of this? I've never seen something like this before and I'm having a hard time understanding the instructions...
Beautiful work. Thank you for the tutorial.
Amazing work, and thanks fo share this art.
Post a Comment